Cetus MK3 to Mellow FLY RRF E3 conversion
I've told my CETUS MK3 story before. Tiertime sent me the machine two years ago for review, and I just didn't like it. It was loud, used proprietary firmware, their own slicer, and didn't really print well. Though I really liked the concept of the machine. Super simple construction with linear rails for all axes, a direct extruder, and super low power consumption due to not having a heated bed but a polymer-coated aluminum plate. A pity if I would just throw it away.
After two years on my shelf, I ripped out the old electronics board and replaced it with a new mainboard from Mellow, the FLY RRF E3. Now, this machine has been becoming one of my favorite and most used machines over the last few weeks. It's silent and super convenient to use with direct upload from PrusaSlicer and a well-working web interface.

Stock Cetus MK3 electronics
Let's talk about the mainboard I used. Simply put, the Mellow FLY RRF seems to be a cheaper version of the popular DUET 3 Mini 5+ because it sells for only around $60. There are two versions of it: the normal E3, which I also used and has replaceable stepper drivers, and the newer E3 Pro version has integrated and five instead of four TMC2209 stepper motor drivers with additional improvements. They are running powerful STM32 microprocessors for RepRapFirmware, have integrated WiFi with an external antenna, and plenty of IO-ports for fans, thermistors, sensors, and different types of screens. The boards are called MELLOW Fly E3 because they're meant as a drop-in replacement for Ender-3s with compatible JST connector sockets and the same hole pattern. Team Gloomy, responsible for the RepRap firmware port, has a great guide to perform precisely this Ender-3 conversion. There's an active Discord channel and a Facebook group around the Mellow Fly boards, and the Duet forum is excellent if you're looking for input on firmware configuration. Despite the name, they are just as well usable for most other 3D printers.

Mellow FLY RRF E3 with 4 TMC2204 driver installed
Prerequisites for the CETUS Mellow FLY conversion
Preferably my adapter board (soldering iron required)
A JST crimping tool for the custom wires
A cartridge thermistor (video comments suggest the CETUS uses a PT100 so the stock thermistor might be compatible with the Mellow boards)
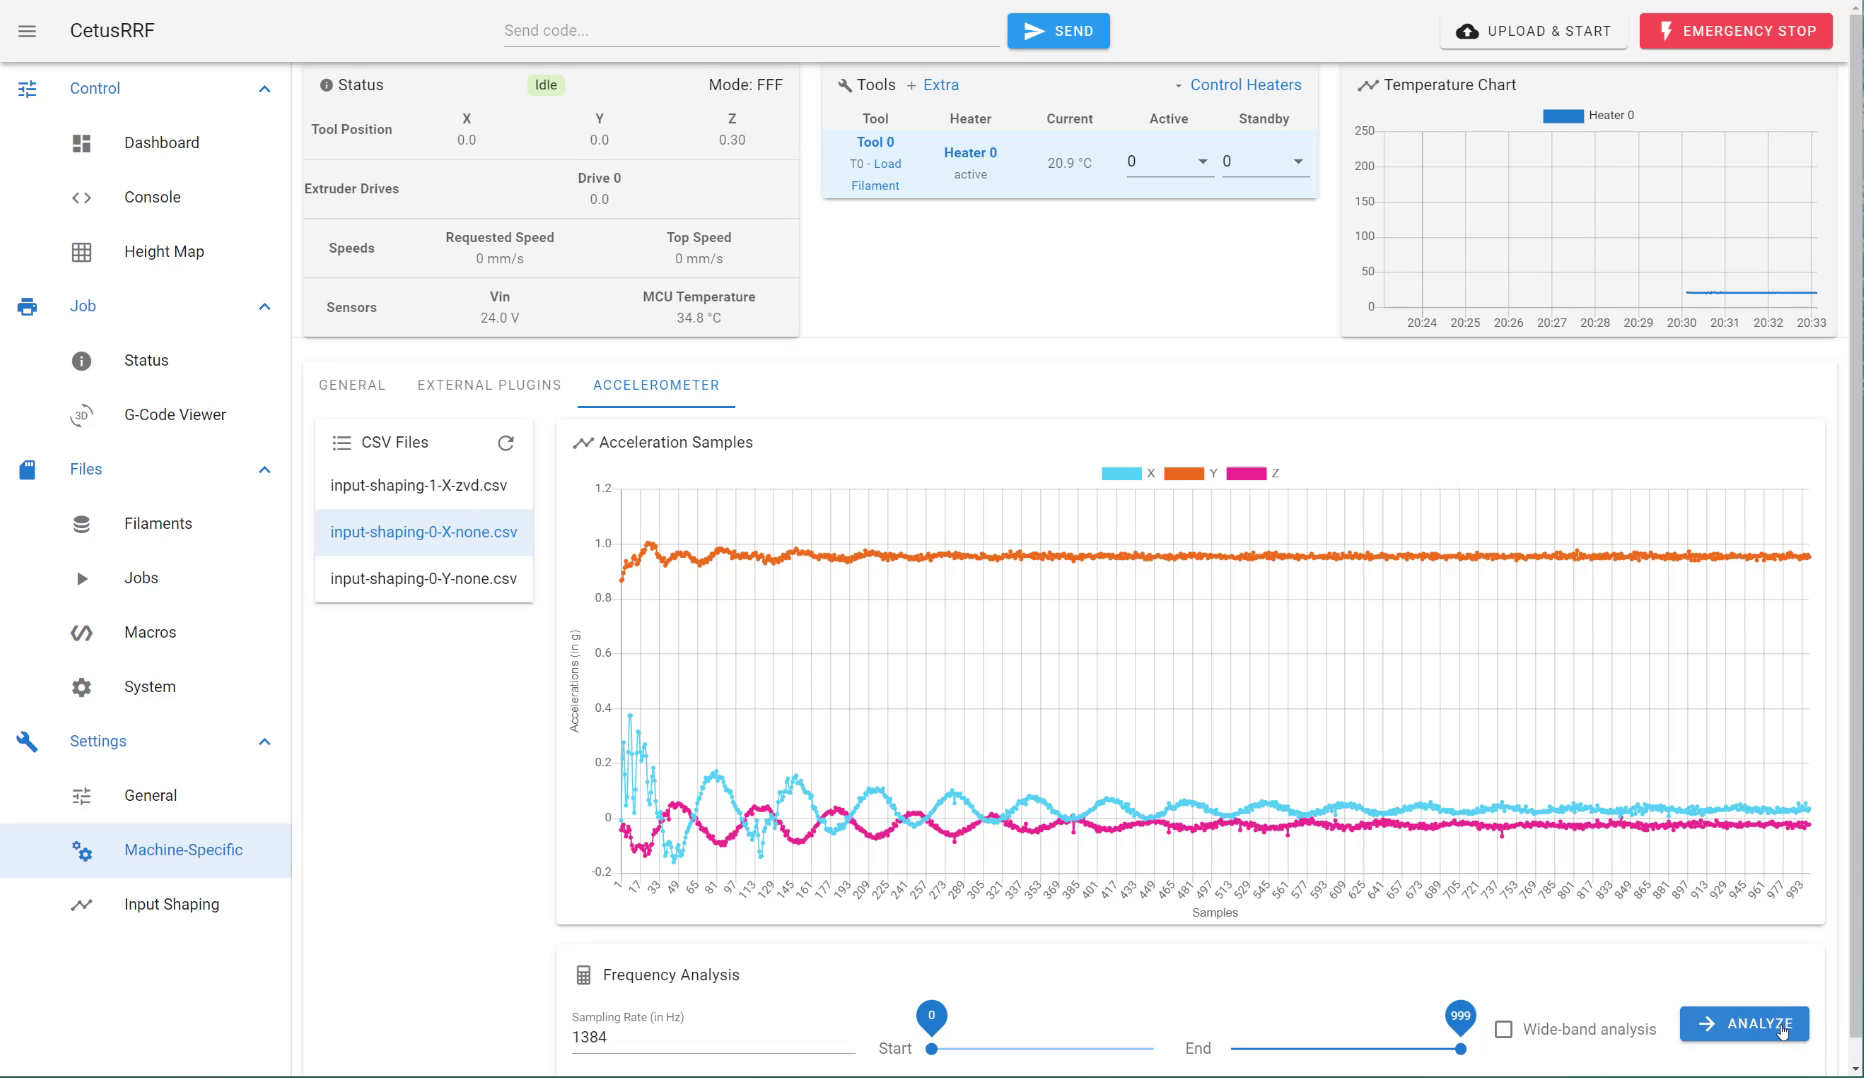
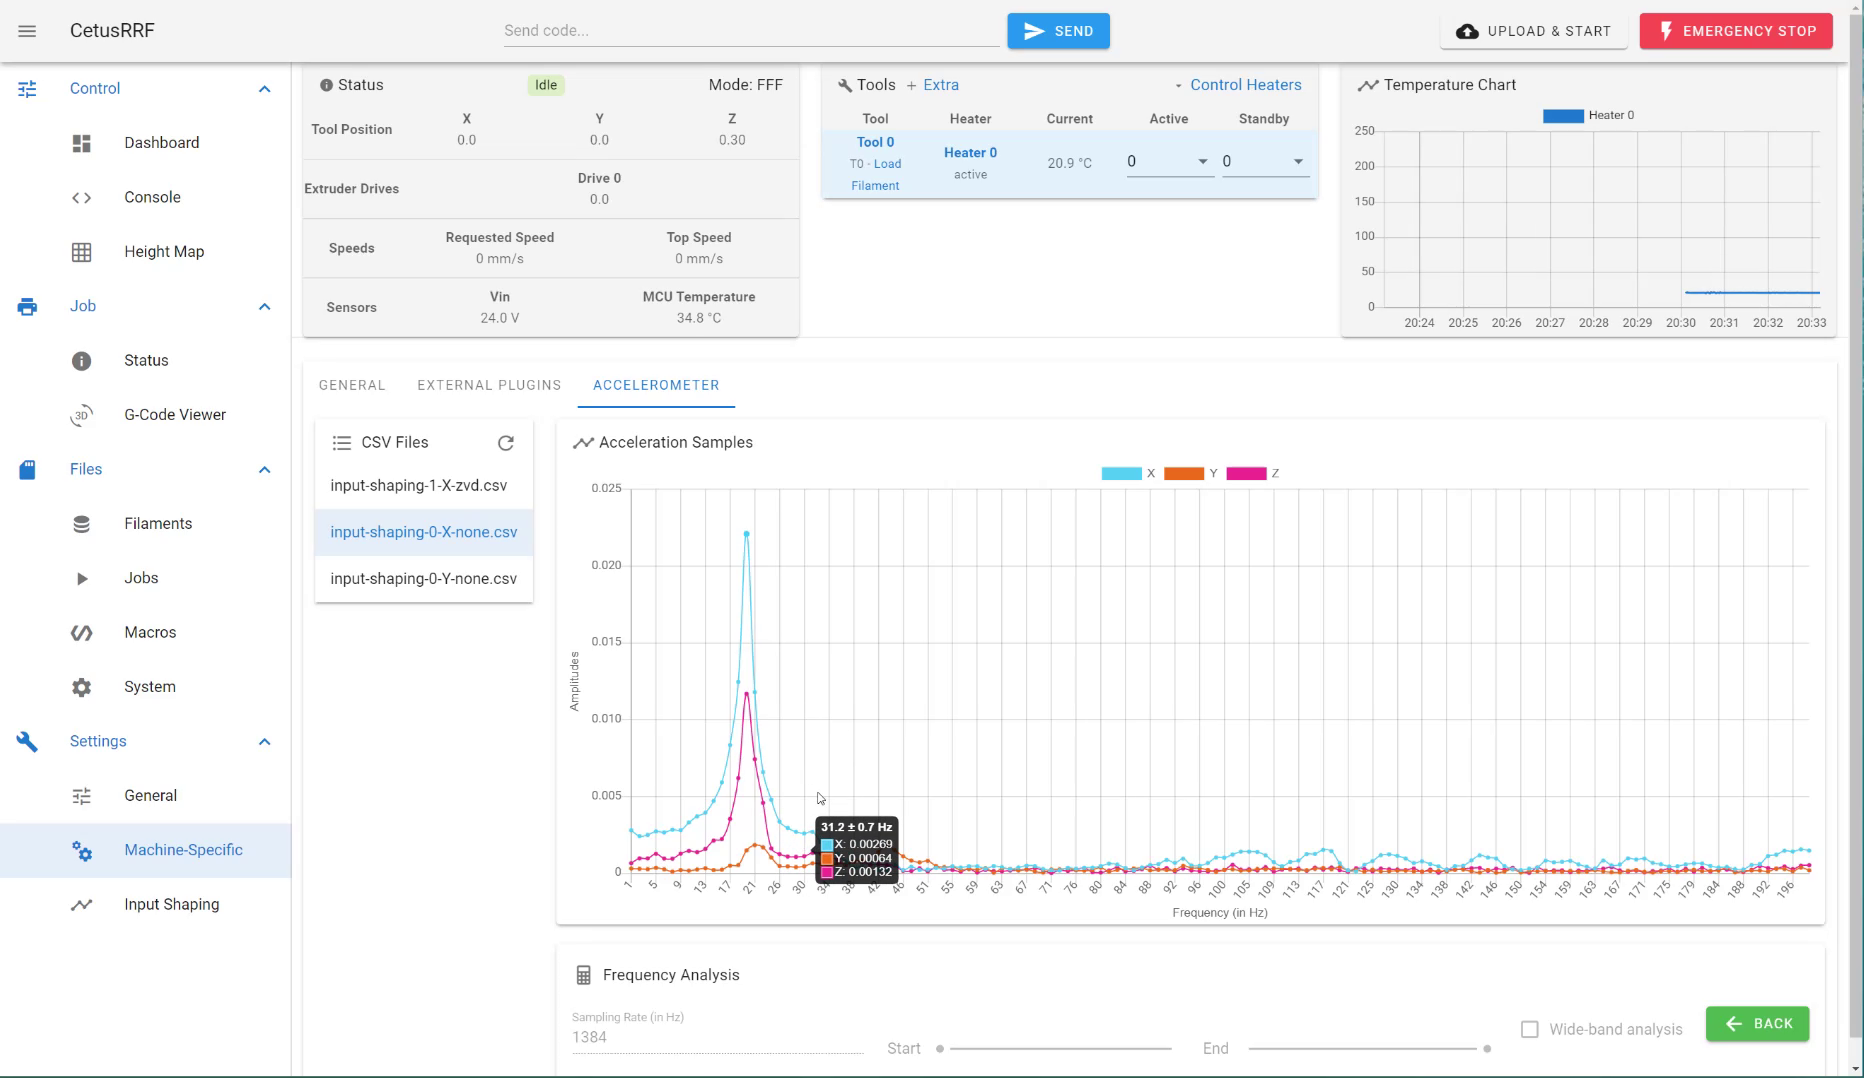
My conversion from a proprietary mainboard to the Mellow Fly RRF worked great, and I regret nothing because everything is better, but what can you expect if you're thinking about putting such a new mainboard in one of your machines? Well, first, if you've got a printer that works and you're only looking for WiFi connectivity, just add Octoprint. That doesn't require any firmware configuration is the easiest to implement and objectively the best solution in such a case. Though if you have a machine that's just not working properly due to the electronics and firmware but is mechanically solid, such a conversion might make an old machine perform really nicely again. A recent RepRapFirmware mainboard like the DUET Mini or the Mellow FLY will come with TMC2209 drivers that have proper Microstepping and can work almost silently. Better Microstepping eliminates salmon skin on prints and will improve accuracy and quality. Dedicated fan headers will allow you to reduce noise in idle because you can turn the hotend cooling fan off whenever the heater is below a specific temperature. The WiFi module, together with DuetWebControl, is excellent to use. Since RepRapFirmware is purely configured via Gcode in a config file, you don't even have to mess around compiling your own firmware. Speaking of firmware – RepRapFirmware offers basically anything you might also know from Marlin, even with more recent features like Linear Advance and Mesh Bed Leveling. And before people start screaming: "But Klipper!!!!" ReparapFirmware even started implementing Input Shaping over the last releases which can reduce ghosting on prints significantly, especially when printing fast. In my opinion, the implementation is not as good yet as in Klipper but already offers frequency calibration with accelerometers, and I'm sure it will improve in the future!
But let's get back to my CETUS. Here, I ripped out the old control board and was tasked with putting in a new one. The challenge was that the CETUS uses a 16-pin ribbon cable as a wire harness. As much as this makes part of the clean look of the machine, as much made this interfacing everything on the extruder harder. I went with the clean route and designed a simple adapter board in KiCAD where I broke-out the 16-pin cable to a bunch of JST and screw connectors. The Cetus also uses an external power brick, for which I was now also missing the connector because it was on the old mainboard. That's why I also added a barrel jack to my adapter board that routes the power to a screw terminal. If you're, by the way, also interested in one of these adapter boards for your CETUS, I had a bunch more boards made that you can purchase as a kit, with all the parts necessary over in my online shop.
Let's now continue with the CETUS modification. I designed a holder to mount the Mellow Fly and the adapter board. It's positioned so that I can reuse the old cutout for the barrel connector. The ribbon cable mounts to the adapter board, which then connects to the mainboard using some custom wires.

Set of custom wires
I reused the existing antenna on the Cetus. If you build the board into another machine, make sure to install the antenna on the outside of the enclosure for better reception. Other than that, there were just two hacks I had to make. For once, the CETUS didn't use a standard thermistor but probably a thermocouple. There are versions of the Mellow and the DUET board that should support that (no guarantee, since I never tired and don’t know the exact type of temperature sensor the Cetus uses), but since I had a standard version, I had to replace the installed thermocouple with a standard E3D cartridge-style thermistor. I simply removed the old sensor from the block and also the JST connector and slit the wires of a new one through the tube. Then I crimped new connectors to the end of the thermistor cartridge that I was able to install in the existing connector.
NOTE: Users commented under the video that the stock temperature sensor is a PT100. If you buy the board that supports it you might not even have to change the cartridge sensor!
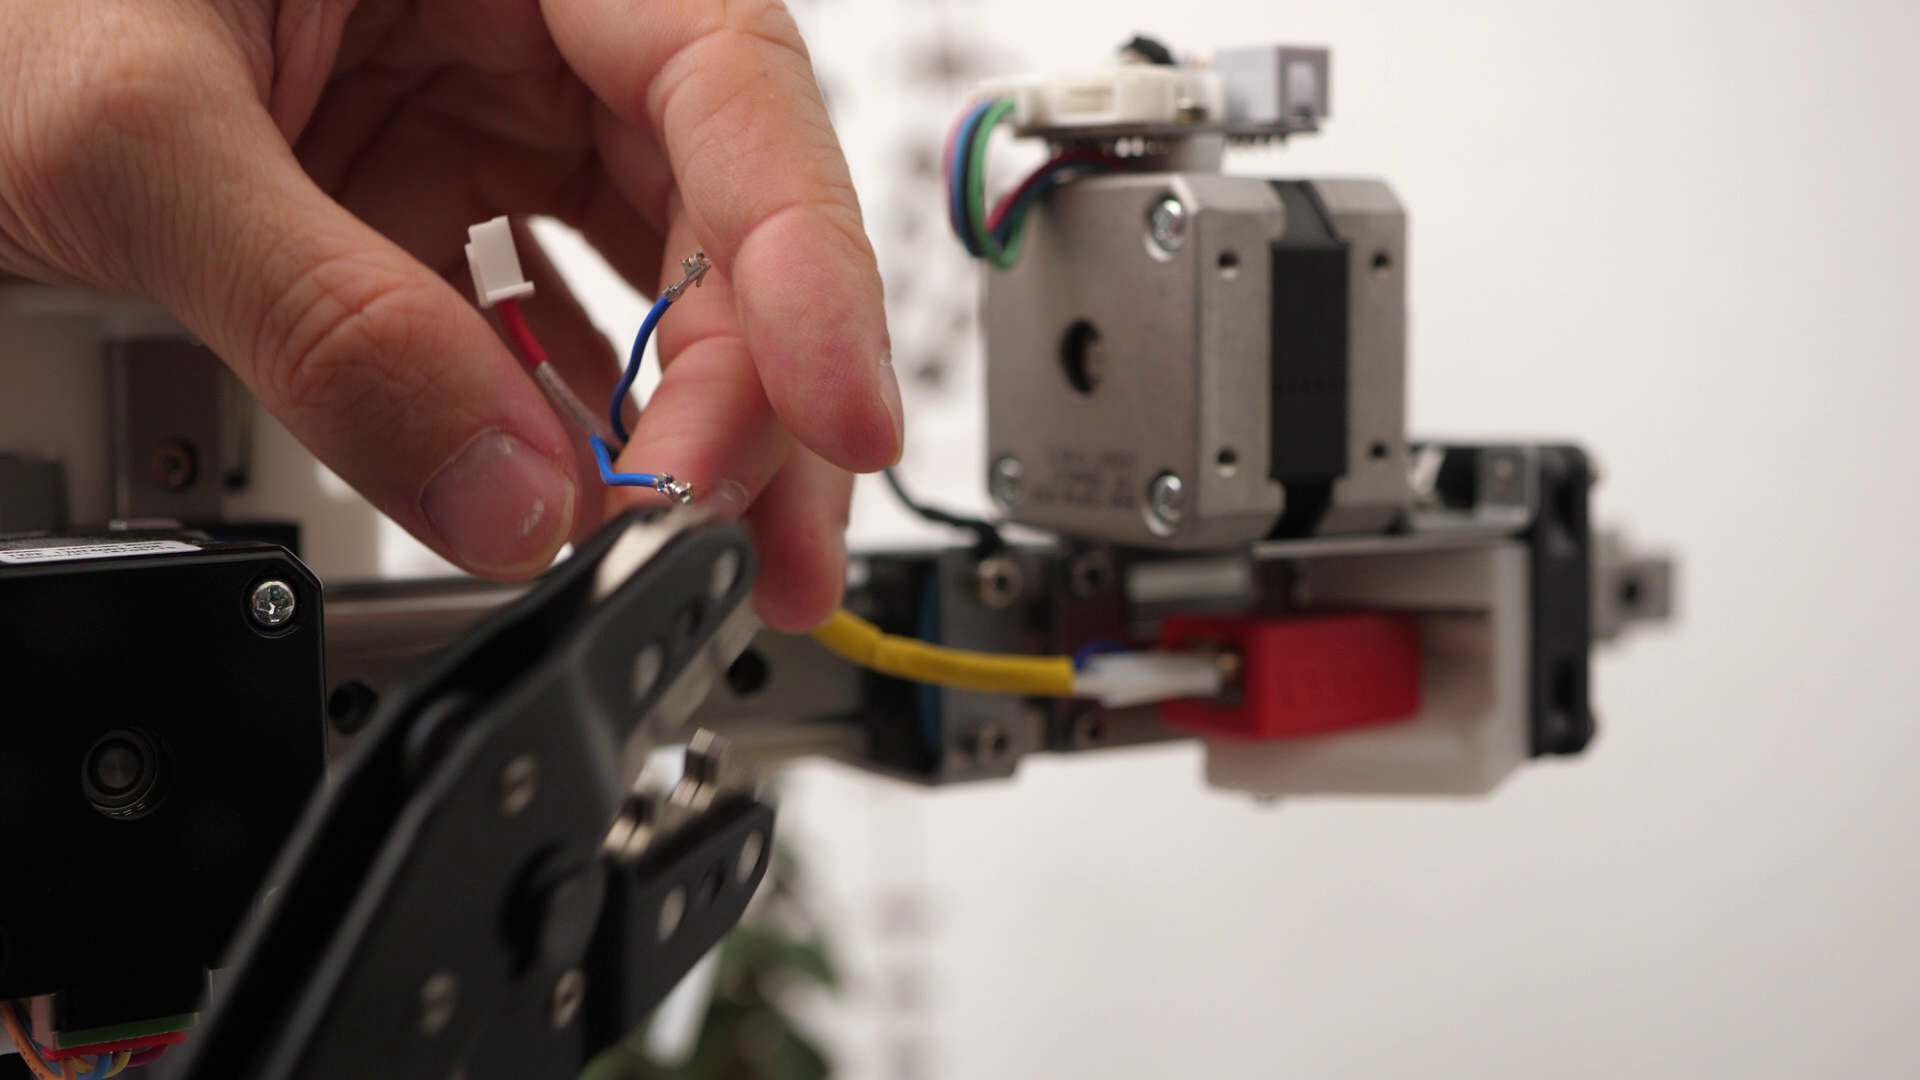
Crimping Plug Contacts to the E3D cartridge thermistor
Additionally, the CETUS uses a 5V hotend fan, similar to Prusa printers. That's a problem because the standard fan headers run with the same voltage as the power supply, which in this case was 19V. Fortunately, the fans on the Mellow are switched on the negative side, so you can connect the minus of the fan to the fan header and the positive side to one of the 5V pins of the board and therefore don't fry the fan. I didn't install a display on my machine since it never had one, though the Mellow FLY RRF is compatible with the stock Ender-3 12864 screen as well as the FlyScreen and the PanelDue. If you are only using one Z-axis motor, make sure to bridge one connector with jumpers as shown below. If you’re using the normal E3 board with replaceable drivers, bridge the pins as shown here, to put them into UART mode.

Wiring Schematics
And that's it for the hardware and electronics. Next, I'll briefly go over the firmware configuration. It's not that hard, but check out the TeamGloomy website or TeachingTechs and ChrisBasements videos if you're looking for more detailed instructions.
If I configure a new machine, I usually first go through the RepRapFirmware configurator and there is a dedicated one for the Mellow boards. That get's you an almost finished configuration. In the end, this lets you download a configuration bundle, the latest stable RepRapFirmware, the ESPFirmware, and DuetWebControl. Just on a side note, if you want the latest features like linear advance, you might need to download the latest Beta. If you have an existing configuration from someone else, you don’t need the configurator and just these pre-configured files. Format a MicroSD card with FAT32 and create the shown folder structure. Put the firmware into the root folder and rename it simply "firmware.bin". Extract the configuration files into the sys folder and the Duet Web Control files into the www folder. Copy the WiFi firmware into the firmware folder, and rename it to "DuetWiFiServer.bin". The SD card is then installed in the board and will install the new firmware when you power it the next time.

SD Card folder structure
We connect the board via USB to a laptop or PC and access it via a serial terminal. I used Pronterface in the past, but Proterface has the problem: it sends all commands in upper case to the board, which will mess up WiFi configuration, so rather NOT use it. Some use Putty or other tools, but I simply used the Arduino IDE, which is always installed on my machine. Connect to the right COM port and select a suitable baud rate (Important: 115200 baud & Both NL & CR). With M115, you can check if the firmware was properly installed. Then update the WiFi firmware with M997 S1 and wait for it to finish. Then stop the WiFi module with M552 S0, set your SSID and Password with M587 S”XXX” P”YYY”, and restart the module with M552 S1, which is then showing you the assigned IP address. Now, you're all set and can access the DuetWebControl using the IP address you just got.
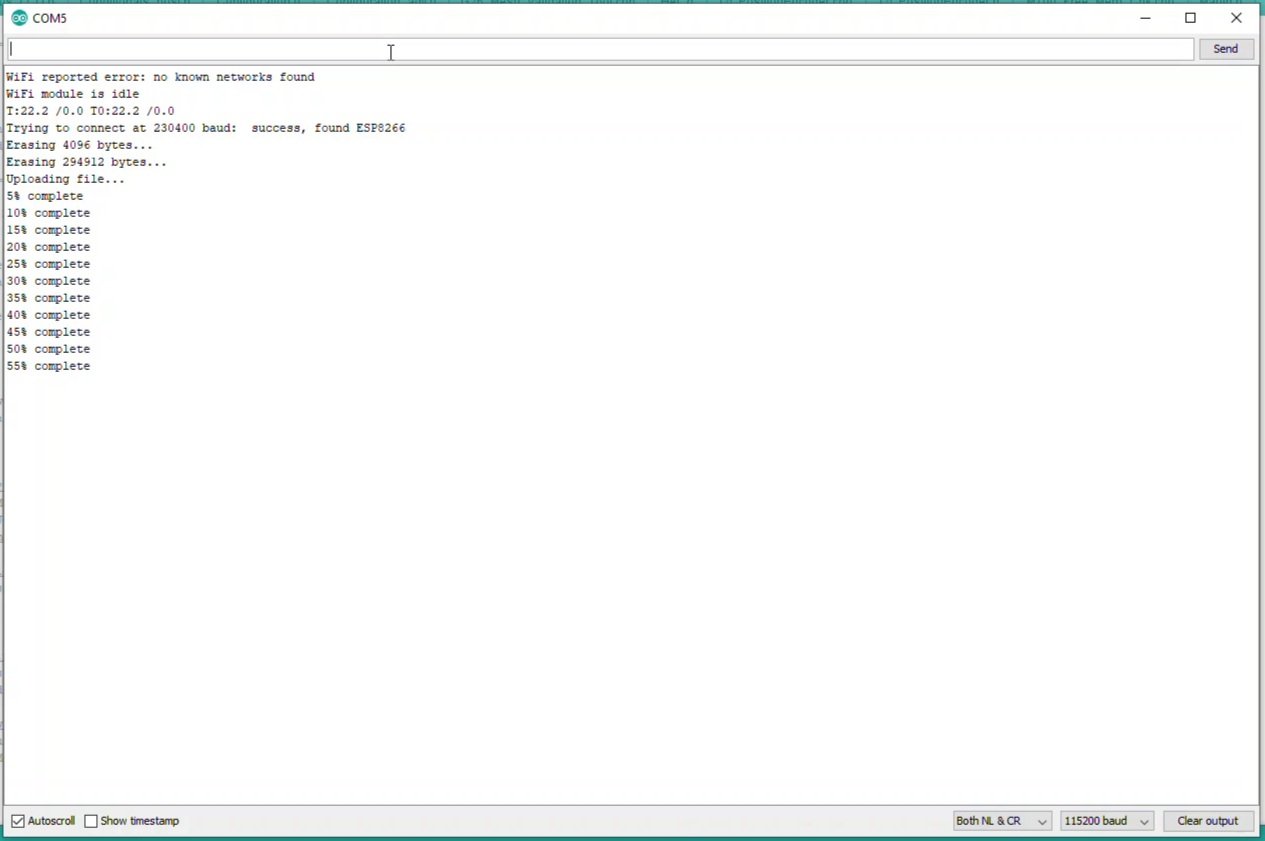
Updating the WiFi firmware in Arduino Serial Terminal (115200 baud & Both NL & CR)
The remaining configuration and also PID tuning is done using the web interface. You can download my configuration for the CETUS using the link below. For the Ender-3, you can find the configuration on the TeamGloomy Github. For a Prusa, I have something on my Github as well and if you are using a RepRapFirmware board in a CNC Router, check the config files at OOZENest. I'll link everything below.
My Cetus MK3 config for Mellow FLY RRF E3
Another Guide and Config on the Conversion
My Prusa MK2 config for Duet 3 Mini 5+
CNC Configuration from OOZENEST
I've now got a couple of hundred hours of printing on my CETUS MK3 with the Mellow Fly board and am super happy with it. My PrusaSlicer profile gives me great print results and one-click sending to the machine. However, you might have seen that I had to change my extruder gear because it was wobbly.
It's even quieter than my Prusa Mk3 and the only printer I'm really comfortable around me for more extended periods. The minimum power draw makes it great if you don't want to heat your office in summer, and I'm even thinking of adding a Makita adapter for complete wireless printing.
Overall, I think that a conversion with the Mellow FLY RRF E3 boards is great for people who want to try out RepRapFirmware. The boards are reasonably priced yet well-built and seem to work great. The only complaint I had, was that my older version didn't use any electrical fuses. For safety, this is, therefore, why I'd recommend going with one of the Pro-Version that now has them. There is also one small caveat. These boards all run a port of RepRapFirmware maintained by TeamGloomy, so you're dependent on their work if you always want the latest features. This has so far been working well and the RepRapFirmware port always only lacked a bunch of days behind the one for the Duet boards. However, there is the chance that you get stuck on an older version if the port is not maintained anymore. So, if you want to get RepRapFirmware into one of your workhorses, I'd still recommend looking at the genuine Duet boards and supporting these guys.
Resources
Holder, adapter board, configuration & PS profile: https://github.com/CNCKitchen/CetusMK3_RRF
Information and Configuration on the Mellow FLY: https://teamgloomy.github.io/fly_e3_pro_general.html
Latest releases of the RepRapFirmware port: https://github.com/gloomyandy/RepRapFirmware/releases
Mellow FLY Board: https://geni.us/PfgTk
CETUS Adapter board: https://www.cnckitchen.com/store
Custom Idler for the Cetus: https://www.prusaprinters.org/prints/77611-cetus-mk3-new-idler-for-improved-extruder-gear
Note: The product links you find in this article might be affiliate likes from which I earn some revenue to support my work.