Nozzle Spacer - CHT for Volcano Hotends
I showed in a recent video how I was able to increase the melting performance of my 3D printer and, therefore, the possible printing speed by replacing my standard brass nozzle with Bondtechs CHT nozzle, which can melt materials way more efficiently with a special internal structure. If you want to know more about the Core Heating Technology, please check out that video! In the end, I concluded that volcano hotends are obsolete because just changing a simple nozzle improves your machine’s performance more than switching to a longer and heavier volcano hotend.
The thing is, there are no CHT nozzles for volcano hotends because adding these tilted bores is hardly possible on such a length and might only work with EDM, which is an expensive process. One solution might be adding a bunch of copper wires perpendicular to the flow direction, which I also recently showed and that can have similar effects as the sophisticated internal structure of a CHT nozzle. Unfortunately, adding these is quite a bit of effort, limits operating temperatures depending on the solder you’re using, and due to the patent on the Core Heating Technology is something that’s not commercially feasible. Fortunately, there are some clever high flow hotend owners around that have been using a solution for this problem already for a while. I’ve heard that they wanted to use longer heater blocks with standard nozzles. To fill the gap between the heatbreak, they simply added a spacer. We can use a similar approach to use a CHT nozzle in a volcano hotend. I highly appreciate the input from Nitram on this method. He’s been using it for years on his speed printing projects and helped me out with all the questions I had! Please check him out!

Using regular size nozzles in longer heater blocks with spacers
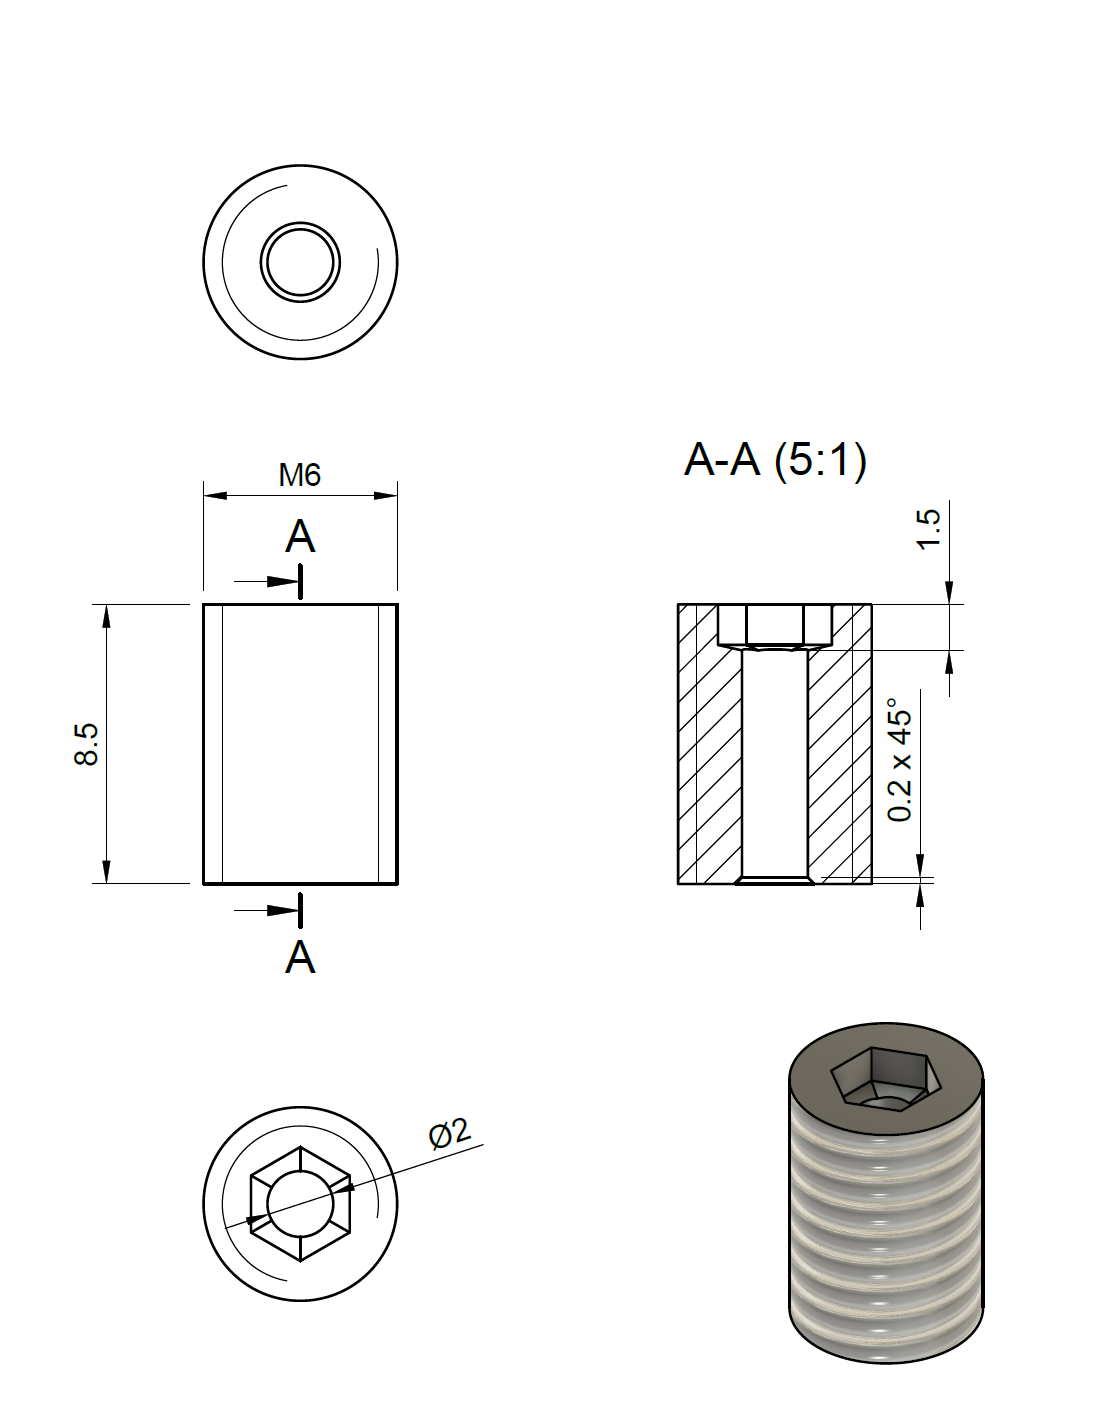
The difference in length between a regular V6 nozzle and a volcano nozzle is 8.5 mm. That’s the length we need to bridge. The spacer I made is simply a piece of brass with an M6 thread on the outside and a bore on the inside. Well, unfortunately not as simple because you need a way to somehow install it, hence threading it into the heater block, so it also seals to the heatbreak and the nozzle. Therefore I used brass grub screws that have a 3 mm hex on one side that we can use for tightening. Unfortunately, finding brass grub screws of suitable length here in Germany was quite tricky. The longest I found were 10 mm, and since I had to remove some material on both sides to make them flat, they are barely long enough. Then there is the hex, which is pretty deep and would form a significant cavity I’m sure wouldn’t be good for performance and also during retractions. So I also ordered some 16 mm ones from overseas that fortunately arrived faster than expected. These are now long enough to give me room to make both sides flat and also shorten the hex to only around 1.5 mm.

The simple spacer with a single bore is relatively easy to make. I used my mini-lathe for facing and cutting off, but if you don’t have one, I’m sure you could use a hacksaw to get it to its rough dimension. Then use an old heater block or maybe even a bunch of M6 nuts to get the end flat and square using sandpaper. I secured the grub screw in a collet chuck on the lathe, cut off the uneven end, and removed around 3 mm on the hex side. Then I measured the remaining length and removed more material until it had roughly a length of 8.5 mm. Then I used a 2 mm drill for the inner bore. This is the same diameter as heatbreaks and nozzles for 1.75 mm filament usually have. If you only have a drill press, this shouldn’t be too hard as well because there is a cone on the end of the hex that should center your drill bit.
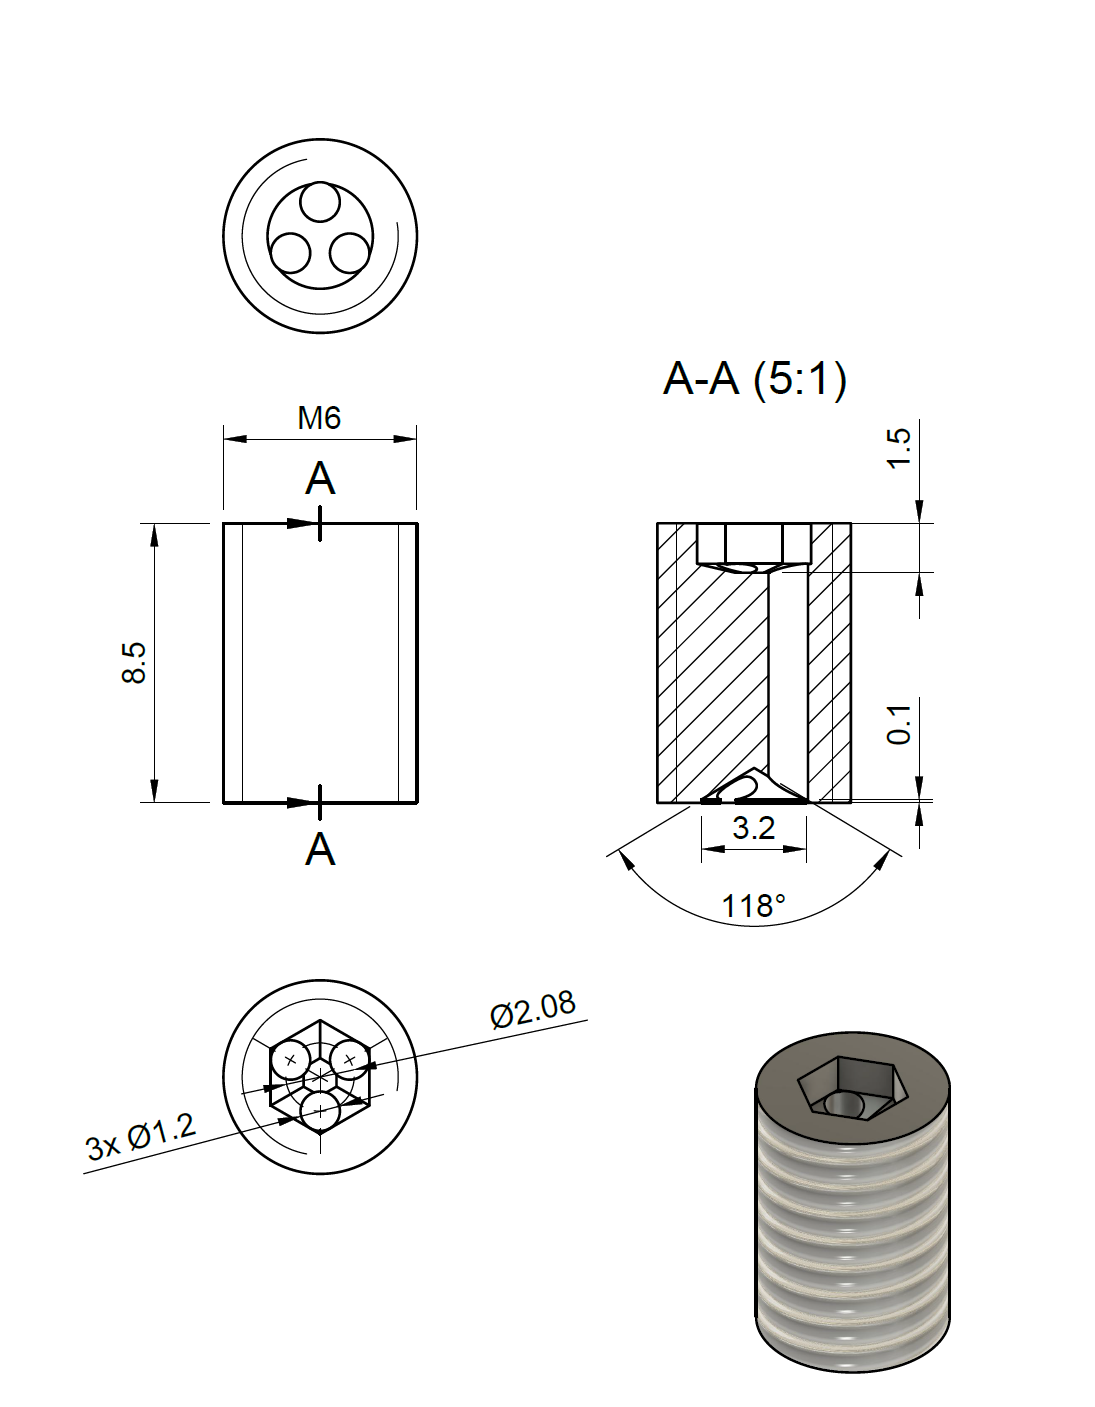
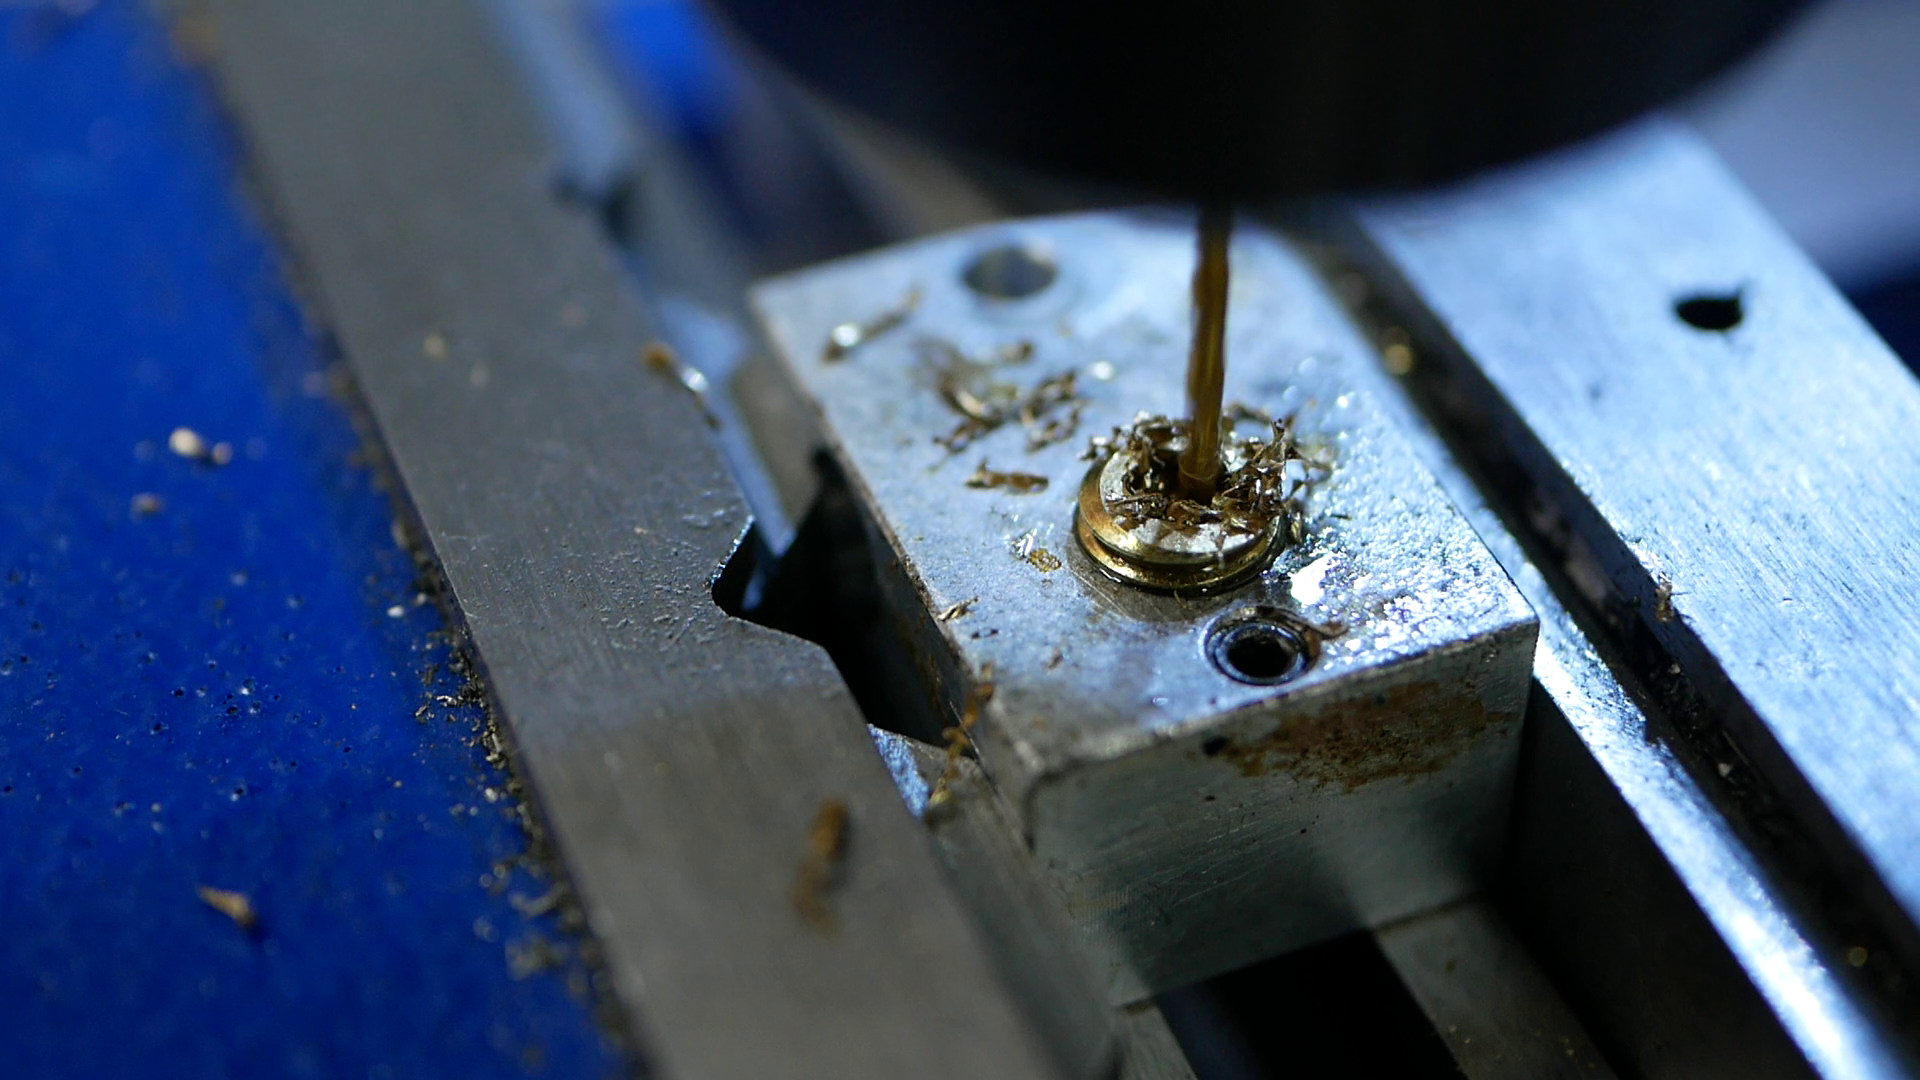
Next, I attempted to make my high-flow variant of the spacer. Like the CHT nozzle, I wanted to add three small holes instead of one to increase the surface area and melt material more efficiently. Each bore has a diameter of 1.2 mm, which results in a final surface area very similar to just one 2 mm hole to not constrain the flow too much.

Failed attempts
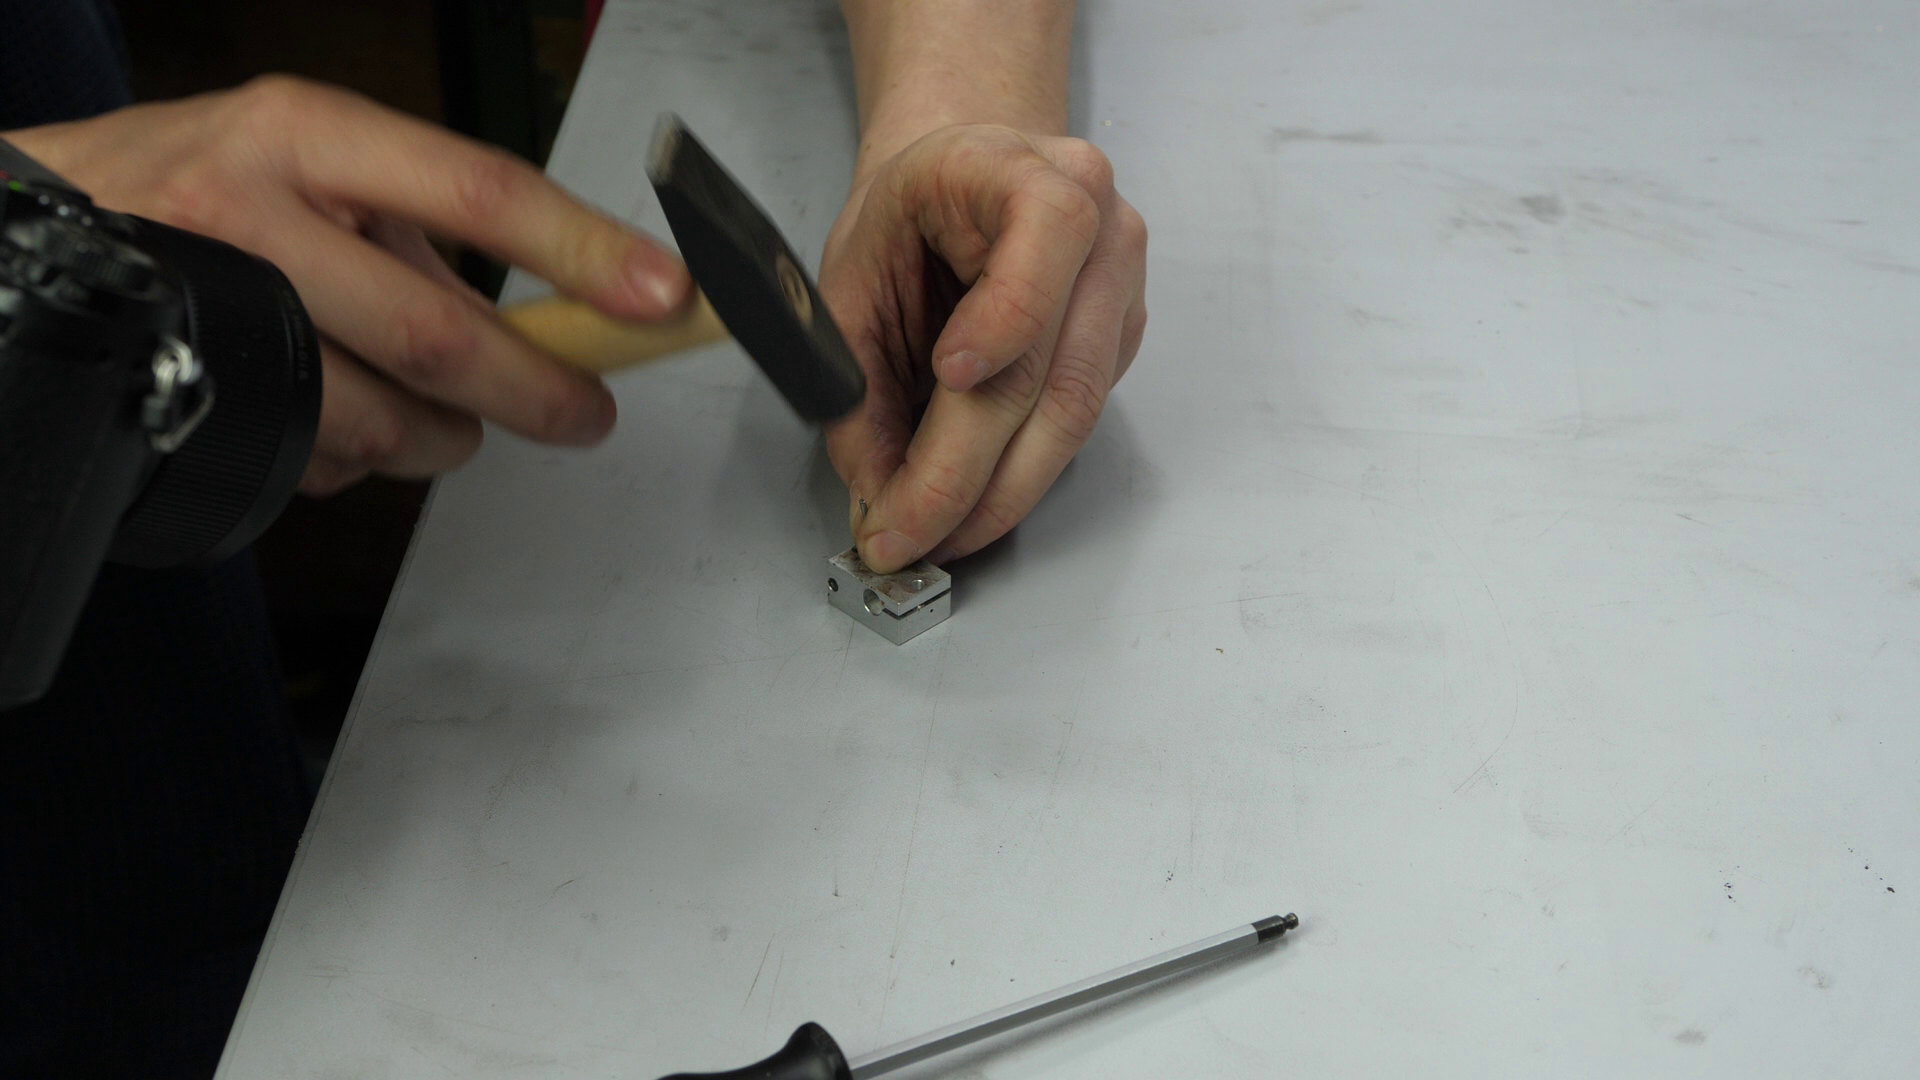
The blank looked the same as with the simple adapter. Before I drilled the three small holes, I added an indentation with a 3.2 mm drill on the opposite side of the hex. This was to not cover the holes by the heatbreak because of their spacing. Drilling the tiny holes inside the hex was a pain, not only because of the 1.2 mm drill bit. The bottom of the hex is slightly cone-shaped, so if I’d just tried to drill, the bit would only wander towards the center. That’s why I made myself the smallest center punch I could imagine by cutting off a 1.3mm drill and grinding a tip on the end. This way, I was able to mark the centers of the three bores in the corners of the hex. Unfortunately, just punching the center wasn’t enough, and the drill still often wandered towards the center. Therefore, I additionally used a tiny center drill and manually increased the indentation size. This way, I could finally drill all three bores without the bit wandering off, having them equally spaced and not breaking the bit. My crude equipment is seriously not suitable for projects at this small scale, but with some patience, it’s still doable.
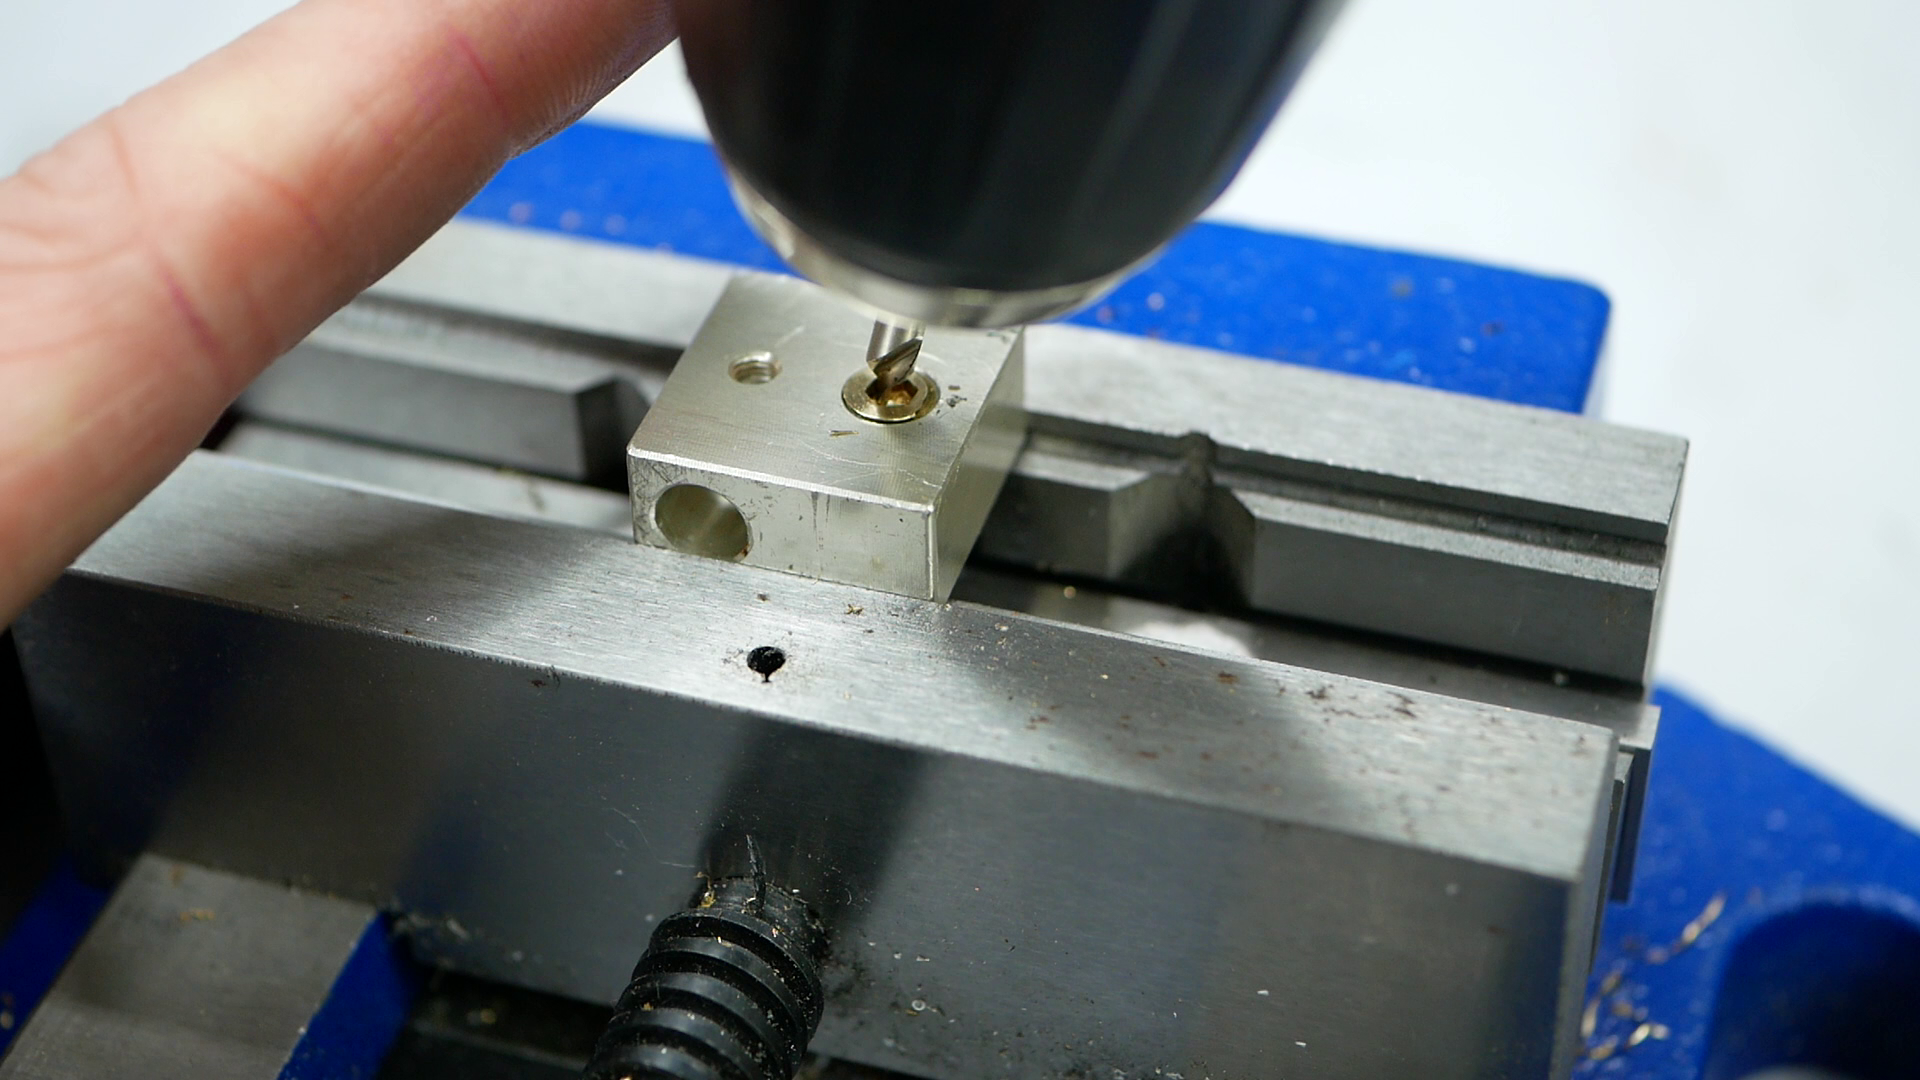
So here we go! Two DIY spacers to use normal length nozzles in a volcano hotend! Let’s try them out. Installation is super simple. I added some anti seize and then screwed them into the heaterblock while it was hot and torqued it with 1 Nm. Then I screwed in the nozzle and tightened it against the spacer. If your dimensions are right the spacer should seal against the heatbreak and the nozzle avoiding that molten plastics gets into the threads.

Installation of the spacer
Let’s now see if they work and if we can improve the performance of a Volcano hotend by adding a CHT nozzle and maybe even more with the combination CHT nozzle plus high flow spacer. For our test setup I mounted all the nozzles and spacers on a Hemera extruder that’s installed on my E3D Toolchanger. This time I replaced the stock 30 W heater with a 60 W one because the old one was just barely able to keep up at higher flow rates. All the tests were done with simple PLA at a conservative 215°C hotend temperature and 0.6 mm nozzles. I’ll always do two tests. First I’ll benchmark the extrusion rate by simply feeding 200 mm of material through the hotend and then weighing the spiral of material. When the extruder is not able anymore to push the filament through the nozzle it will slip and strip which results in less material coming out of the nozzle which is easily measurable.

Filament spiral of the extrusion test
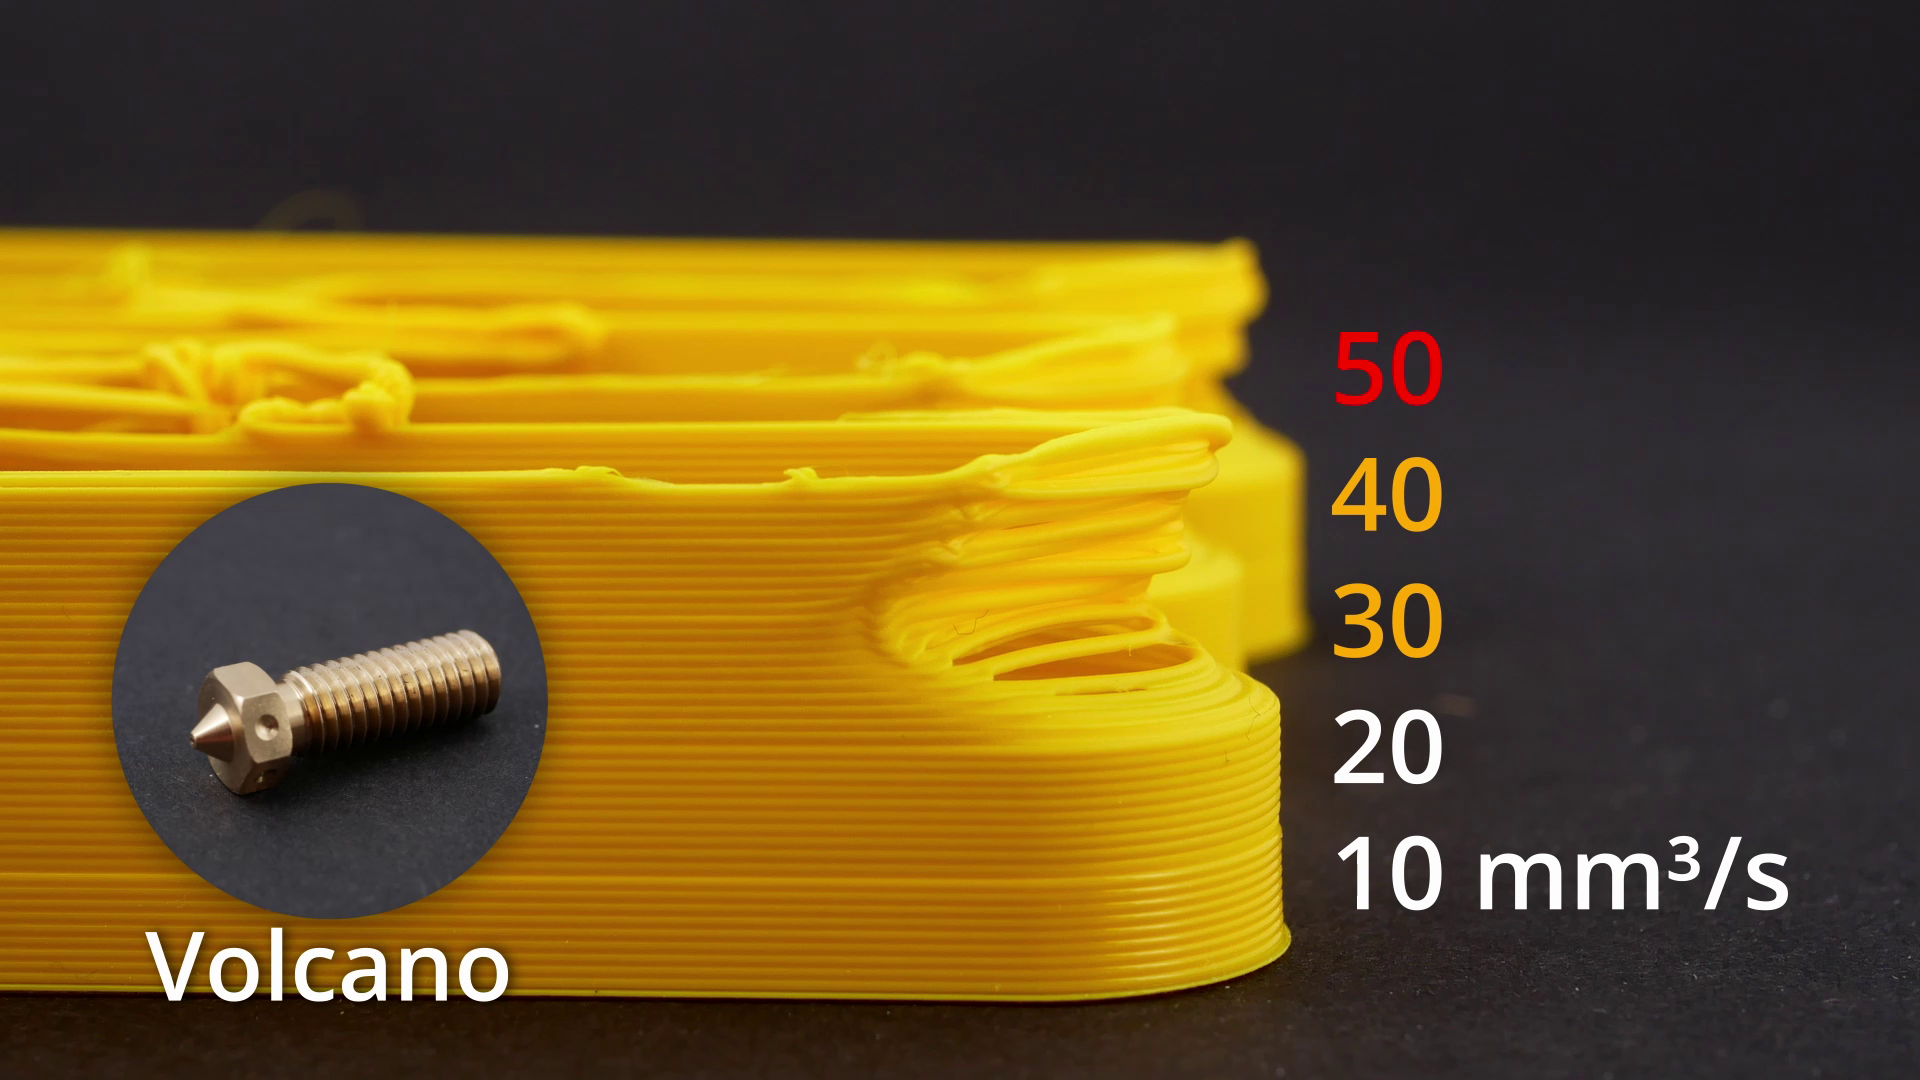
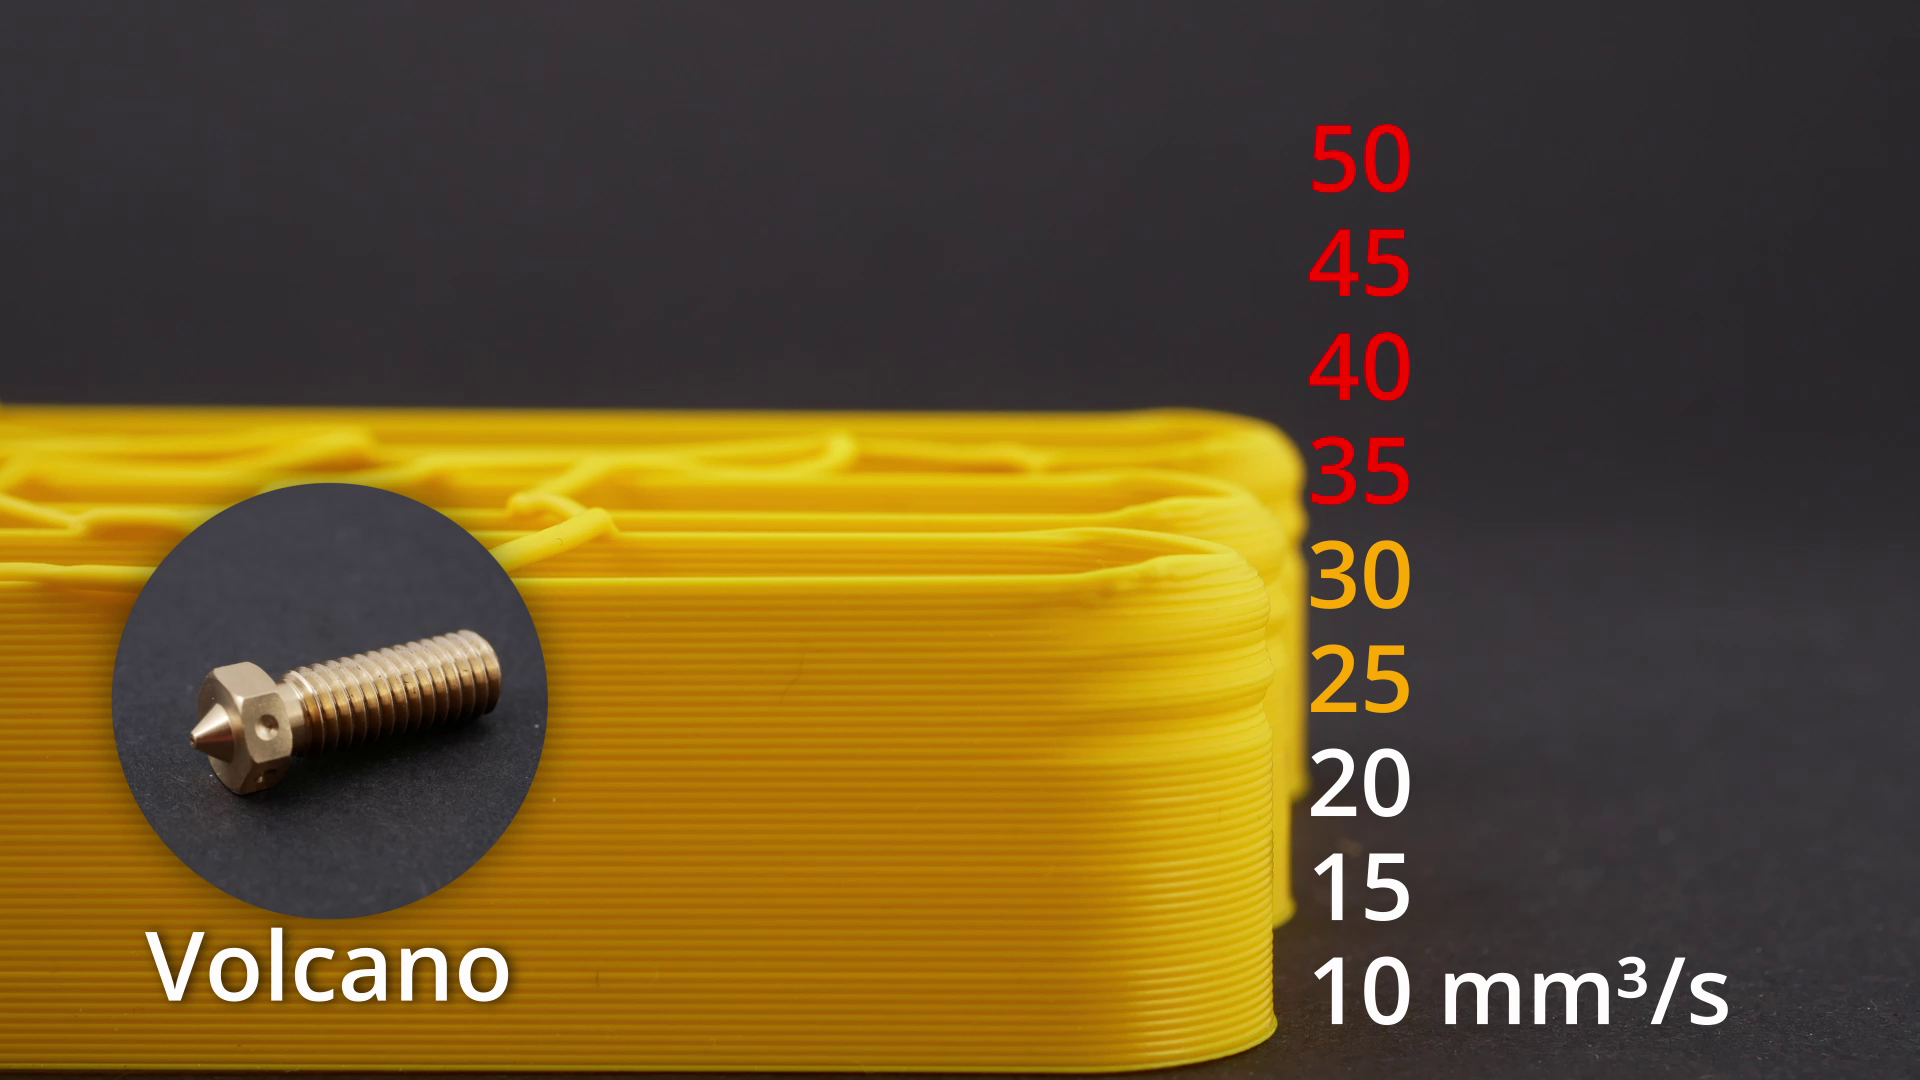
I’ll start with the reference, just a simple but genuine 0.6 mm E3D volcano nozzle. It performed great up to 20 mm³/s, then started slightly dipping and then totally dropped off at rates higher that 35 mm³/s. What we can also notice is that starting at 25 mm³/s the amount of die swell significantly increases which is an indication for internal stresses because the material is not as thoroughly molten as it should be.
Die swell and internal stresses bring us nicely to the second test I performed, which is real printing. Here I printed this meandering shape in vase more and increased the flow rate every 5 mm by 10 mm³/s. If the material is not thoroughly molten and has significant internal stresses this will cause printing problems, visible by bulged corners. During real prints this will cause additional warping, curling on overhangs and probably even worse layer adhesion.
The standard volcano nozzle was able to print nicely at 10 and also 20 mm³/s. At 30 mm³/s severe deformation started which became so bad that the part failed at 40 mm³/s. Hence, using my material and settings, the extrusion limit is somewhere between 20 and 30 mm³/s for a standard volcano even though the normal extrusion test would have suggested more, which makes this second test that valuable.
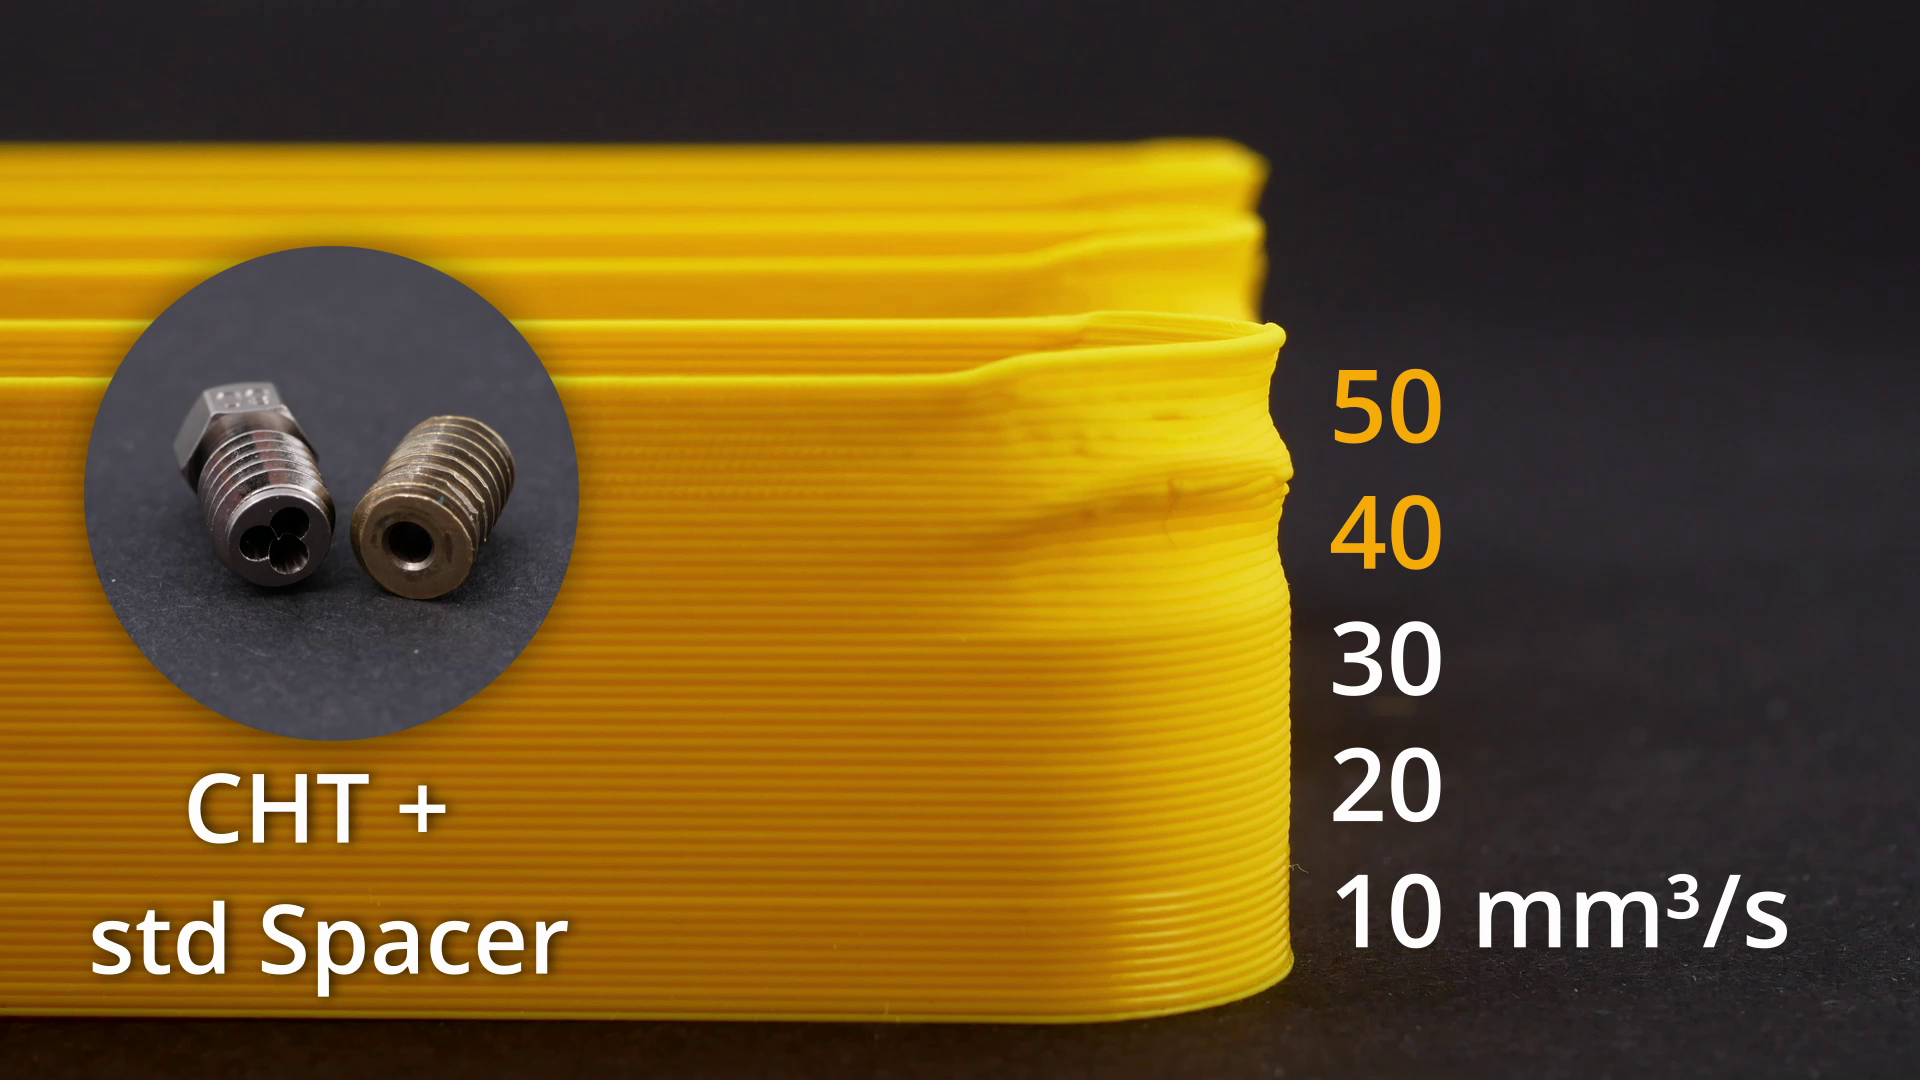
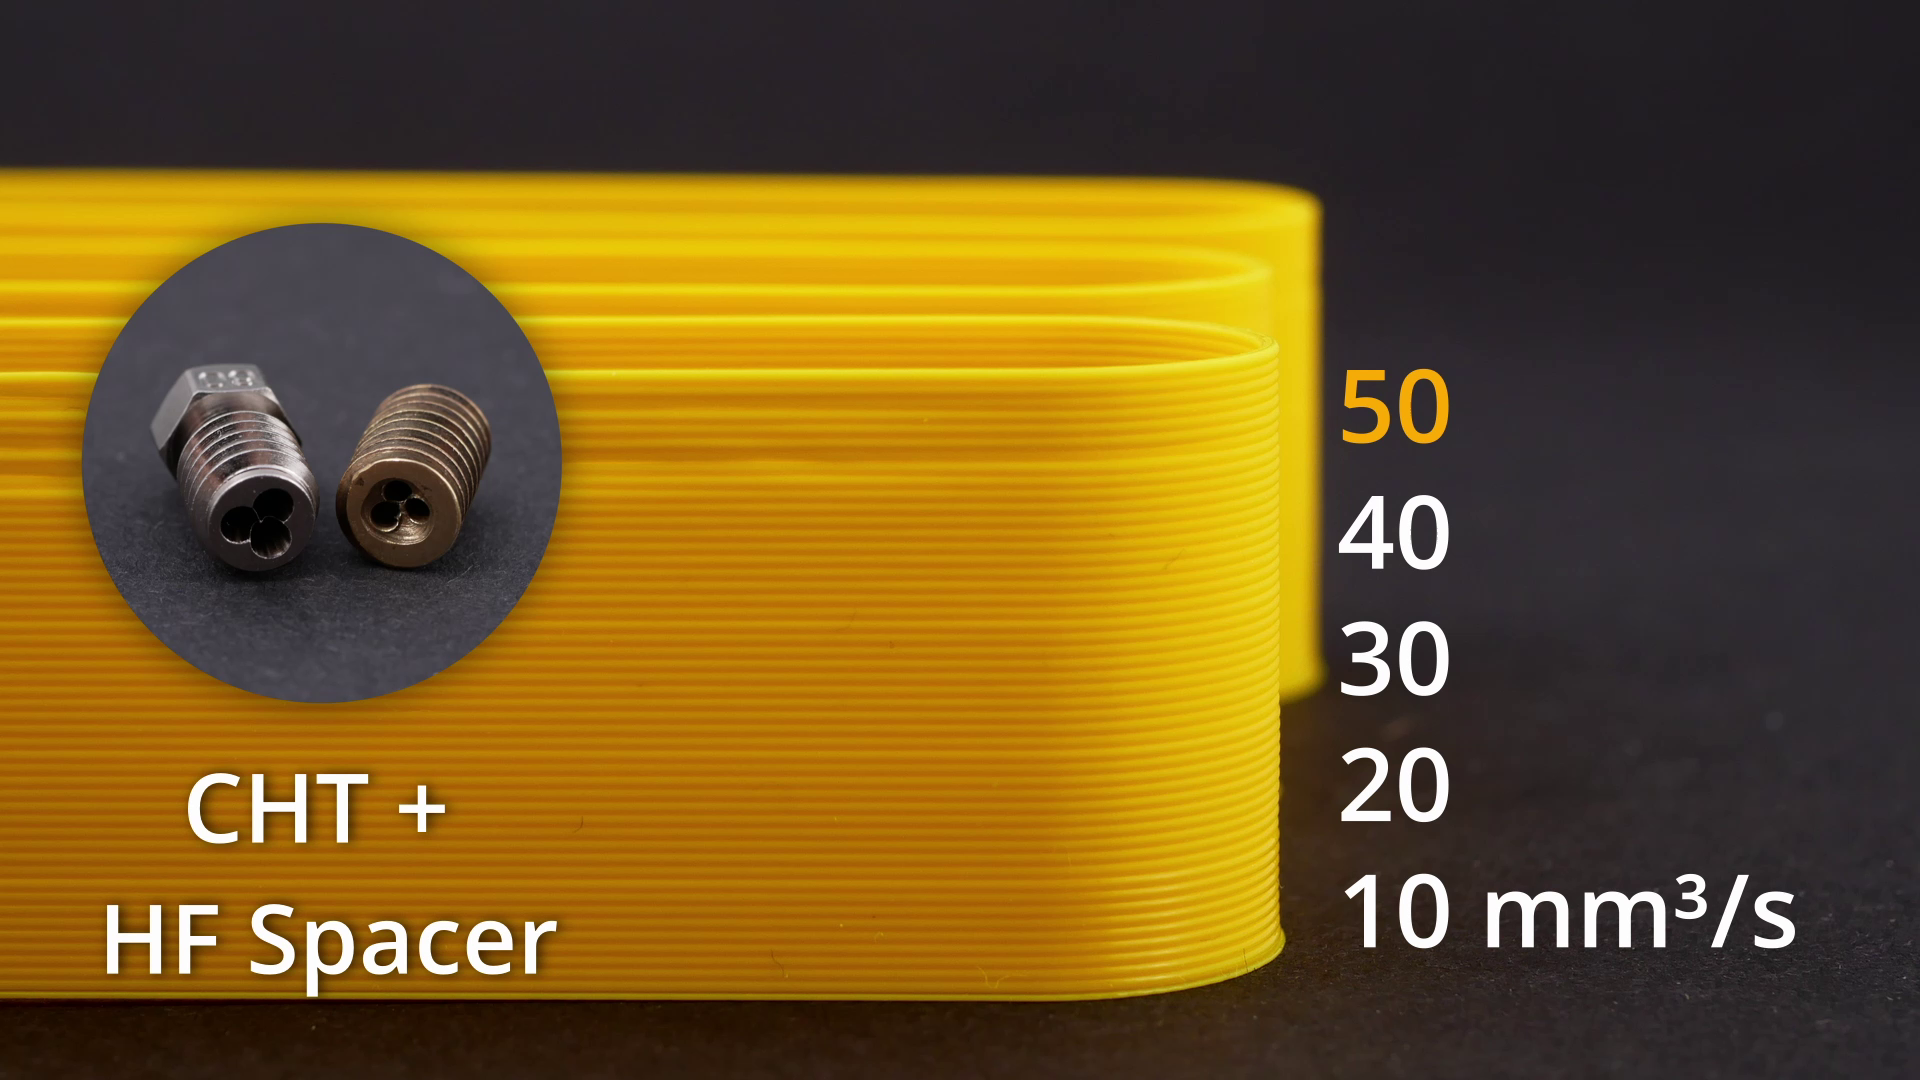
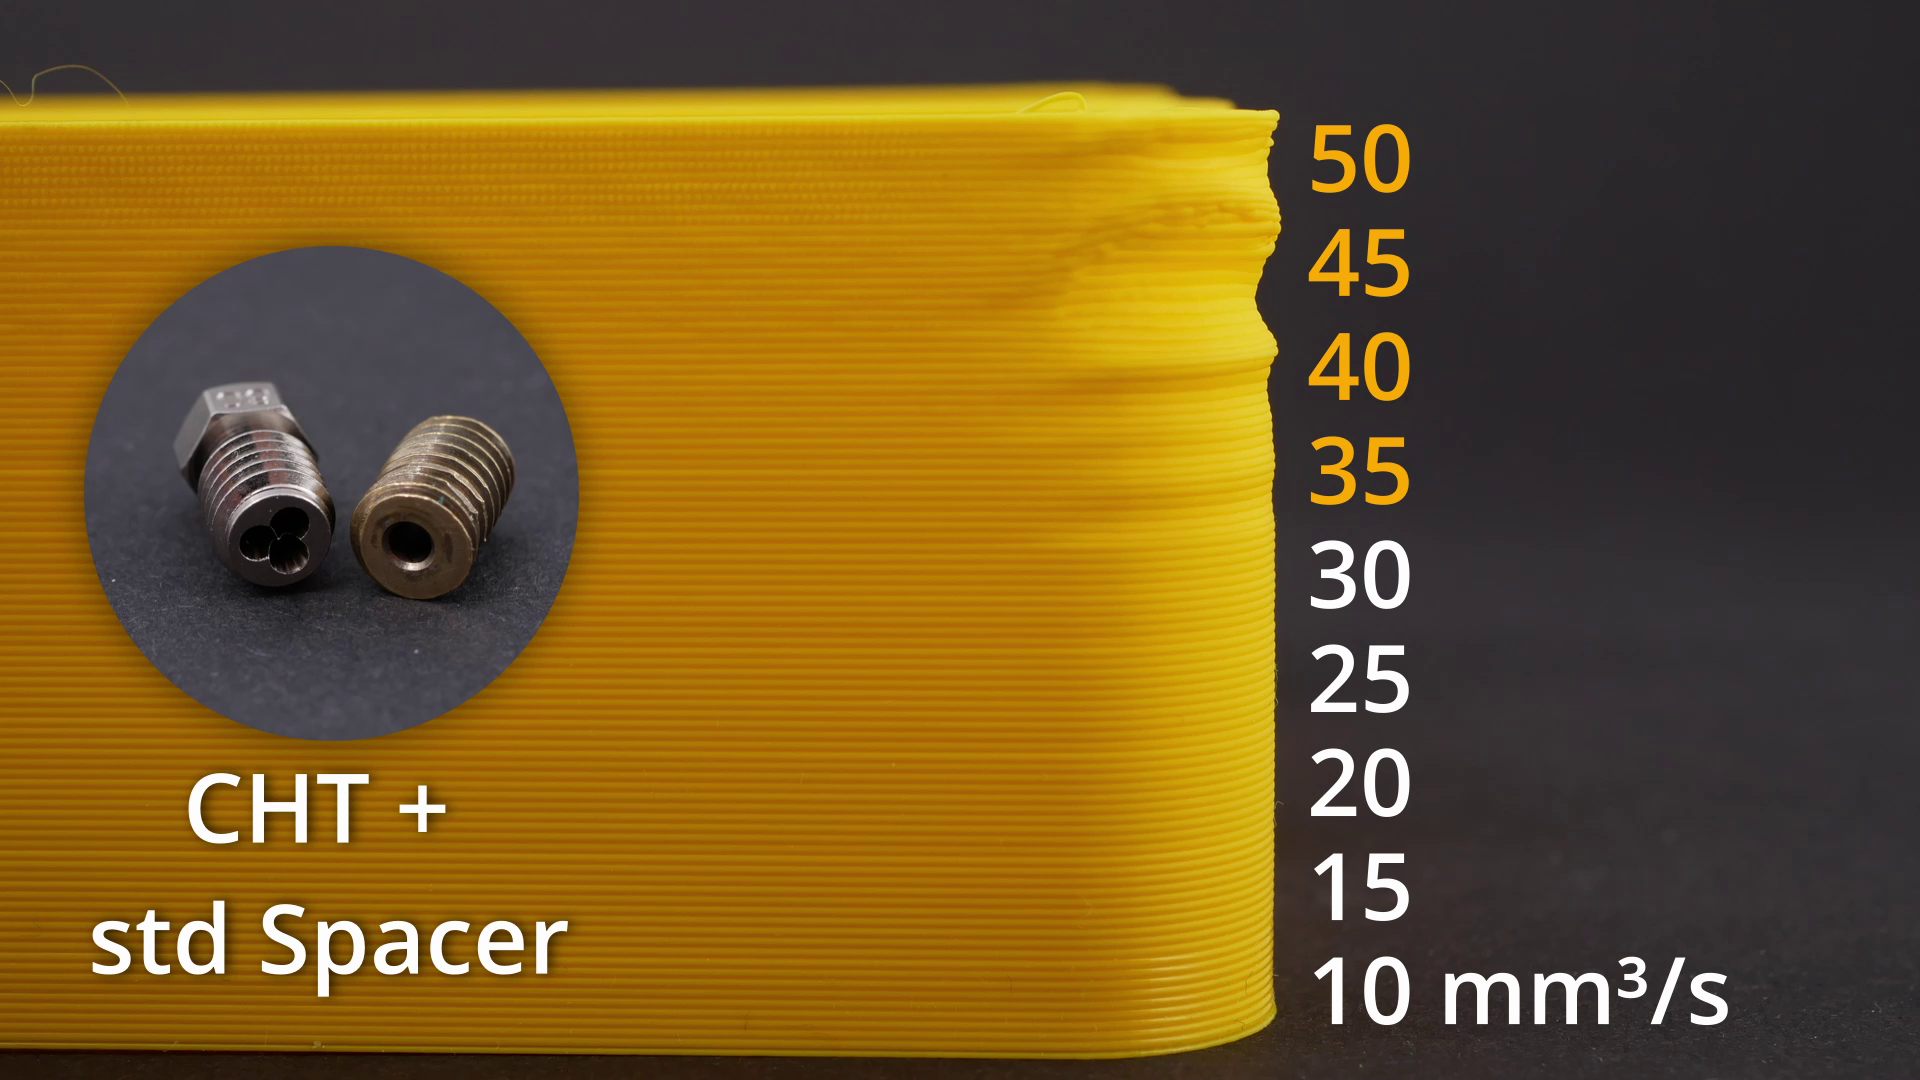
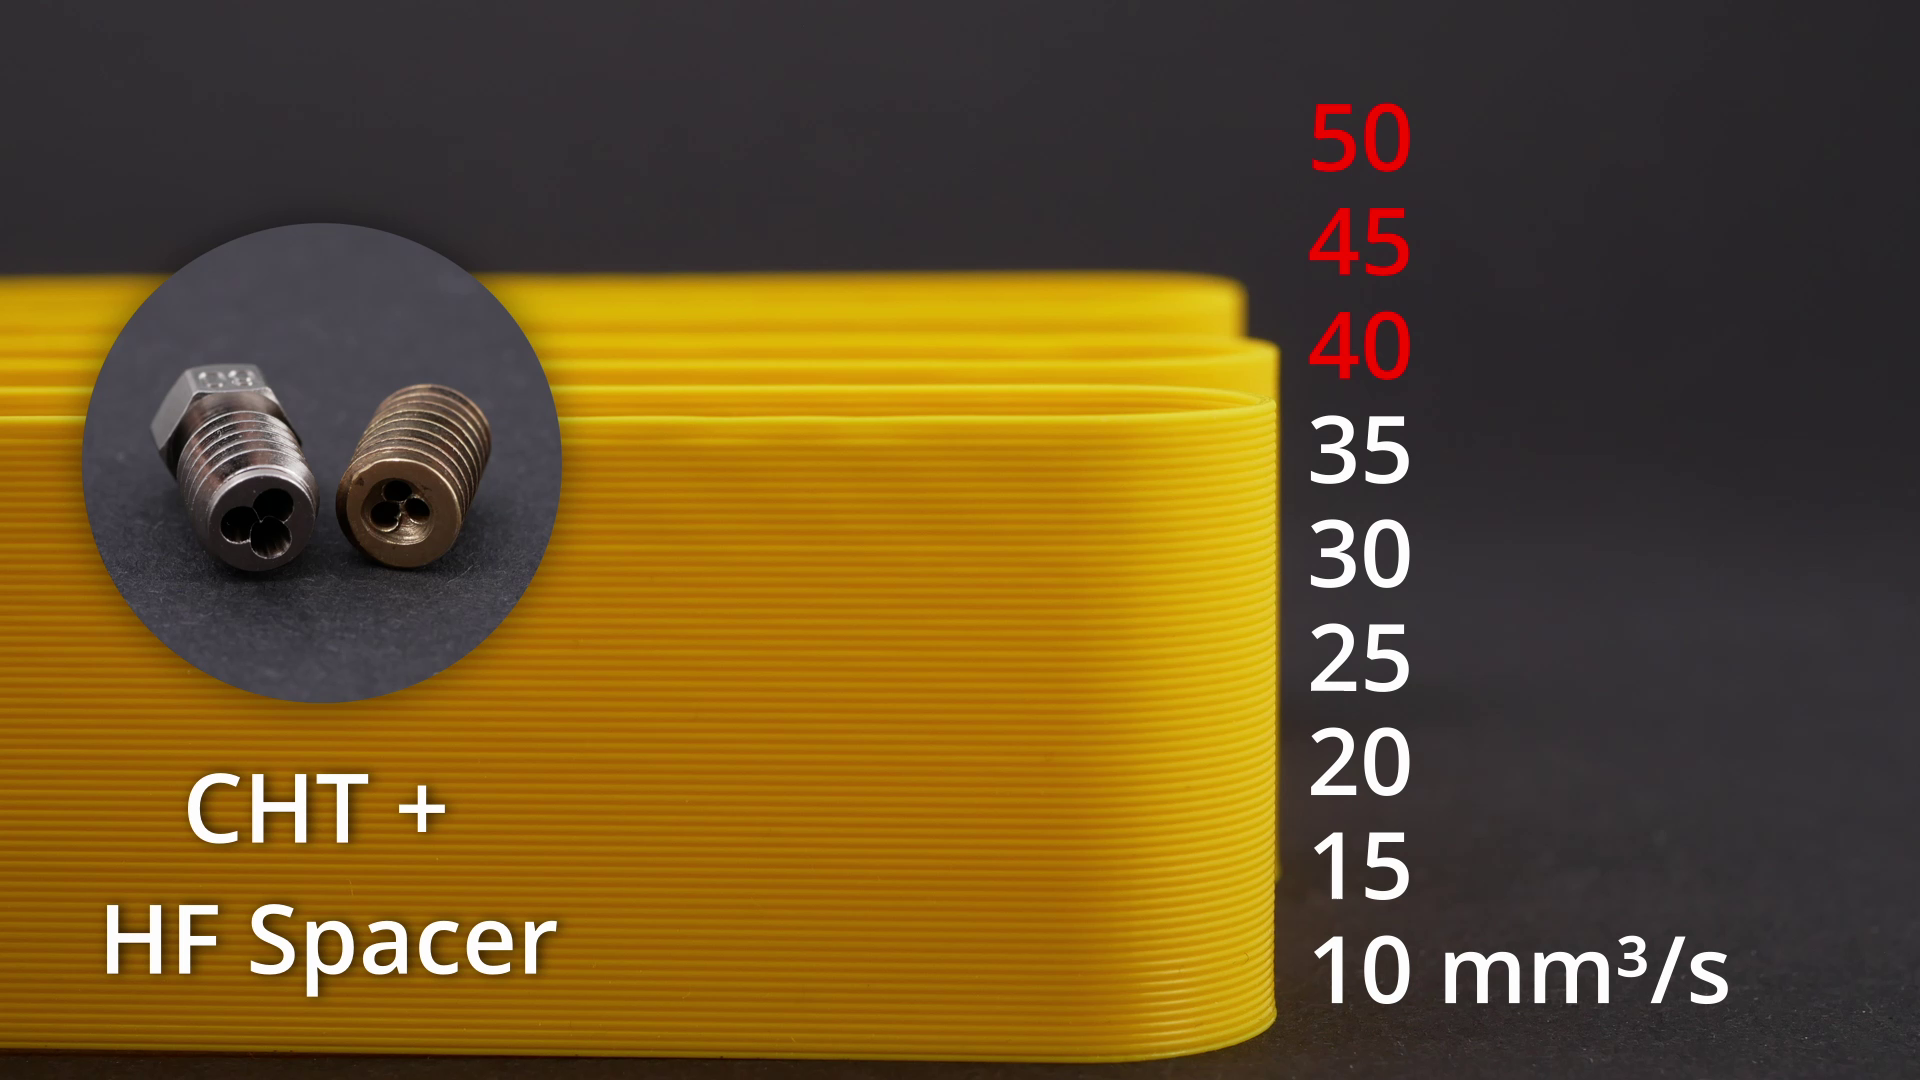
Let’s next test a CHT nozzle with the single bore spacer. This combination performed flawlessly up to 30 mm³/s in the extrusion test and only then started slightly dipping down and even at 50 mm³/s we only under-extrude by around 10%. The CHT geometry causes a very interesting stress pattern within the melt resulting in a very curly material once internal stresses and die swell gets more severe. The print test part also looked great until 30 mm³/s but then started showing deformations at higher rates. This looks very similar to what we have seen in the past with just the CHT nozzle on a standard-size heater block.
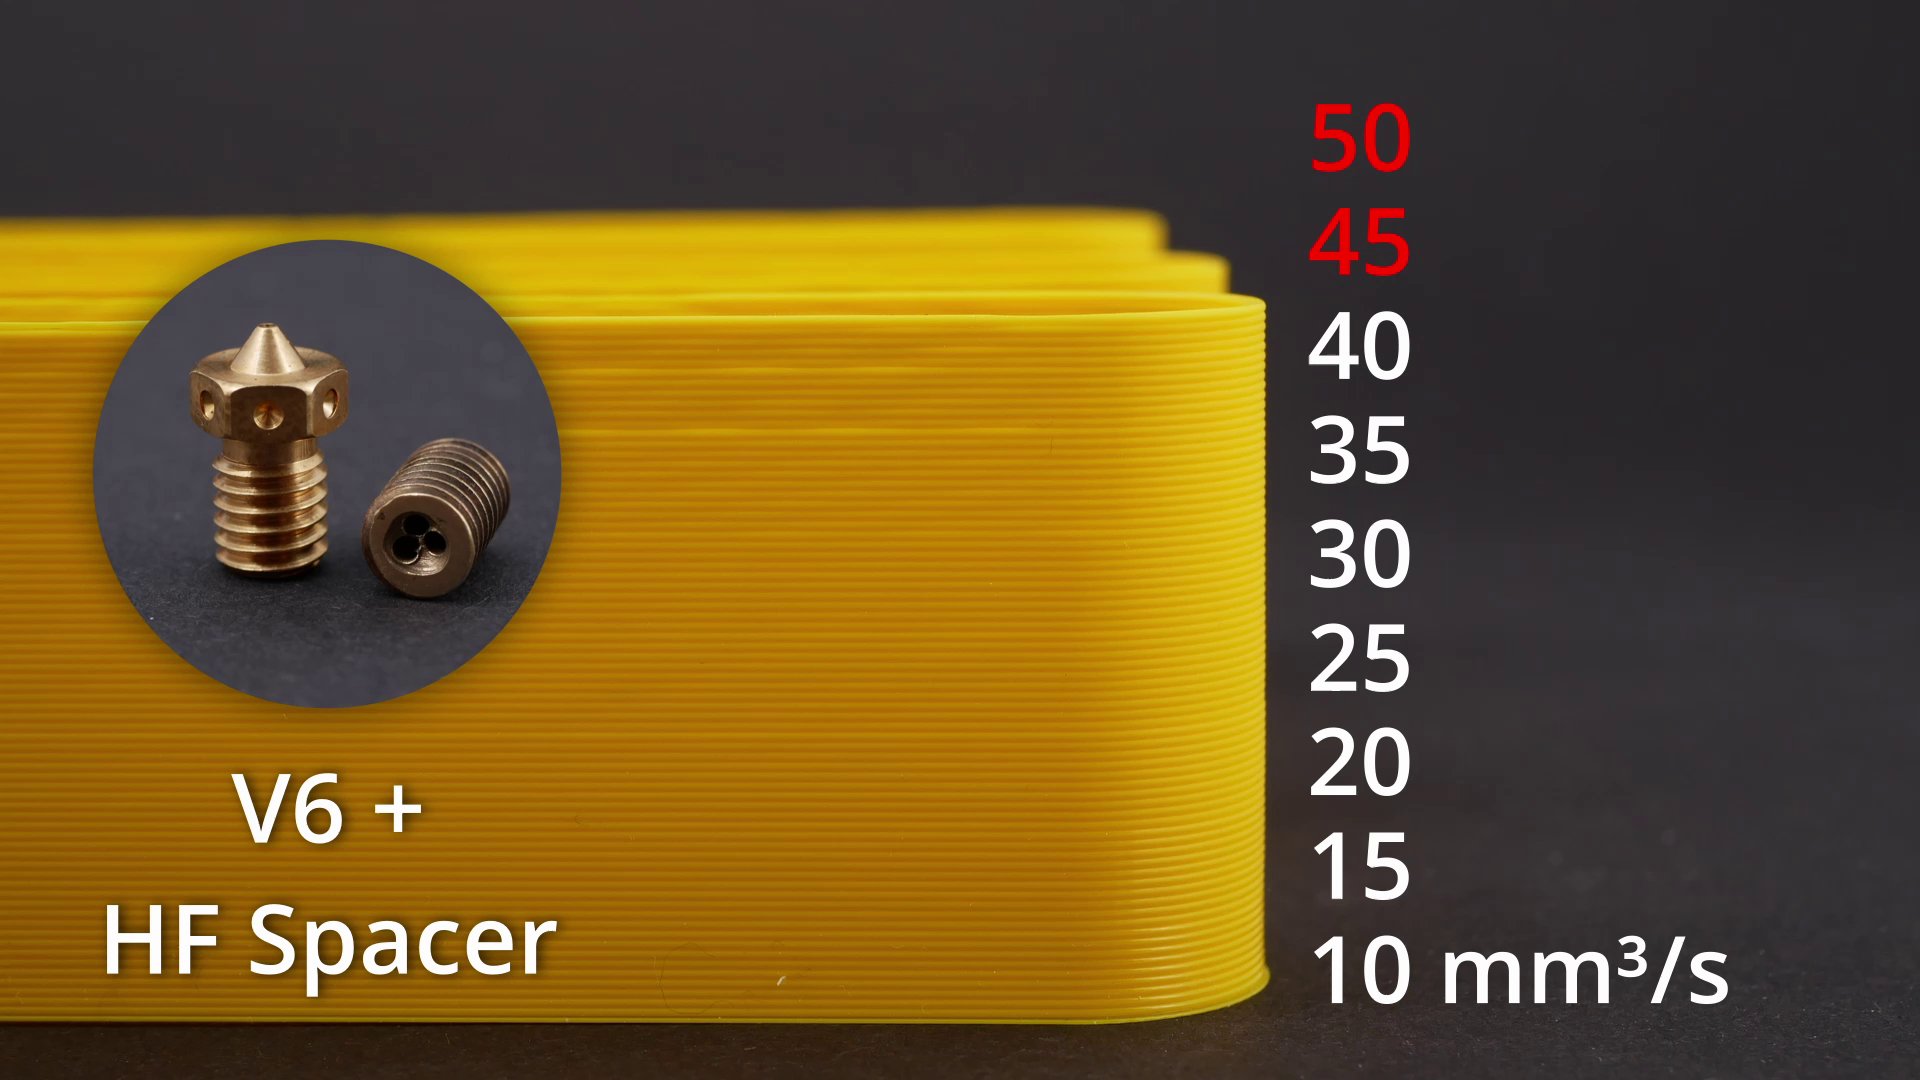
But what can we expect if we combine a high flow spacer with a high flow nozzle? Well, judging from the extrusion test the performance seems to be worse because under extrusion constantly increases until we completely dip down at 50 mm³/s. This nicely shows how hotend performance is dependent on several factors. Even though my high flow adapter might help with melting performance, the additional resistance we add by the sharp turns and small channels increases backpressure. If the feeder cannot push against that force, it will slip and, therefore, under-extrude. Though, what we can see with our high flow combination is that the die swell seems to be very small, and we don’t see this curling behavior as before. This might mean lower internal stresses, which we can see in the print test because even at 40 mm³/s the extrusions did not deform! Only at 50 mm³/s, the Hemera cannot push enough material anymore, starts slipping, and causes under-extrusions. Pretty impressive and, therefore, also beats the performance of a CHT nozzle on a standard hotend.
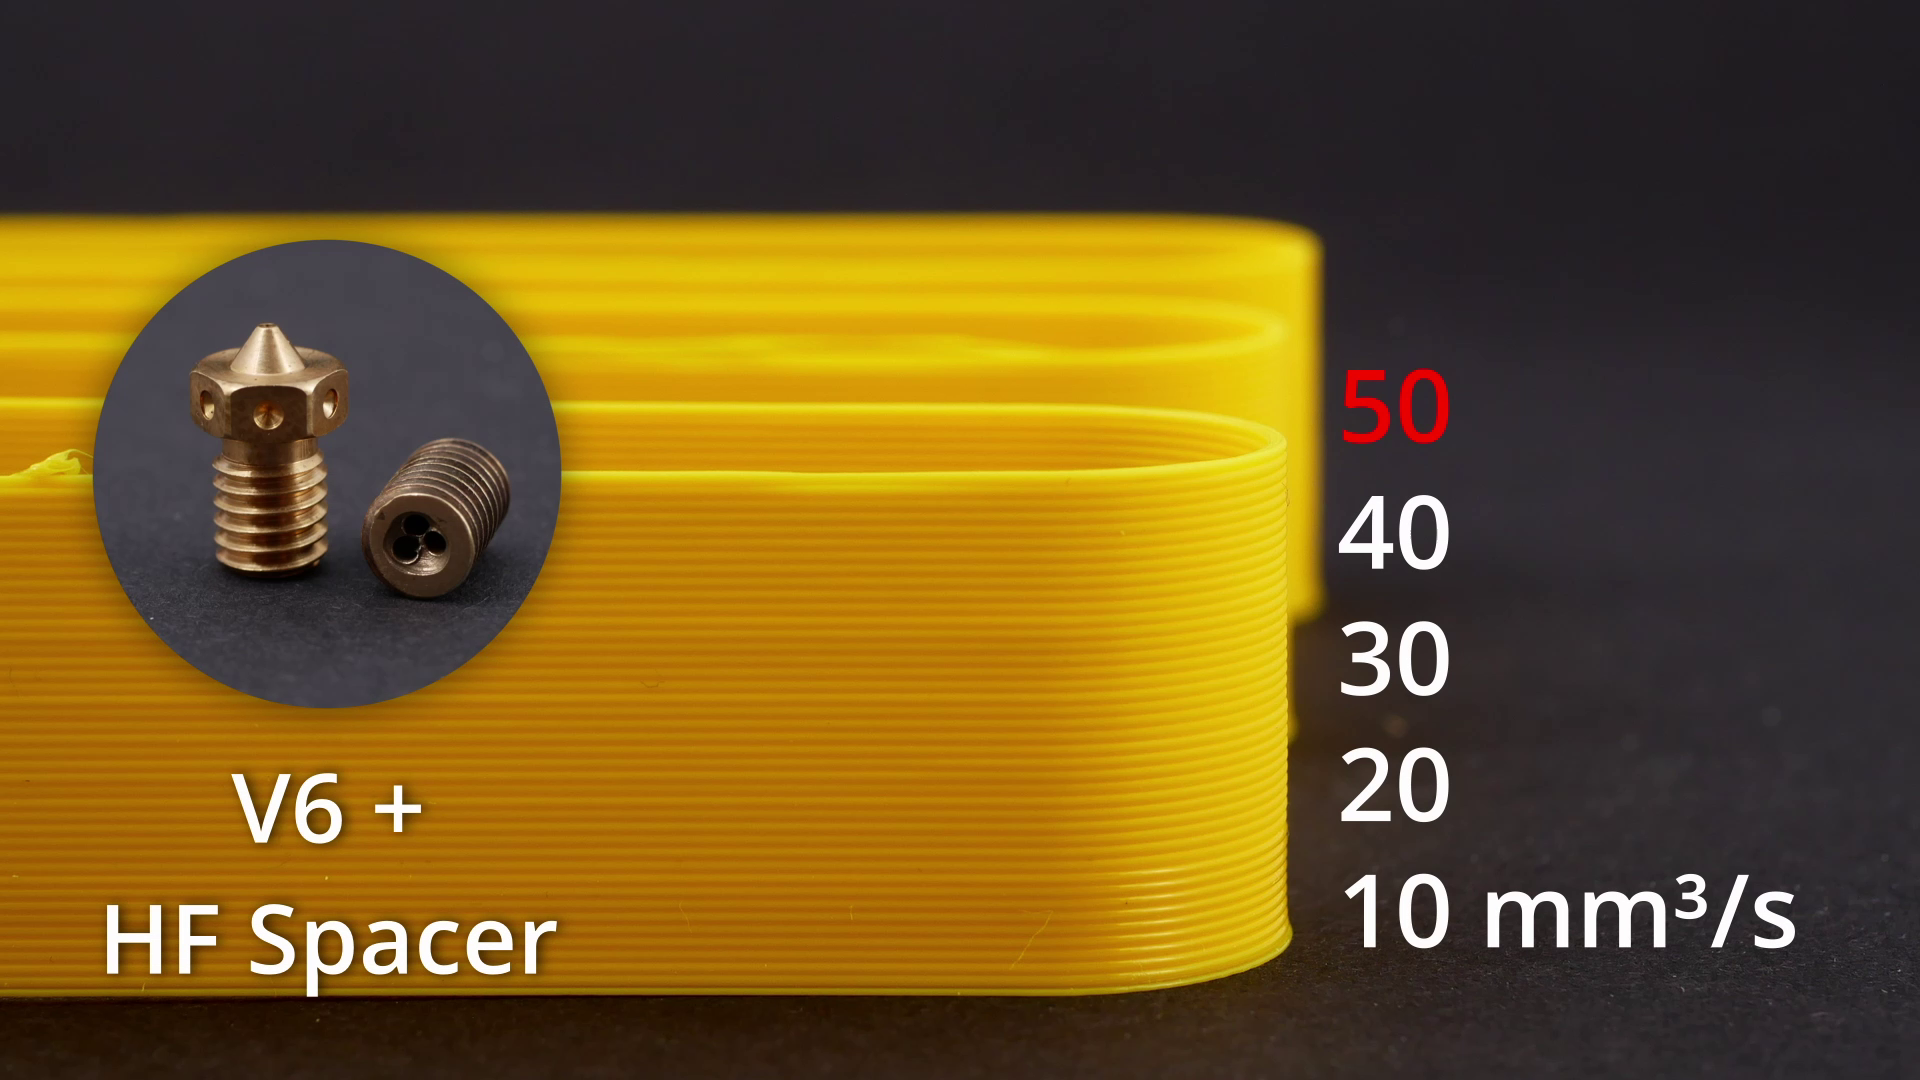
Just because I was curious, I tried leaving away the CHT nozzle and only mounted our high flow adapter and a regular nozzle onto my Volcano. Interestingly the results were very similar to the one with CHT nozzle. During the extrusion test, it did a great job up to 40 mm³/s but then totally failed because the filament completely stripped. This shows that you might not need both a CHT and a high flow spacer. If you only make yourself a high flow adapter, you could get almost similar performance as with the CHT.

Extrusion test results
Before we crown the new king of high-flow combinations, let’s quickly take a look at one last but very important point. The attentive viewer might have noticed that some combinations under-extruded more but performed better during real printing. Let’s exaggerate that in an example. If one combination would under-extrude 50% at 40 mm³/s, we would, in reality, only melt 20 mm³/s and therefore perform way worse than we think. Comparing that in the print test to a combination that only slightly under extrudes at 40 mm³/s would be unfair. So we can adjust the demanded flow rate by the amount of under extrusion to get the real flow rate. This changes the picture dramatically and shows the real flowrate limit of the different combinations. A normal Volcano goes up to 32, with the high-flow spacer we scratch at 40 mm³/s, and only the combination single bore plus CHT seems unstoppable. But as we’ve seen before, extrusion performance isn’t everything because internal stresses can ruin our prints just as well. I, therefore, printed another set of high-flow test parts, this time in 5 mm³/s increments for better resolution, and also adjusted the flowrate in each of the segments to compensate for under extrusion. Now 30 mm³/s should 30 mm³/s to make the results comparable. As expected, the Volcano nozzle showed first stress marks at 25 mm³/s and later failed due to printing issues. Then came to combination CHT plus simple spacer, which showed warping starting from 35 mm³/s but made it all the way through. In second place came the combination high-flow spacer plus CHT nozzle that only showed tiny inconsistencies at 35 mm³/s but then abruptly failed at 40 because the filament stripped. Somehow the best performance showed the high-flow spacer plus a regular V6 nozzle that only showed small flaws at 40 mm³/s but then also abruptly failed at 45.
Everything was better than just a regular nozzle. The CHT plus single-bore spacer seems the most reliable because it didn’t strip the filament but might cause more curling on overhangs. The high-flow adapter performed great regardless of the nozzle that I used. I just think that the flow resistance is a bit high due to its current shape so that at some point, it just gets blocked and therefore makes the filament strip. Still, if we also include the CHT nozzle on a standard length hotend, the gain isn’t as high as one could think. That’s why I still stand by my statement that the CHT nozzle made the advantage of many high-flow hotends insignificant.

True volumetric flow rates
So, who is the new king, and is there even one? Bondtechs CHT is still right at the top but I honestly think that the high flow spacer in combination with the longer volcano hotend might put it’s position in danger. If we further improve the design of this adapter to decrease flow resistance and improve the ease of manufacturing, we might be on to something! So my suggestion if you want to melt a lot of material quickly: If you have a normal hotend buy a CHT nozzle. If you have a Volcano I’d suggest buying a CHT and combining it with a simple adapter. If you want similar performance and don’t want to buy a CHT nozzle, try to machine a high-flow adapter and just use a regular V6 nozzle. But what do you think? Let me know your thoughts and ideas down in the comments!

Volcano Spacers
*NOTE: Some of the links you find on this page are Affiliate links that help to support my work.