How to set Extruder Tension?
Extruder tension is something almost everyone who has been dealing with 3D printing was already confronted with, but almost nobody really knows how to handle it properly. Even if we look at manuals, they often just say to adjust it to the middle mark or a specific distance from the extruder body and then adjust it to your liking. I honestly didn’t bother in the past to tune or calibrate the tension simply because I always felt that it didn’t have a huge impact on my parts. But there is actually more to it, and I, therefore, tested the effect of extruder tension on a wide variety of extruders so that you will know after this video what you need to look out for! Since I can’t test any extruder and material combination, I’d be super happy if you shared your experience on that topic in the comments so that others can learn. Do you ever touch this setting, and if you do, how and why do you adjust it?
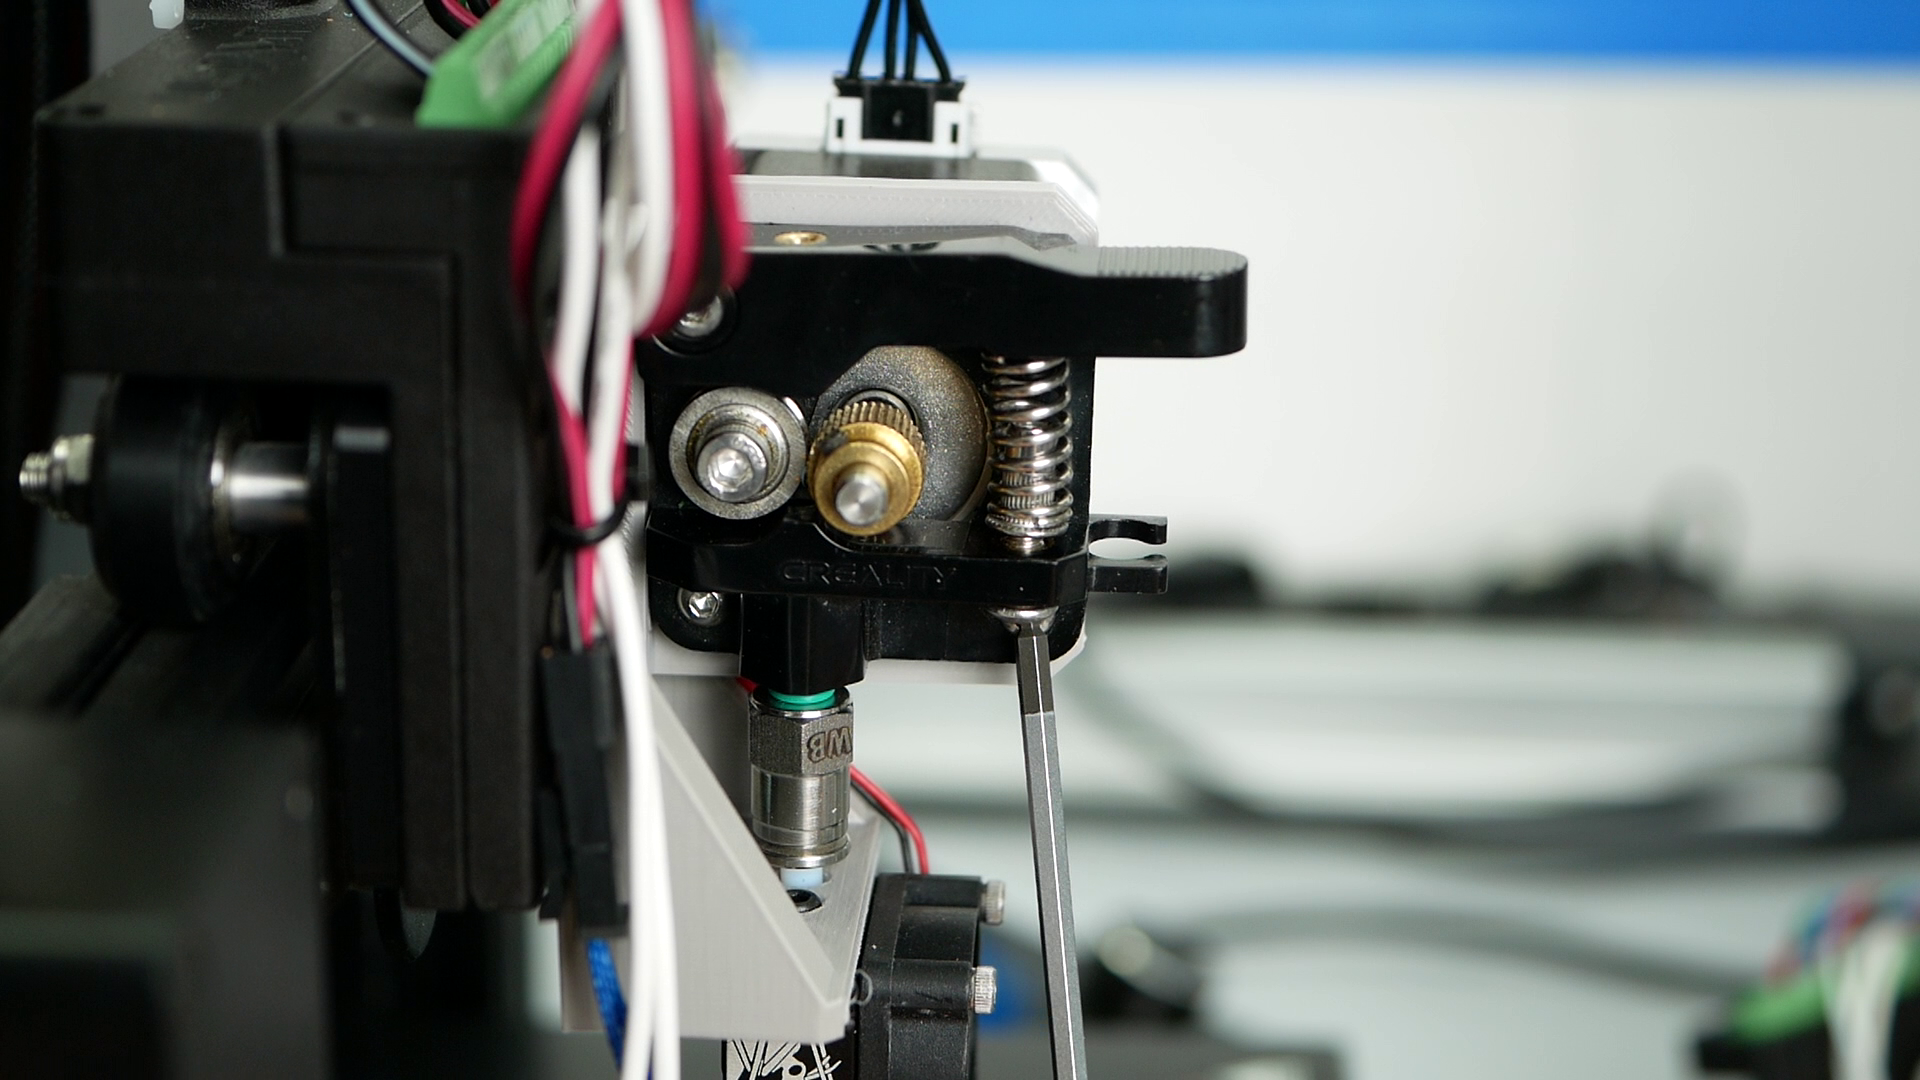
Setting the Extruder Tension on an Ender-3 Pro Feeder
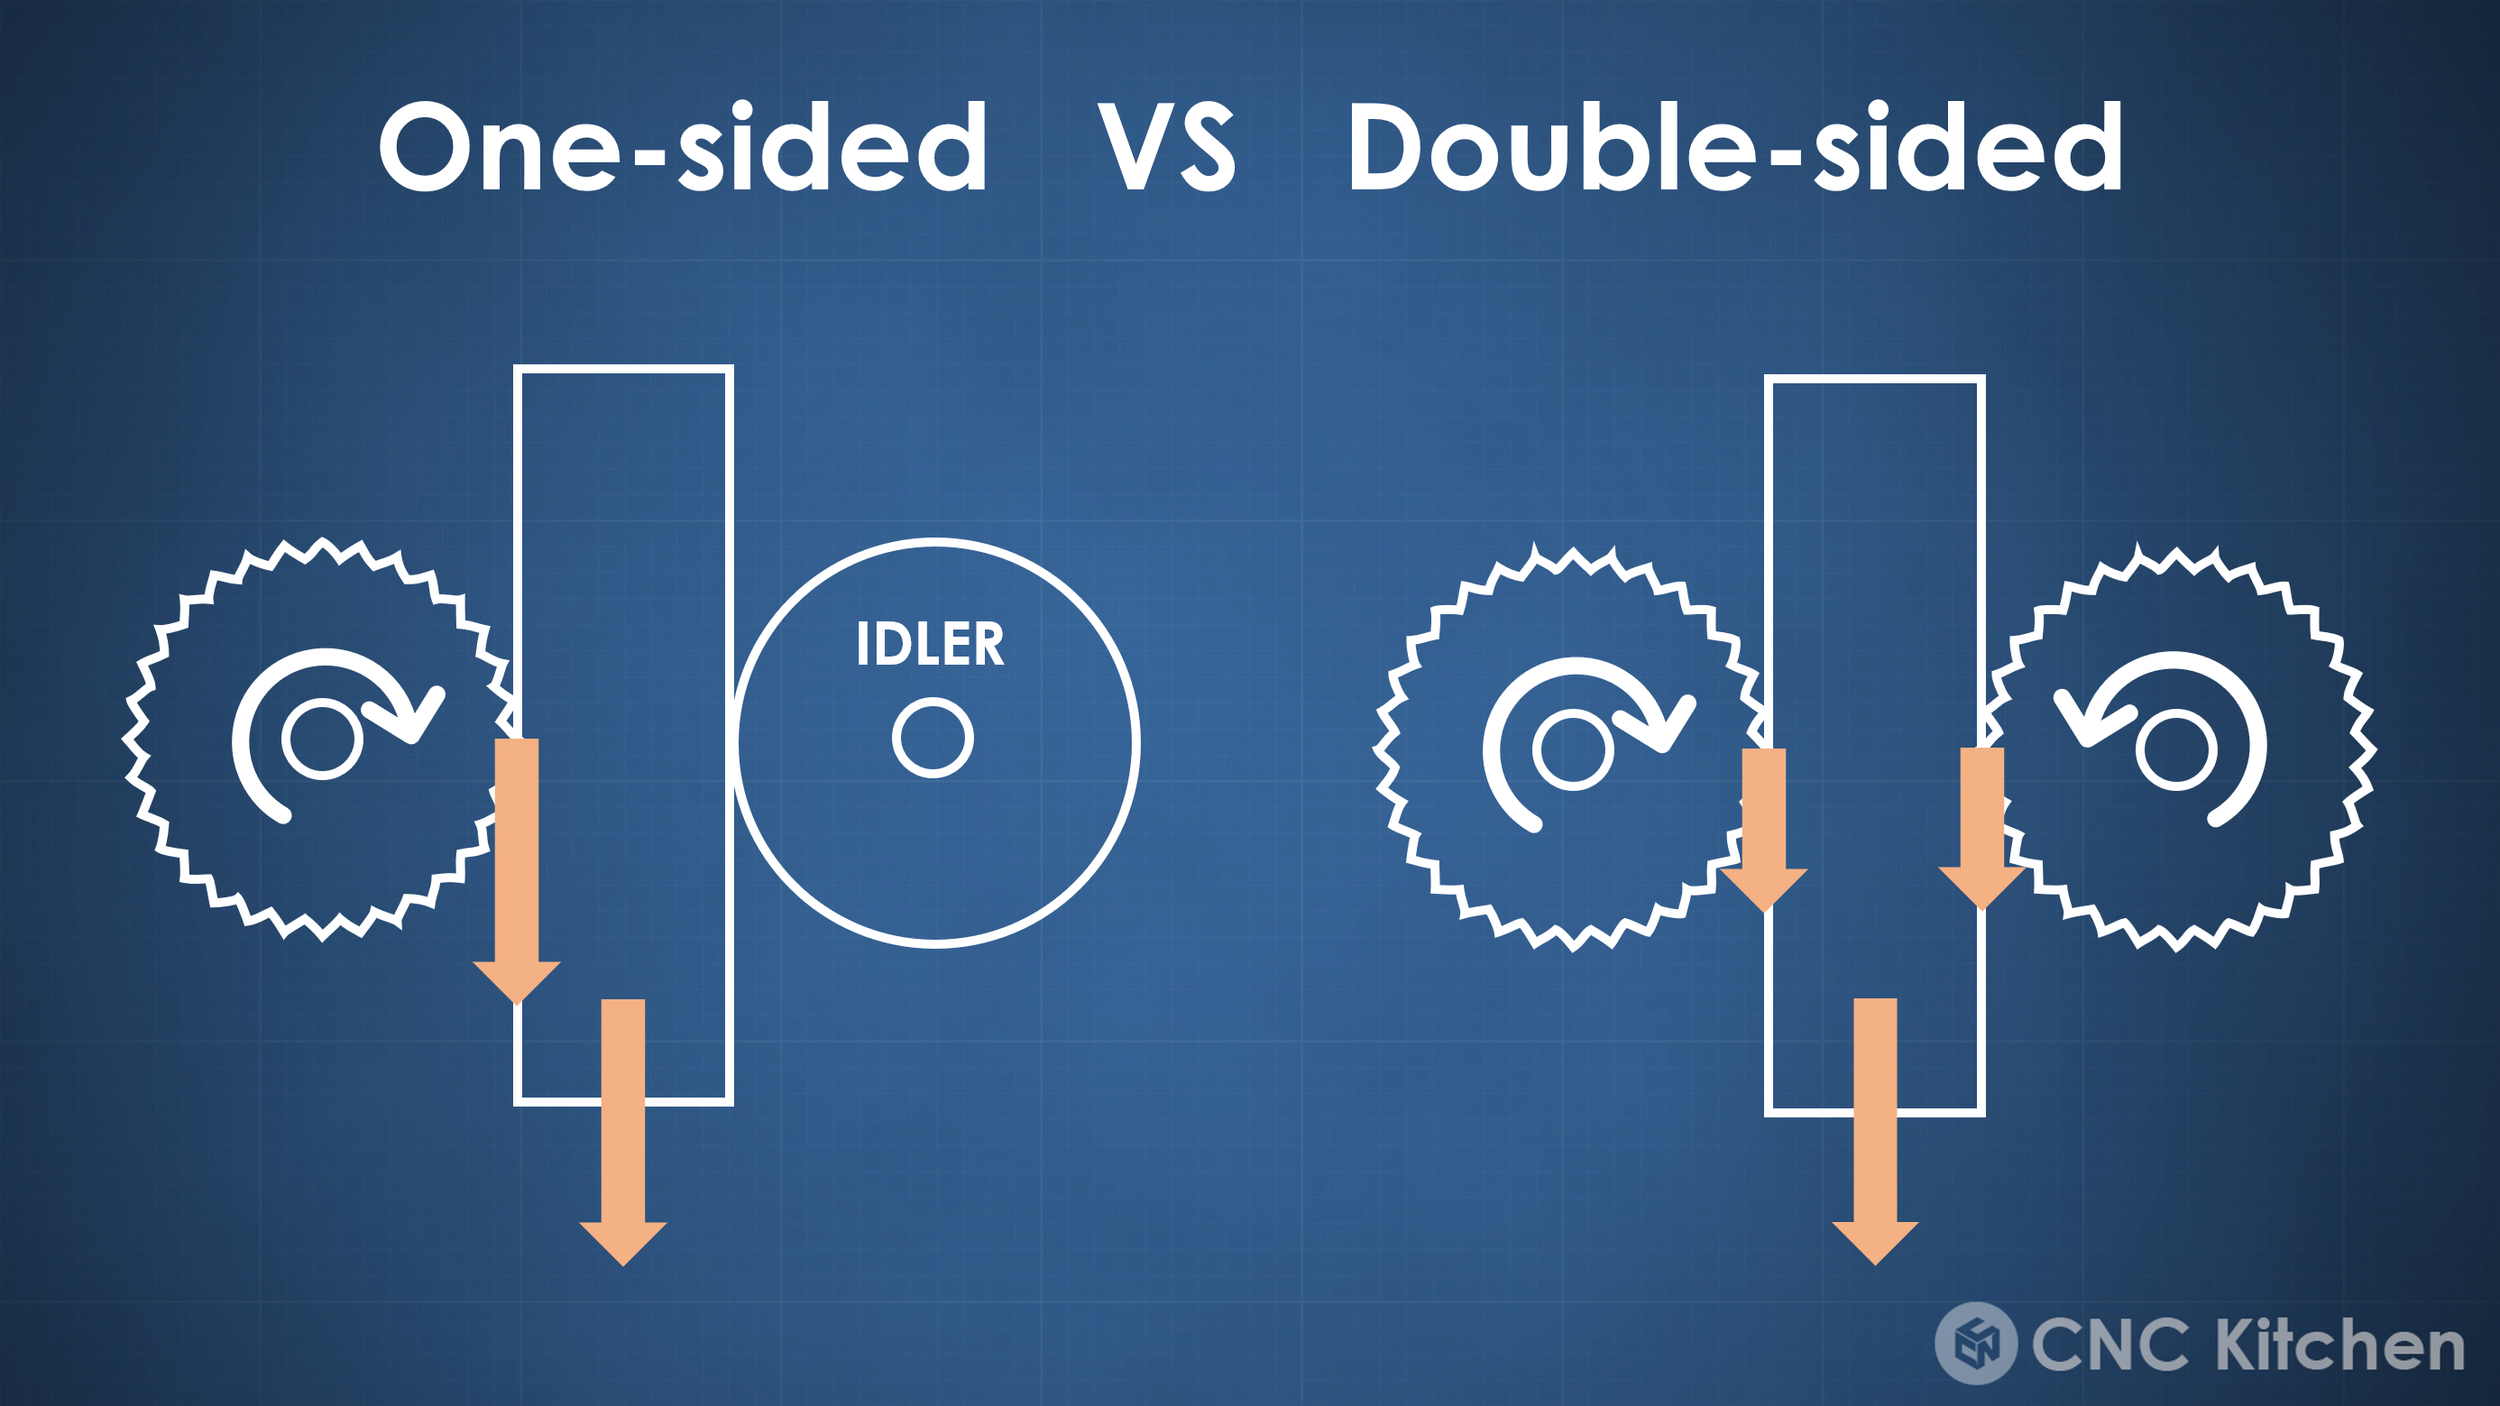
On most filament-based 3D printers, the material gets pushed into the hot nozzle by a set of gears that grip into the material and push it forward. There are two variations. The simplest method is just having one driven gear on one side and one freely rotating idler on the other side. Over the last years, dual drive systems have become more and more established where you have gears on both sides of the filament that pushes it forward. The idea of a dual-drive system is that you can exert more force onto the material to feed filament more quickly and avoid stripping it because every side only needs to push with half the force. In order to transmit force onto the material, the gear needs to get pushed onto the filament so that the teeth grip into it. A spring usually generates that force that you can set to a specific pretension via a screw. But how much force do you need that an extrusion system properly works?
Let’s look at two extremes. First – not enough tension. In this case, the teeth of the gears just barely dig into the filament. This way, only little force can be transmitted via positive engagement, and most of it will come from friction between the gear and the material. This causes grinding shows in grooves on the material.
On the other hand, the filament literally gets crushed if you apply too much pressure. This doesn’t only deform the material and makes it harder to feed. Crushing, so permanent, plastic deformation takes a lot of the motor’s energy, and you, therefore, lose power to convey the material forward. Additionally, you’ll create more friction in the bearings and might even break your idler arm if the pretension is too high! Ideal pretension in most cases means that you have some indentation of the extruder gears on your filament so that enough torque can be transferred but not so much that you crush the material and waste energy at the extruder and make the deformed material harder to feed.

Too much pretension
We already touched the first of three failure modes of an extruder with grinding filament. Grinding happens if the teeth don’t dig deep enough into the material and basically just slip over the surface and shave away the filament. However, grinding can also happen if the extruder is too strong and at a jam simply shears away the material.

Grinding marks on filament
If your extruder is not strong enough to push the material forward or to shear away the material, it will skip. Skipping means that the stepper motor loses a step. I usually paint a small line on the motor shaft to quickly see if the extruder is skipping because that’s when the shaft doesn’t turn continuously anymore. When only the filament jumps around, but the shaft turns, it usually means grinding.
In most you want a motor that skips before it grinds on the filament. Why? Because when the extruder skips, you will get an inconsistent flow for a bit, but there is a chance that your print recovers. If your extruder gears severely grind, it’s hard to recover because the more material they grind away, the less grip you will have – plus, the ground away material will clog your extruder gears, making it even harder to grip into filament.
Finally, there is material buckling which usually happens with flexible materials. Here the column of filament buckles away under the load, and when the filament path is not perfectly constrained, it will find a way to get entangled in the extruder gears. Everyone who has already printed with flexibles will know that phenomenon, which usually happens when printing too fast. Printer manuals will often tell you to lower extruder tension when printing with these materials. Even though one would think that this is due to the flexibility of the material and not squishing it too much, another reason might be a fail-save feature. See, with lower tension on the gears, you limit the maximum force you can apply onto the filament. So before the filament starts buckling, it grinds and under extrudes a little. Due to the flexibility of TPU the teeth usually don’t really bite into the filament so grinding often means just that the gears are slipping but not really chewing away from the filament. It’s more acceptable for a user if you have some under-extrusion on a TPU part rather than a complete print that fails because the filament buckled.
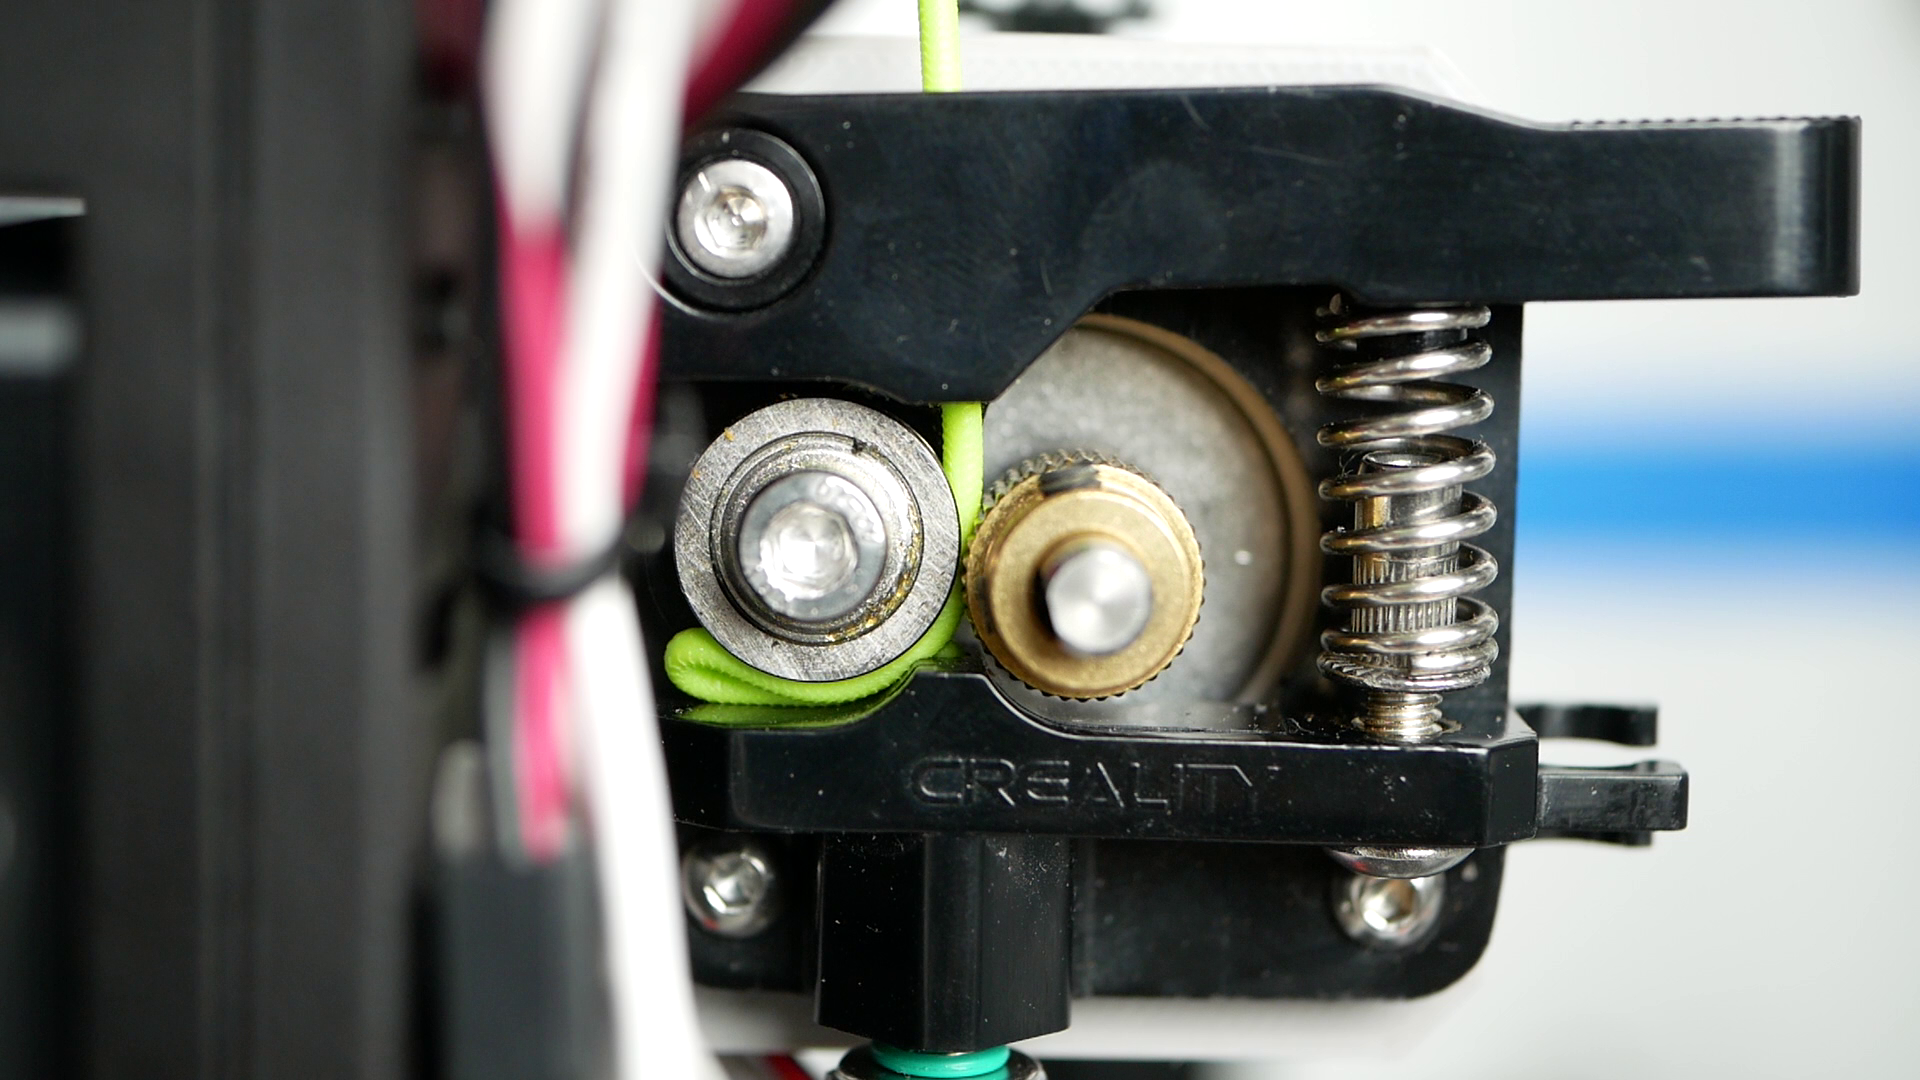
TPU Filament Pushed to the side
In terms of printing quality you want a feeding force as constant as possible. This means that too little pretension is bad because that can make the filament grind. When it’s too high you severely deform the material which can make extrusions inconsistent, waste energy of the feeder and cause skipping. You can either find your sweet-spot with a bit trial and error or by doing some extrusion tests, where you’re looking for a pretension setting, that gives you very consistent results over a broad range of flows.
So which pretension setting gives us consistent flows and the best hotend performance? I’ve done tests over the whole adjustment range of the most common extruders. I tested Prusas MK3, which uses Bondtech gears, and that you also find in many of the BMG clones. Then I tested the typical one-sided Ender-3 Extruder, E3Ds Hemera extruder, the OmniaDrop, and Bondtechs new LGX, which is special because instead of pretension, the LGX uses fixed distance gears which is something I’ve never worked with before. I did my tests with regular DasFilament PLA. Of course, other materials behave slightly differently. Still, many say the hard and brittle nature with a low temperature-resistance makes PLA one of the more challenging materials to tune, and the overall results will be generally comparable. I did a ton of flow tests with each of the extruders, from slow extrusion speeds up to their limits to simulate increasing extrusion forces. After each test, I cleaned the gears, adjusted the pretension from the lowest to the highest setting, and plotted the achieved flow rates.


Let’s start with my Prusa MK3S and its Bondtech BMG gears. On the Prusa you adjust the pretension with an M3 screw. The lowest setting was when the screw just cleared the nut on the other side. The maximum setting was eight more turns in, which is 4 mm of travel. On the lowest setting, I got fairly constant extrusion up to 8 mm³/s and then more and more under extrusion due to grinding. 2 turns in still wasn’t perfect but definitely better. Interestingly, all other pretension levels resulted in the same performance. Once the teeth properly bite into the filament, the system is very robust and doesn’t crush PLA filament.

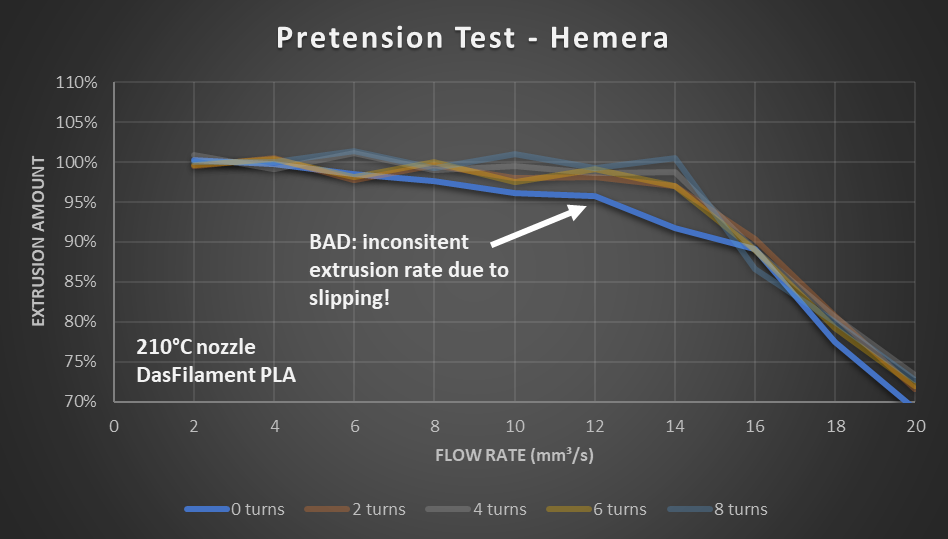
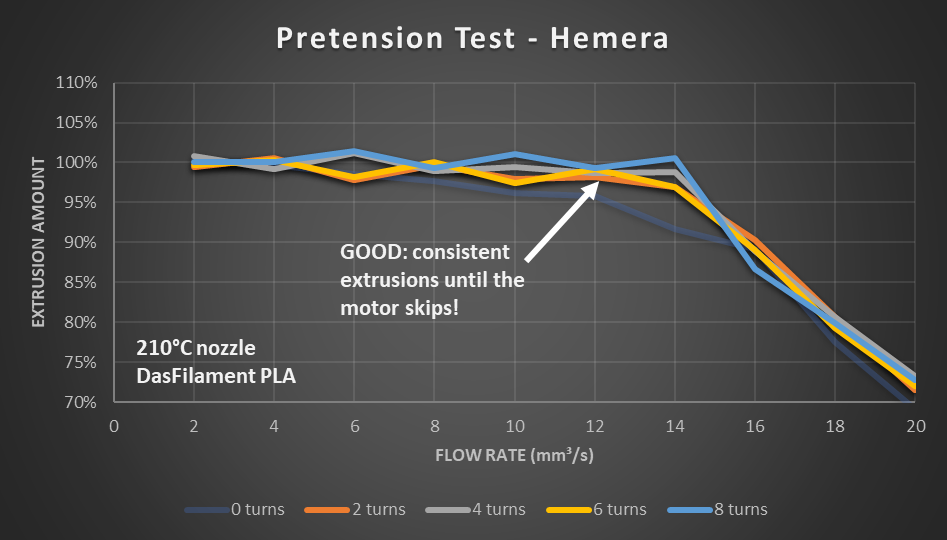
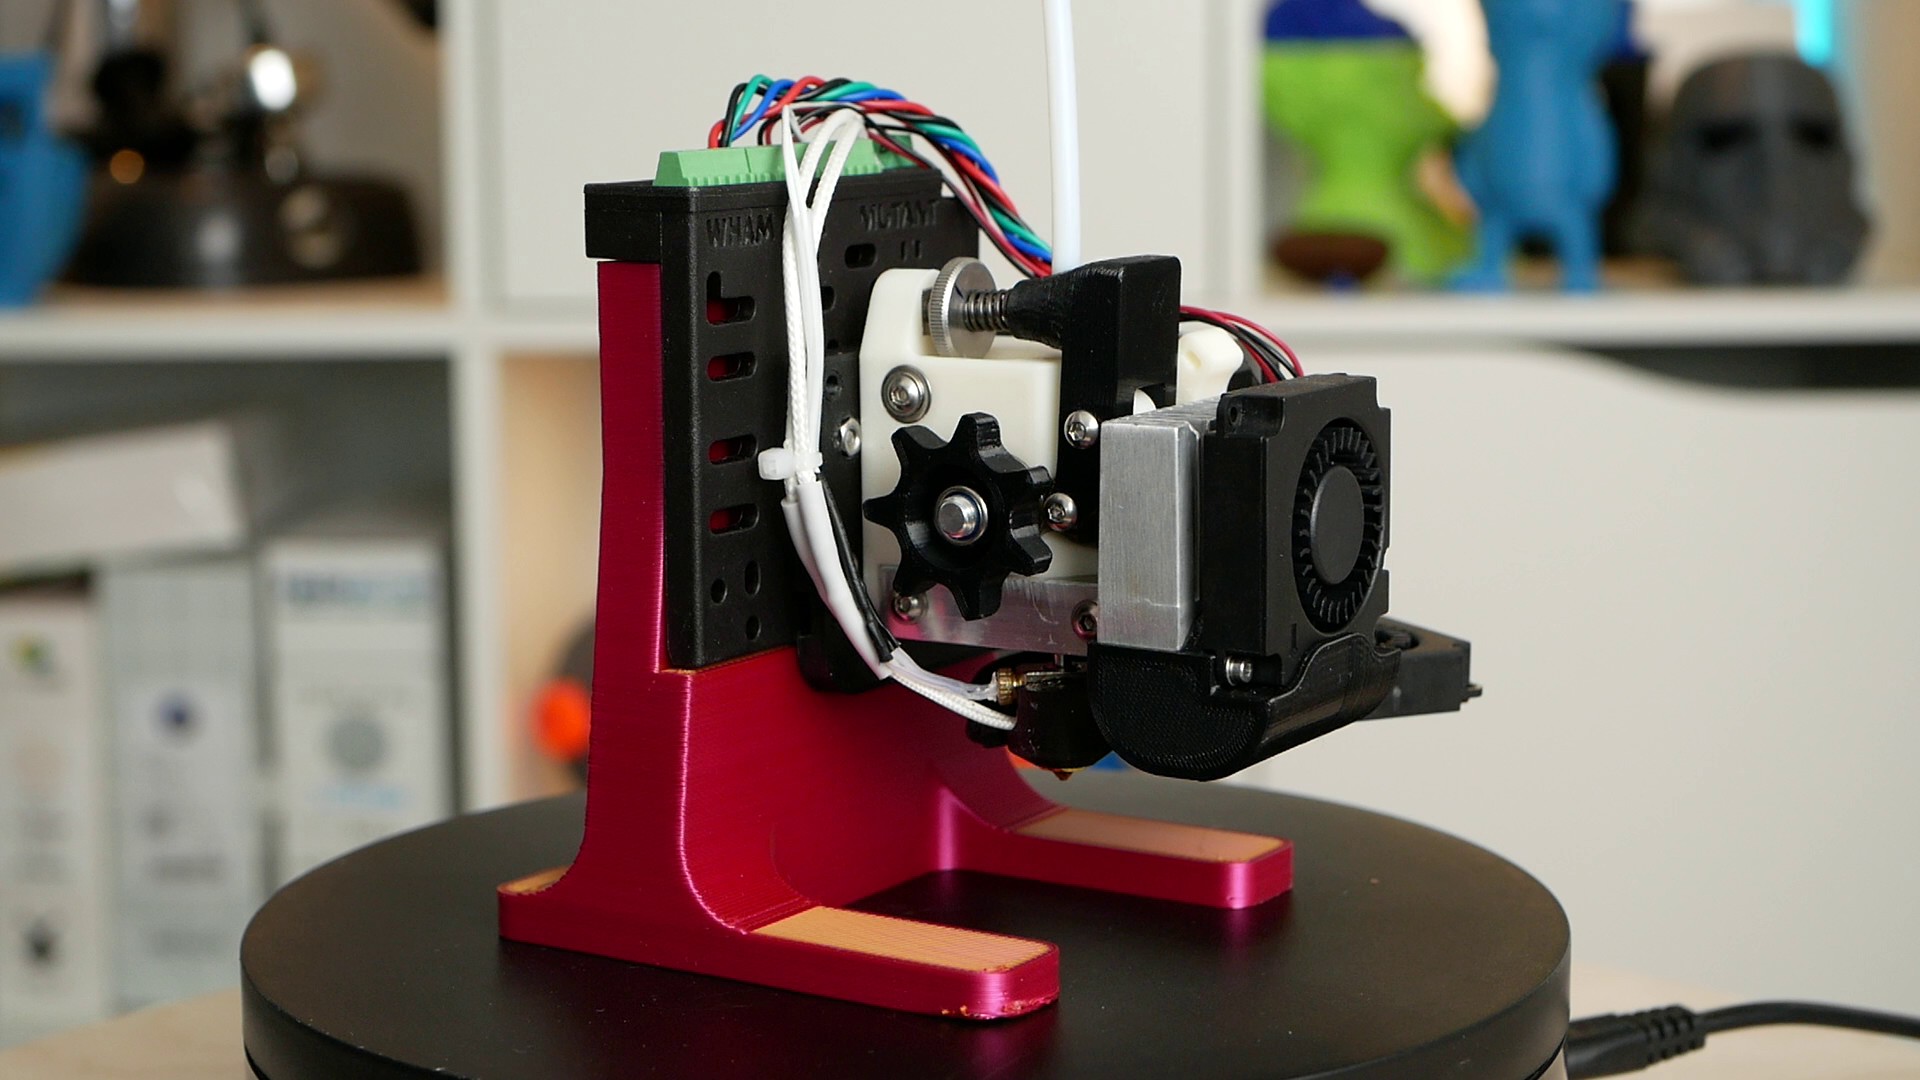
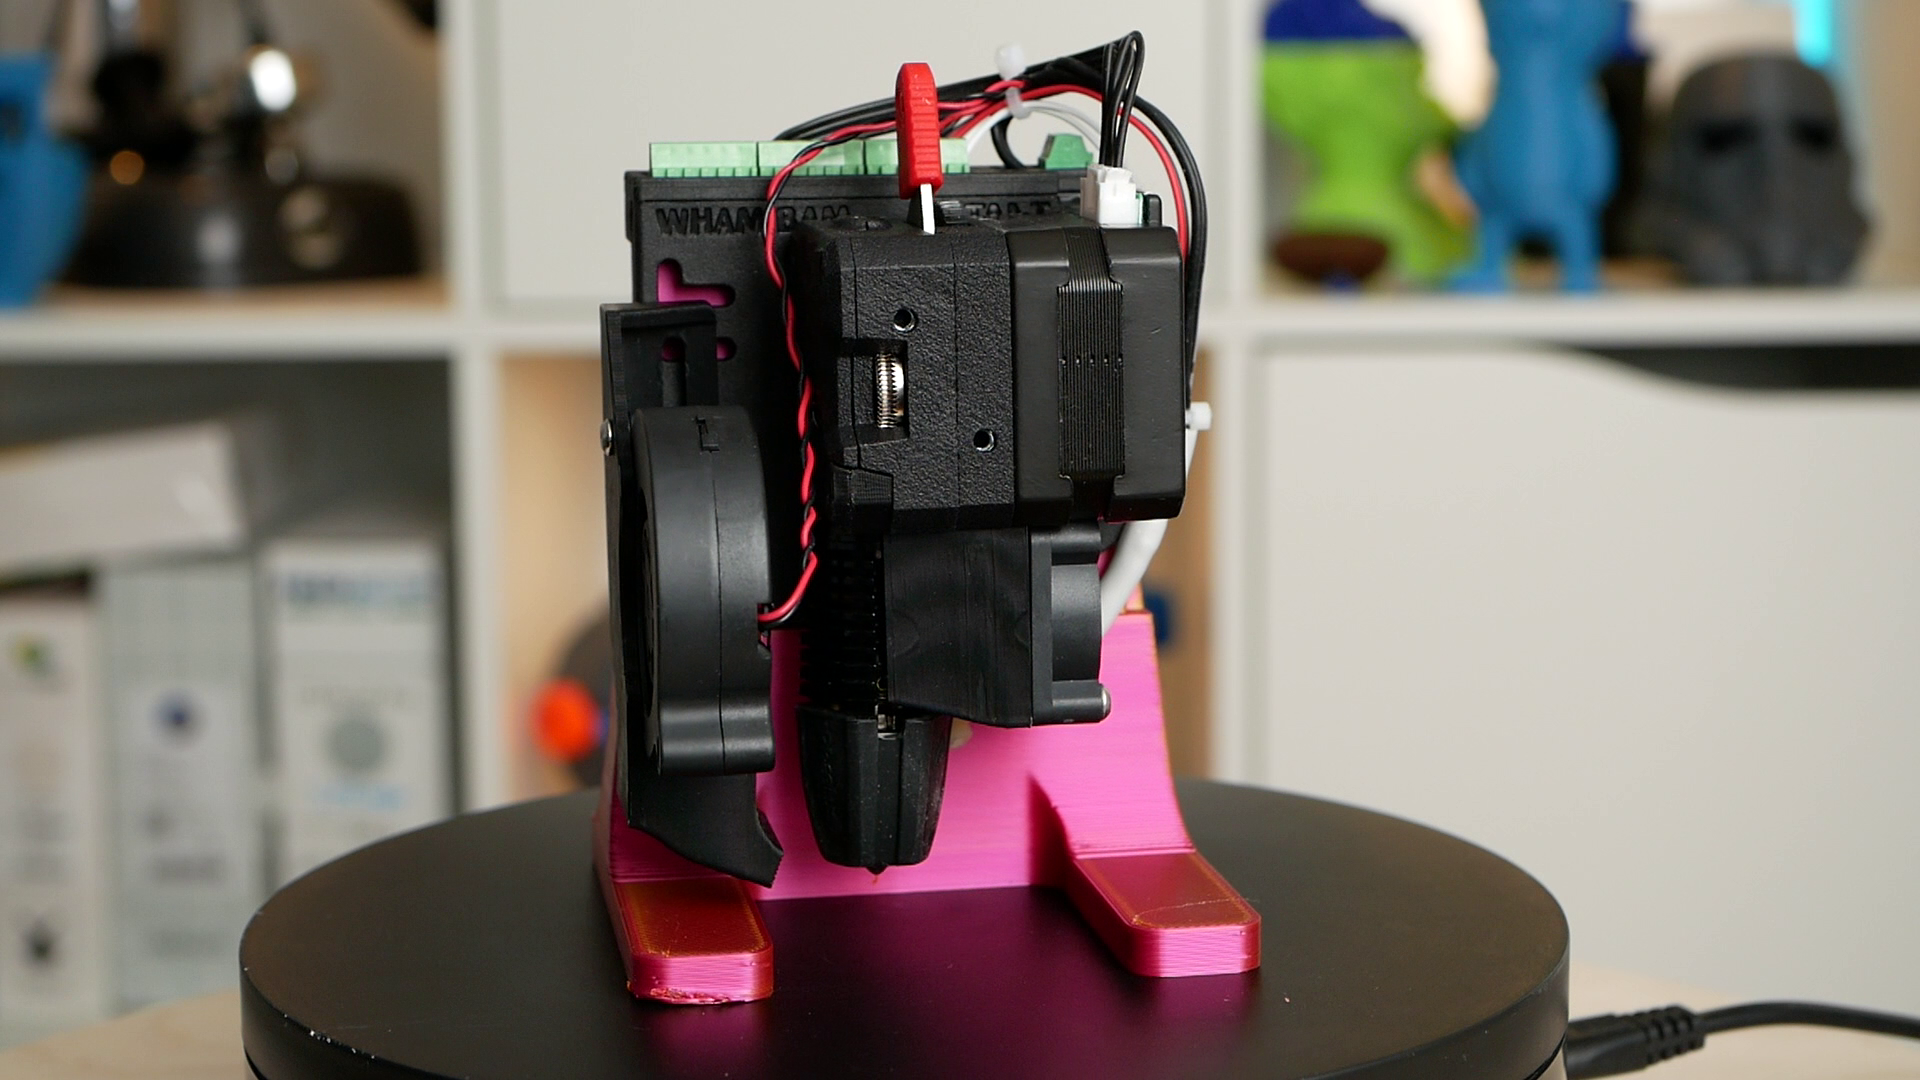
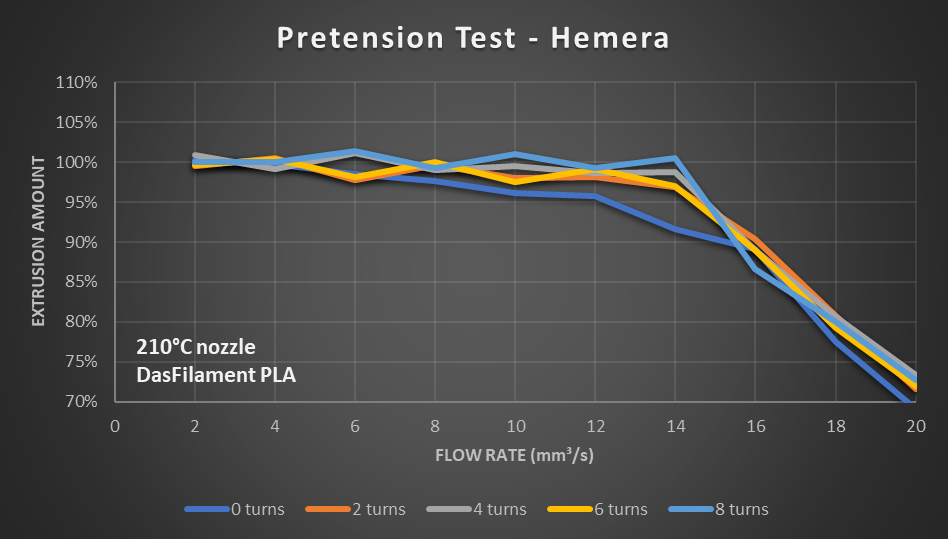
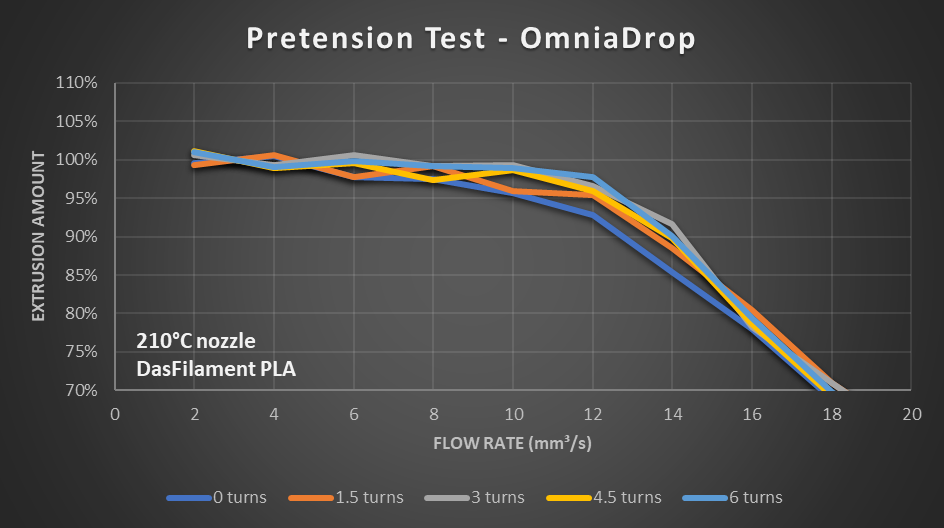
The Hemera and the OmniaDrop extruder behaved very similarly, with slightly lower performance levels at the lowest setting but then very constant extrusion values if you slightly increase the pretension.
Before we take a look at the probably most common extruder used on millions of Creality and Ender-Style printers, lets look at Bondtechs LGX. Here you don’t adjust the tension on the filament but the gap between the two extruder gears.

Bondtech LGX mechanism
The gears are disengaged for loading and unloading material in the first lever position. Setting 1 is where the gears are the furthest apart from each other, recommended for PLA and all other non-flexible materials, Settings 2 to 5, where the gap constantly decreases for increasingly soft materials. In setting 1, I got really consistent results over a vast flow range until the extruder started skipping. Setting 2 still was good, with a slightly worse performance at higher flows. Anything more, and the results were devastating. When we look at the filament, we can understand why this is the case. The lower settings nicely indent the teeth into the part. The closer we bring the gears together, the more they bite into the filament until they finally almost chop and severely deform it, which can be nicely seen in the whitening marks when feeding ABS. The stepper motor uses most of its torque to deform the material and therefore struggles to push it forward, which shows what too much pretension can result in.

Flow Test Results: Bondtech LGX
Let’s finally look at the probably most widespread extruder in desktop 3D printing – the one of the Ender-3. The old ones simply had a lever that pushed the idler onto the filament without any adjustment, though you can increase the spring tension by putting in some 3D printed spacers. Mine that I stole from my Ender-3 V2 and under which I strapped a Mosquito Magnum on my testbench has an adjustment screw that lifts a cap and allows a bit of variation of the pretension. The flow test results were very interesting and worth all the efforts. Here I got fairly similar flow performance over the whole adjustment range up to the point where the motor started skipping and the dip starts. At these higher flows the underextrusion increased the higher the pretension was. By removing the cap to futher decrease pressure I was even able to improve the performance more, which goes along with some of the comments I found online where people solved their extrusion issues by lowering and not increasing the pretension on their Ender extruders. So keep that in mind and if you have problems try both increasing and lowering the tension to find your sweetspot!

Flow test results: Ender-3 Pro Feeder
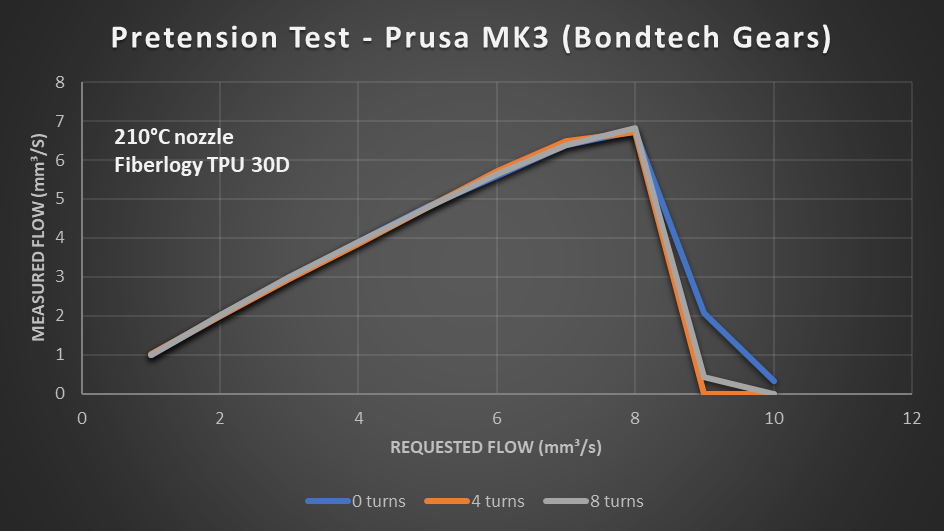
Let’s also take a quick look at flexibles to see if we really get better results for lower tension values. I tested some soft 30D TPU from Fiberlogy with the Ender extruder and the Prusa that uses the Bondtech gears. The Ender extruder didn’t perform very well because of the barely constrained filament path but I had slightly better performance with low pretension because the gears started grinding before they buckled the material and pushed it out to the side. On the Prusa, the TPU results were very similar regardless of the extruder pretension. The material always started buckling at 9 mm³/s with slightly better performance at the lowest pretension.

So after all of this how should you handle extruder pretension? If you don’t have any problems, leave it as it is. If you see symptoms like a grinding or skipping extruder check your filament path at first because I promise in 95% of cases, the problem comes after the extruder! So, is your Bowden tube okay? Are your extruder gears clean and not worn down? Is your nozzle not blocked? Is your hotend fan working and preventing heat creep? Is your nozzle temperature high enough? Are you printing within the limits of your system? Did you load the right filament? From my experience, all of these points were the cause of extrusion problems in the past, and only in very rare cases have I touched extruder pretension. But if you feel the need for changing that setting, I’d first extrude a bit of filament, pull it out and check the surface. If you don’t or only barely see imprints of your gears, increase the tension. If you see severe deformation instead, reduce it. Soft filaments like ABS, ASA, or Nylons might need a little less, rigid filaments like PLA, or even fiber-reinforced materials a little more. Flexibles shouldn’t be squished too much, and with less tension, you might also have a fail save feature against buckling. Load and extrude some filament at reasonable speeds. I’ve added some test g-codes for that on Printables.com if you don’t know the G-Code commands by heart! Start with the default setting and then significantly decrease or increase it. If your extruder skips, reduce pretension a little; if it grinds, increase it. In my experience, extruder tension is not so touchy that you need to tune it in, to a quarter of a turn of the set screw and all the tests I did here prove this. If all of that doesn’t help, recheck the points I mentioned before and simply feed some filament by hand to feel how much force you need to make sure that it flows easily! And that’s it – I hope this helped you understand a little better when extruder pretension is important and when not so much and how you need to adjust it in the future!