Extrusion System Benchmark Tool for fast Prints
Fast printing profiles seem to be the new hip thing right now, and Chuck from CHEP’s Filament Friday made some really nice tutorials on how to use CURAs new Extra Fast printing profile on your Ender-3, that Ultimaker introduced in their latest release, to print significantly faster.
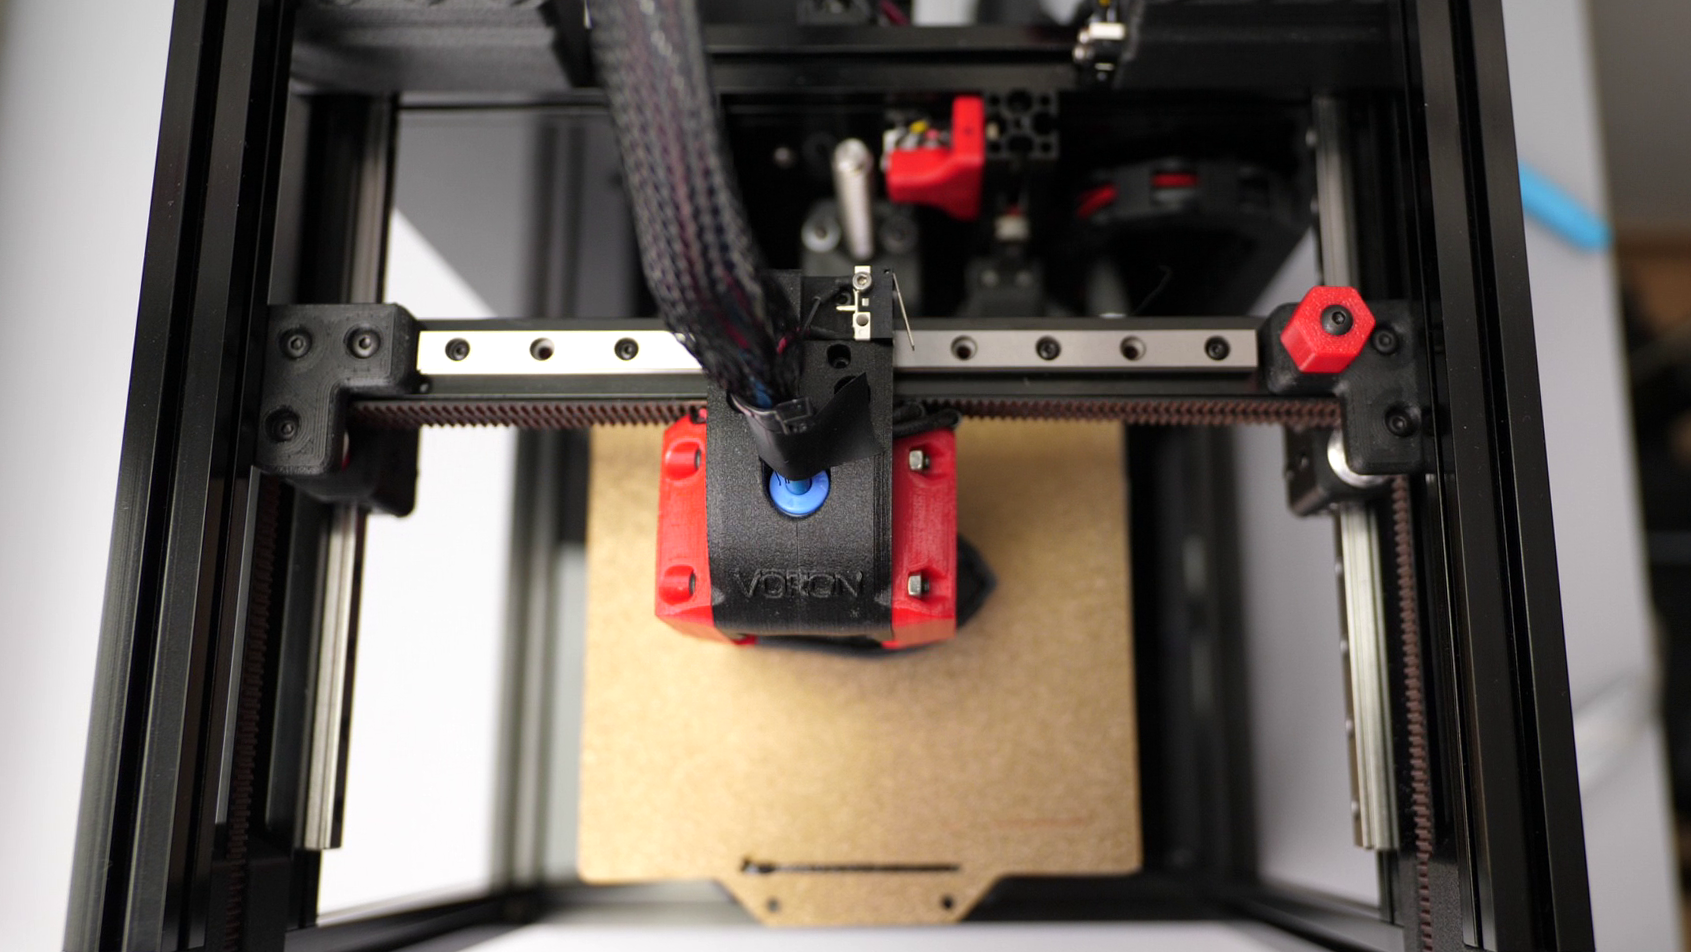
Speed Printing on a Voron 0
But what means printing fast in the first place? Most would probably say that fast printing means moving the printhead as fast as possible, but since many of us only have one of these typical bed slingers like the Ender-3 at our disposal, this seems to be a far-fetched goal. Though printing fast, for me, means printing a model as quickly as possible with still a reasonable quality. And this is something where movement speed is not necessarily the most important thing. Look at this the following way. A part has a certain weight, and you can lay down the filament for it in different ways. Let’s look at the extremes. The typical speedprinting approach is moving your toolhead as fast as possible at relatively thin layer heights and small nozzle sizes so you retain all the details but that requires specialized, light and stiff hardware. The other extreme is printing with thicker layers and bigger nozzles where you also extrude a lot of material but might lose a considerable amount of details. The limiting factor for both methods is something that’s not that often talked about, people don’t consider or they even only rely on data sheets and marketing. This factor is the material flow rate the printer is able to handle.
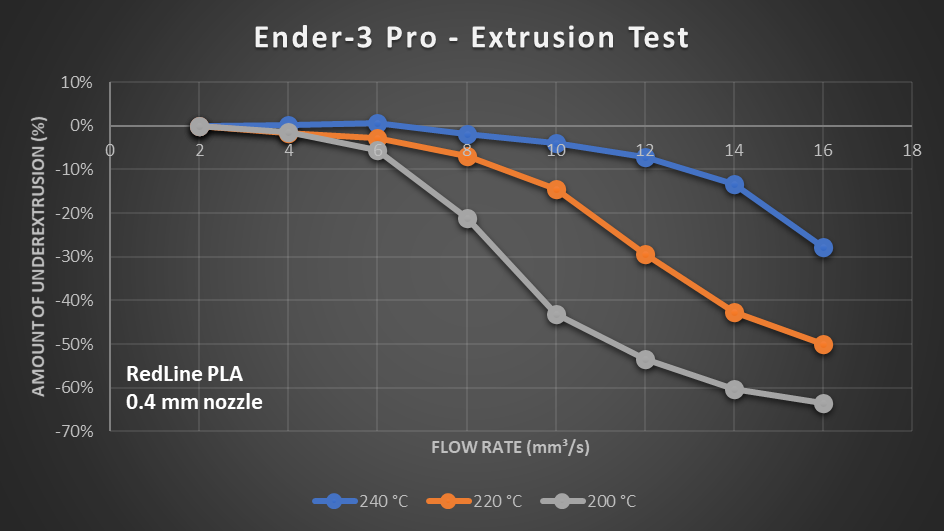
On an ideal printer, and this is what you assume when calibrating your e-steps, the amount of material you tell the printer to feed and how much is really fed are the same. Though as soon as you try to feed more and more material through the nozzle, it gets harder for the hotend to melt all of the material properly, making it less viscous. This and the higher flow resistance create more backpressure, and the extruder gears will slightly start slipping and stripping your filament. This can be nicely shown in graphs like this one that I regularly make. Here we see the flow rate on the x-axis and the amount of expected under-extrusion on the y-axis. This test was done on a basically stock Ender-3 Pro using PLA and a nozzle temperature of 200°C, which is common with many profiles. The thing that’s important here is that the flow remains relatively constant up to 4 mm³/s, slightly drops to around 5% under extrusion at 6 mm³/s, and then just severely plummits after that.

Extrusion Test Result
You can and actually should create these plots yourself if you want to print faster than the standard profiles you usually receive with your machine. They will tell you how fast you can go without creating huge gaps between your top layers or your perimeters. Every printer is different due to wear, tolerances, setup, and especially materials can behave completely differently even though they are both called PLA! In the past, I manually extruded spirals of filament and weighted them one after the other but creating one of these plots sometimes took me an hour or more. Since I’m, on the one hand, lazy but on the other, would like to have as much data as possible, I created a more automated process.

Automated Extrusion Test
Here the printer first purges the already pre-heated material quickly out of the nozzle and then extrudes a blob of material at different flow rates until the print platform is full. Each of the blobs should be made from 200 mm of material, but the faster we feed the filament, the more it slips, and the less plastic will be extruded. When the test is over, I weigh each blob on a milligram scale, which you can get for cheap on Amazon, and plot the weights over the feedrate. Since I need to use different parameters for each printer, hotend, and material, I wrote a small tool that allows me to adjust settings quickly and automatically generate a test G-Code. The tool is currently still written in Visual Basic and part of an Excel sheet, but as soon as I get some feedback from you, I’ll make a small web app out of it, which will be easier to use.
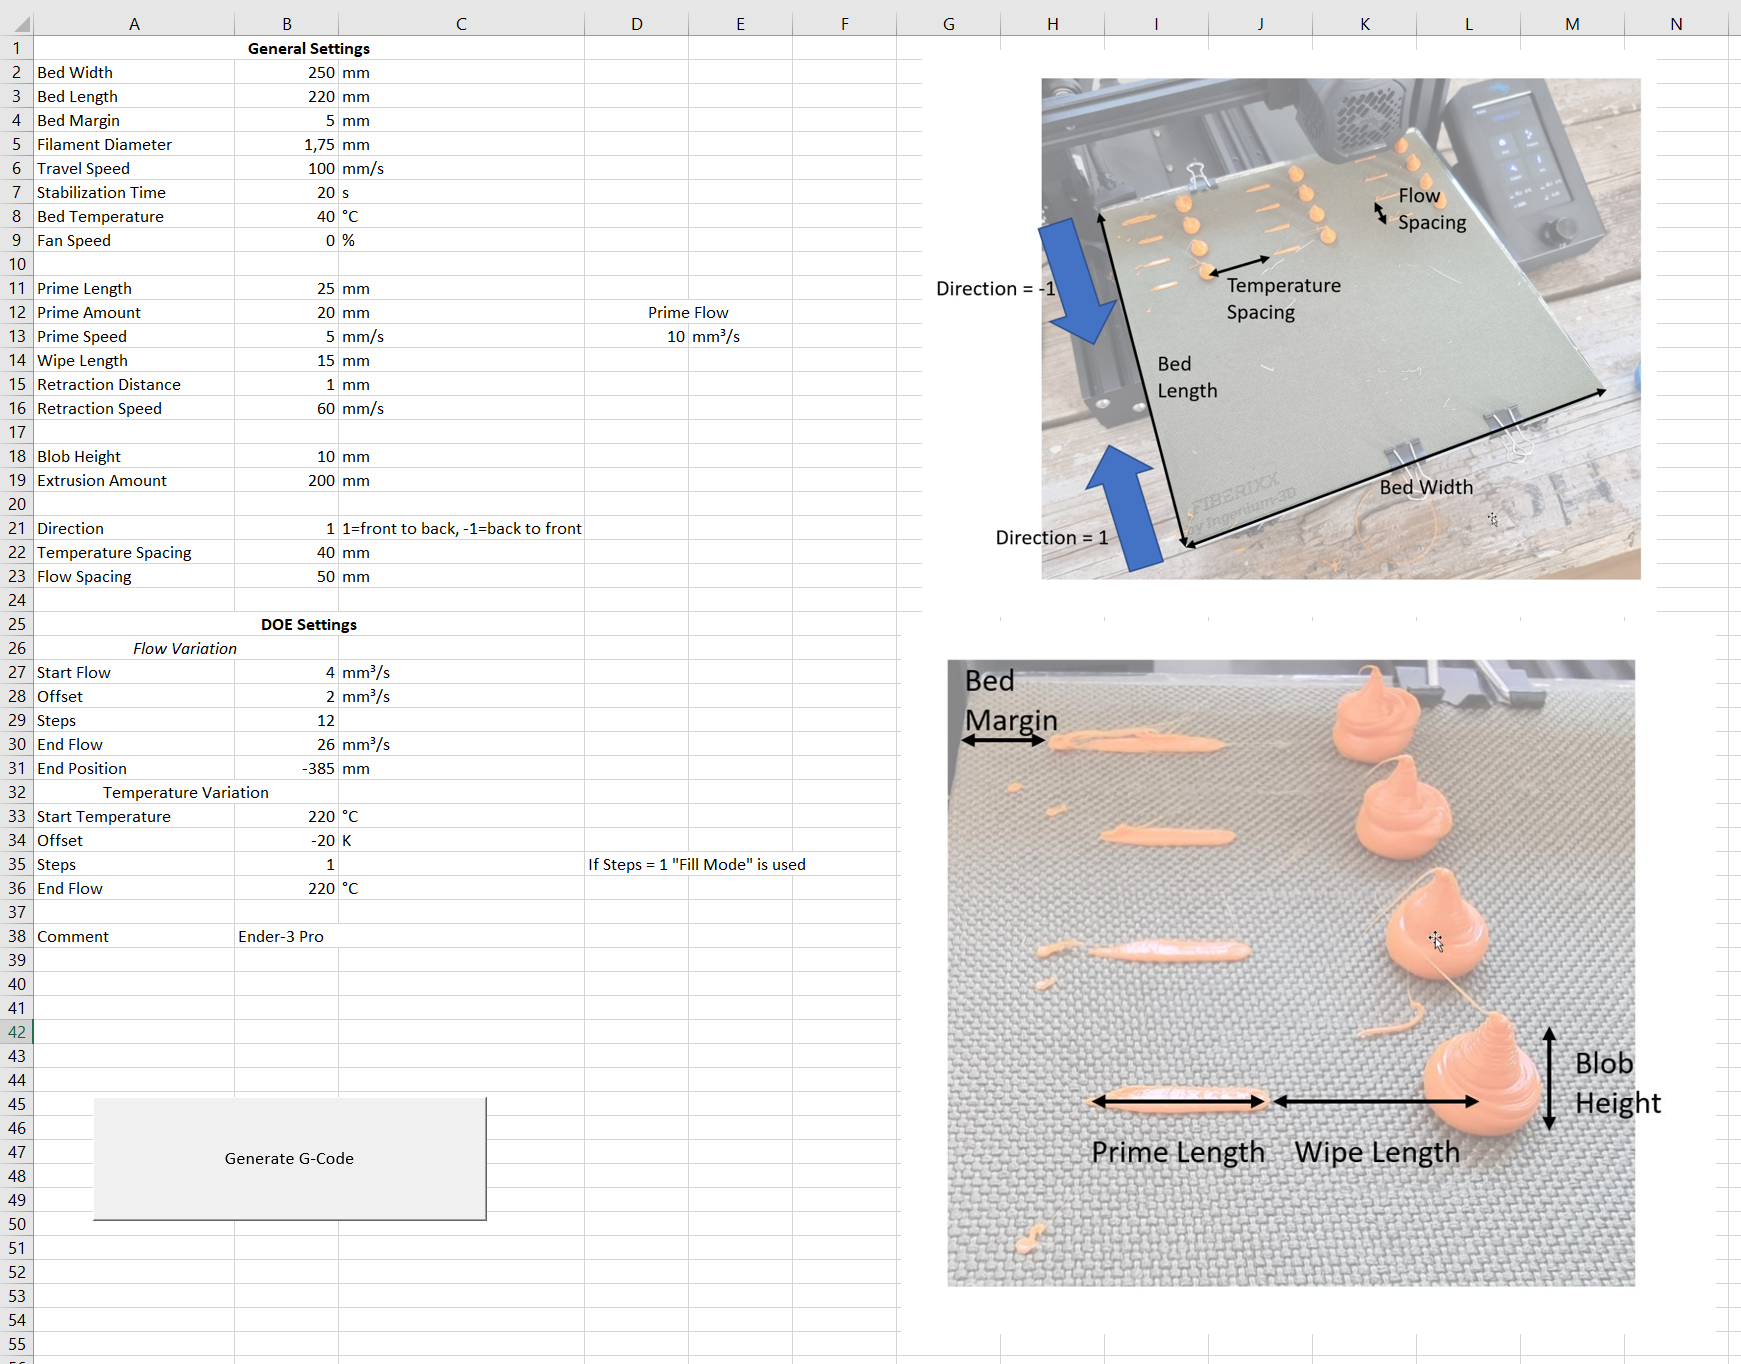
Excel GUI
Download the tool: https://github.com/CNCKitchen/ExtrusionSystemBenchmark
Download sample G-Codes: https://www.printables.com/model/160335-hotened-benchmark-test-g-codes
If you try the current version, please give some feedback on what works, what doesn’t and what else you’d like to see implemented! The current tool is available for download below, and if you either don’t have Excel or don’t want to use Excel sheets with macros in them, I uploaded a bunch of test G-Codes for common printers on Printables.com which if you didn’t know yet is the re-branded version of PrusaPrinters. The amazing thing about this tool is not only the ease of use, but it allows me to show your error bars on my extrusion tests finally and easily create bigger studies. In particular, this is the temperature dependence because the tool allows me to print each column at a different nozzle setting.

Extrusion test with Error Bars
But why is that important? Let’s take a look at PrusaSlicer and CURA, which have the option to visualize the flow rate. Chuck’s extra-fast profile uses two main flow rates. 9 mm³/s for the infill and inner perimeters and around 6 mm³/s for the outer perimeter. If we take a look at our previous graph, my Ender-3 Pro using some RedLine PLA at 200°C is hardly able to feed filament at these flowrates, which shows on the parts because they have gaps between the perimeters and on the top surfaces. So, I did a flow test on the Ender-3 using the same material but at higher temperatures. The difference in flow capability is staggering! Raising the nozzle temperature to 220°C easily lets us print at 8 mm³/s, and 240°C increases it to around 12 mm³/s before dropping off. Scaling the flow rate by the amount of underextrusion finally perfectly shows the capability at different temperatures. 6 mm³/s at 200 °C, 8 at 220 °C and around 12 at 240 °C.
Temperature Dependent Flow

Real Flow
This also shows why just increasing the flow multiplier won’t help close the gaps if you want to print fast. There is a physical limit what your extrusion system can handle. Of course the one of the Ender is rather lowend in that regard and other systems, especially direct ones will perform significantly better at lower temperatures. Still, the point is that flow capability, in my opinion, often gets overlooked in these high-speed profiles or sometimes the potentials aren’t full used. Of course, the printhead needs to be able to move fast, but if your hotend can’t handle the flow, you can tune as much as you want – you’ll always get these under-extrusion artifacts. Simply raising the temperature can increase the throughput capability and help you lay down significantly more material in the same amount of time. You shouldn’t always print that hot because that comes with more stinging, blobs, a higher particle emission, and maybe even material degeneration. Though if your speeds necessitate it, give it a try, and you will be amazed by the results! A quick tip: If you notice that your surface appears matte instead of shiny, that’s usually an indication of too low temperatures!
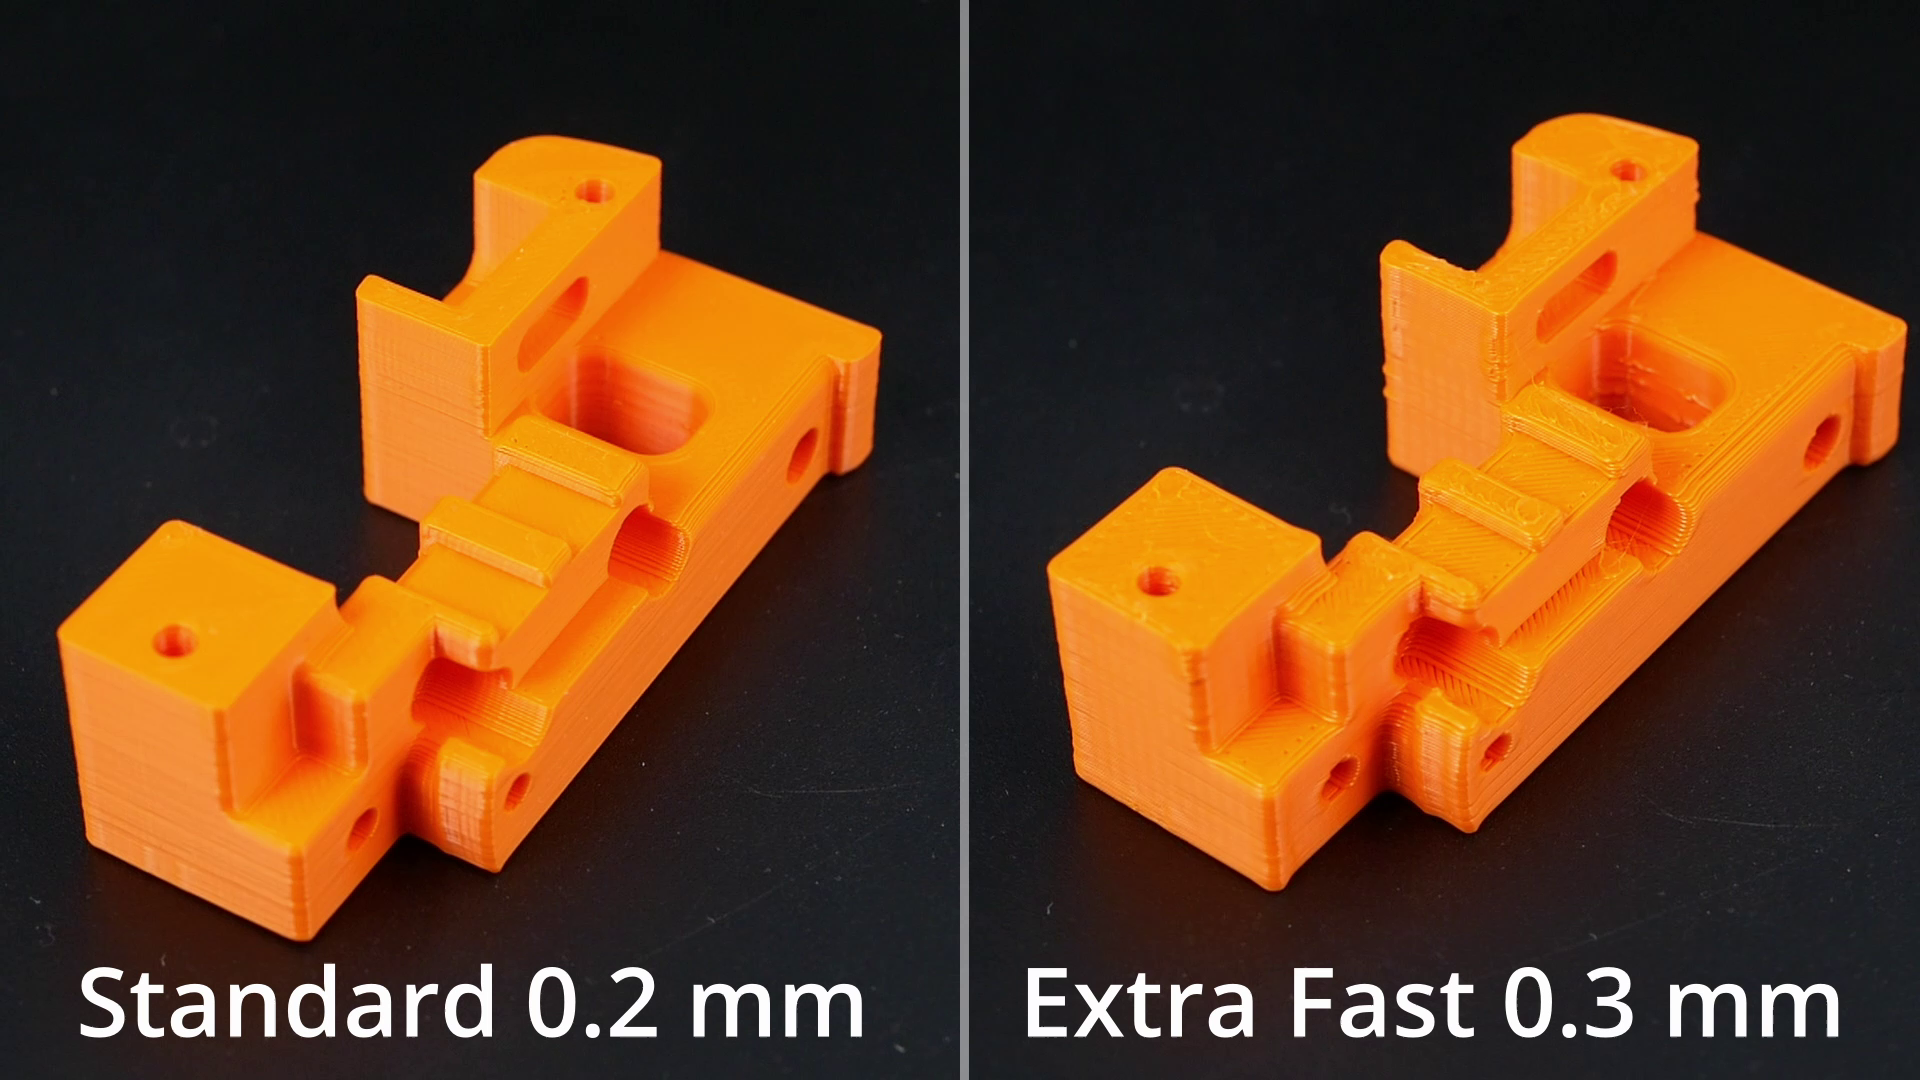
This was all about how you can evaluate how fast you should be able to print, but how do you create a fast printing profile in the first place? If you’re using CURA with any sort of Ender-3 type printer, watch Chuck’s video and download his profile with the additional remark on raising the temps a little if you see under extrusions. I’ll be going over the settings for an Ender-3 in PrusaSlicer instead to reduce the print time of this Voron part that I took as an example from 2 h 12 min to only 51 min! This won’t be a profile for the next worldrecord speedbenchy but a solid selection of settings for a very fast draft quality profile with changes very similar to what the CURAs extra fast profile uses!
I’ll start with the standard 0.2 mm profile with 3 perimeters and 30% infill, which I usually use for functional parts. The most apparent change to speed up a print is increasing the layer height from 0.2 to 0.3 mm. Since the layers are thicker, we can reduce the number of top and bottom ones while retaining the same wall thickness. This scales very well and reduces the time already significantly to 1 h 33 min.
The next parameter is extrusion width, so the width the extruded line has. We can simulate a bigger nozzle by increasing this value to 0.6 mm, which works surprisingly well on a 0.4 mm nozzle. This means that for the same amount of infill, we need to draw fewer lines which is faster. Since we increased the extrusion width and therefore the wall thickness by 50%, we can reduce the number of walls from 3 to 2, which also saves time, and we land at 1 h 12 min. This parameter, of course, will reduce the amount of details the printer is able to resolve, similar to a bigger nozzle. PrusaSlicer and CURA will allow you to tweak the individual thickness of the inner and outer perimeters, which you can use to print with fine details on the outside and increase the thickness on the inside for maximum flow.
Next, of course, come the movement speeds themselves. They are often kept quite low in stock profiles to maximize printing quality. An Ender-3 and many other machines can easily handle 60 mm/s or even more with only slight degeneration in quality. If you like, you can again change the speeds of different features individually. I usually print perimeters a bit slower than the rest for optimal quality. This decreases the print time further to 1 h 3 min.

Severely over-extruded edges
Unfortunately, the quality at this point was horrible, and my PrusaSlicer parts looked way worse than the ones with Chuck’s CURA profile. All the corners were significantly over-extruded, and I had tons of blobs on the surface. I tried to fix that for half a day and was almost about to kill this video until I figured out the problem. We get these over-extruded corners because the printhead needs to decelerate before a corner and then accelerate again. Since a Bowden-extruder is quite a springy system, it will continue extruding material at a constant speed even when the printer decelerates, leading to over-extrusion. Linear advance or pressure advance can reduce that problem. Still, since this feature isn’t activated on a stock Ender-3 and even doesn’t work that well on Bowden systems, we need to reduce the problem differently, and this is getting around the corner as fast as possible. Most would probably try to increase accelerations, but they don’t actually change that much. The important parameter is jerk which describes the maximum instantaneous speed change without the need for accelerating or decelerating. Some think this is fixed in firmware, but you can actually change these values via G-Code commands. CURA does that when activating the acceleration and jerk control. In PrusaSlicer you need to “emit them to G-Code”. Increasing jerks from 8 to 20 mm/s improved the quality significantly, only caused minor ringing but chewed off another 12 minutes from our print time, resulting in a final duration of 51 minutes and beating the CURA profile by almost 10 minutes.
The last thing remaining is checking the flow rate, which is around 10 mm³/s in most of the print. My hotend benchmark showed me that I need to increase my nozzle temperature to at least 220°C, better 240°C, to reduce under extrusions. I settled with 230°C and honestly got some good-looking prints from the old Ender-3. Of course, they are not as good as with my standard profile, but the part is printed more than twice as fast! My Prusa Mk3, with its direct extruder and more capable hotend, can produce even nicer-looking prints at similar settings because it can better handle and control the flow. On such a system, if the extrusion and motion system allows it you could now continue increasing speeds, acceleration and thicknesses until you’re either not happy anymore with the quality, your extruder skips or cooling is not sufficient anymore. In the end, it’s important to understand and not only copy the principles we have applied and how they affect printing speed and quality to get the most out of our machines with any of the slicers that you use! Bonus tip at the end: If you have a very detailed model and your printer struggles with all the small print segments, play around with the G-Code resolution in PrusaSlicer or the Resolution and Deviation in CURA. I made a whole video about that in the past!
Ender-3 ExtraFast Profile for PrusaSlicer: DOWNLOAD