Can Acetone Glue Layers of 3D Prints together?
Filament based-3D printing is a great technology - not only for prototypes but also for real functional parts. Though, one of the great weaknesses of these prints is that due to the layer-by-layer manufacturing approach, the individual extrusions usually don’t perfectly adhere to each other, which is making parts significantly weaker in this direction. There are ways to increase layer adhesion like higher extrusion temperatures, slower printing speeds, less cooling, enclosures, or just selecting a material that performs better in this regard. But still, the holy grail of filament-based 3D printing is creating parts that are equally strong regardless of the printing orientation.
If you have kids at home that play with Lego or Duplo, you might be aware that if these parts break, the best way to glue them together is just to brush acetone on the fracture surfaces and push them together. Most Lego parts are made from ABS, which is dissolved by acetone and, when it evaporates again, creates a joint almost as strong as the initial part. I already tested in the past if acetone smoothed ABS and isopropyl alcohol smoothed PVB are stronger than regular parts and if you want to see the results, check out the linked video!
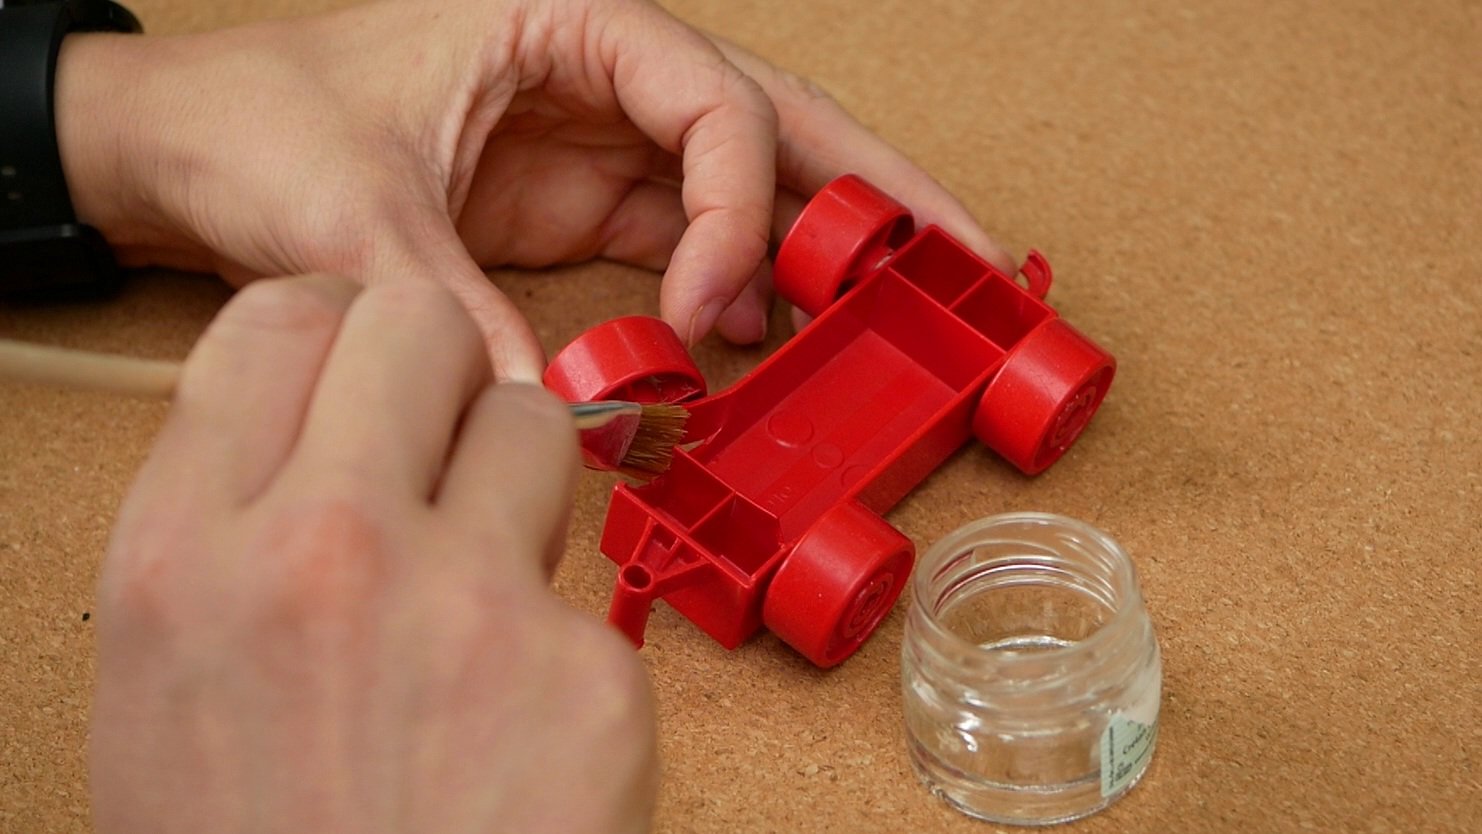
Repairing a broken Lego Duplo toy
But what myself, and I think even man y of you have already been really asking ourselves if we could increase layer adhesion of ABS 3D prints if we would simply brush a bit of solvent on every print layer to create a perfect bond when the subsequent one is printed on top. And so that you don’t have to try it out, I sat hours and hours in front of my 3D printer, brushing acetone on every layer to find out, if this method works or not! If you appreciate the work and dedication I put into projects like this, then consider leaving a like and subscribing to the channel, for more interesting tests like this one.
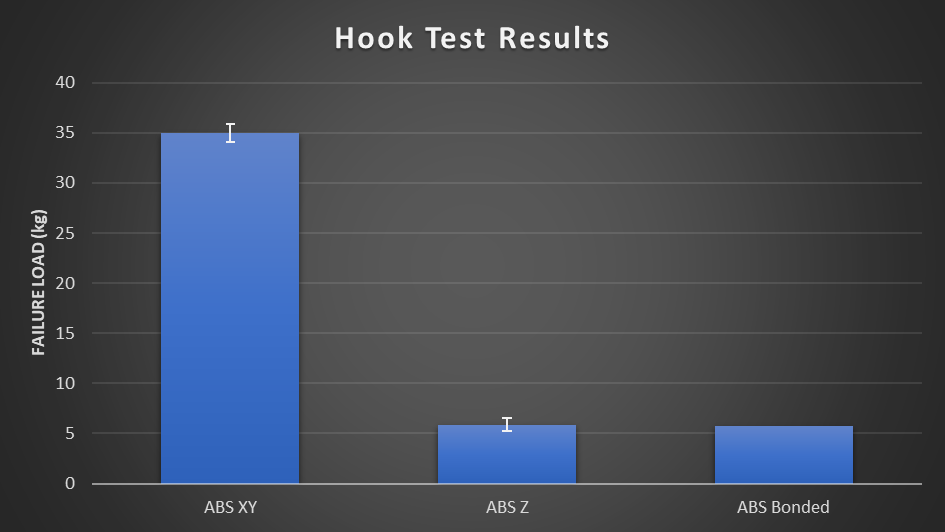
Before we try out this method, let’s first test the strength of parts printed flat and those printed upright. This will give us a reference that we can use to compare our solvent bonding techniques against. For the horizontal specimens, I used standard dog bone samples printed with six perimeters, so that all of the print lines are oriented in the loading direction. The standing parts are round layer adhesion samples that are printed with 100% infill and only one perimeter. For a more real-life part, I also chose my test hook printed with two perimeters and 30% cubic infill, printed horizontally and standing on the bed of my Prusa MK3S.

Horizontal and Vertical Hook Samples
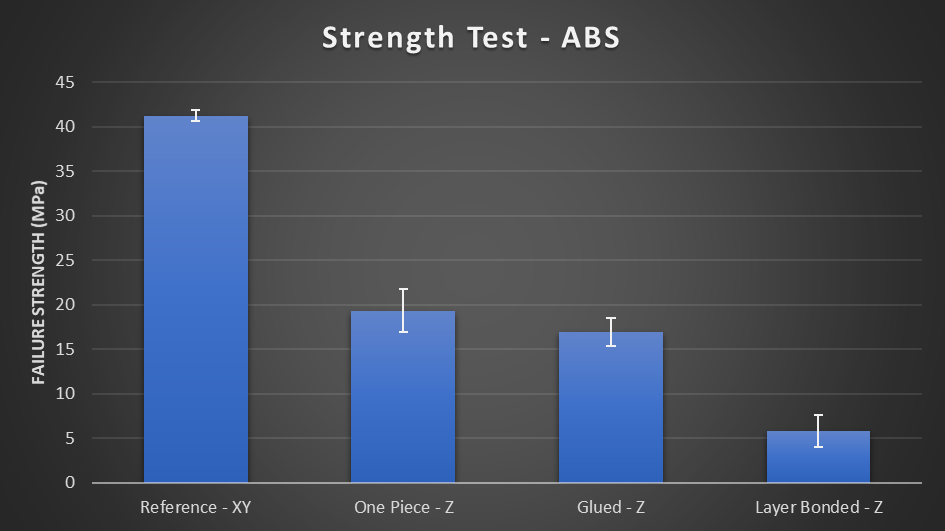
As a first material, I tried regular ABS because smoothing and bonding that with acetone is very common. Once the parts were printed, I put them one after another into my DIY universal test machine and slowly pulled them until they broke. I tested at least three samples per orientation to get some idea about the variability of the results. I measured each sample before the test to accurately take the cross-section into consideration. The horizontal dogbone samples were able to bear 41 MPa of stress on average and all failed with a really mesmerizing whitening pattern. The layer adhesion samples, on the other hand, were only able to bear 19 MPa until they failed, which is less than half of the material strength, but honestly, more than I would have expected with ABS because that’s often really bad in layer adhesion when printed without any enclosure. Maybe the 30 °C I sometimes had in my office helped there. Let’s also take a look at my test hook that I use to represent a more real-life part and use case. The ones printed flat were able to bear 35 kg of load before failure. The standing ones unfortunately only a disappointing 6 kg. Though this isn’t unexpected with ABS, especially since I had to use a tiny bit of cooling to print the overhangs. On the other hand - maybe the solvent bonding technique can shine here!
Before I tried solvent bonding of a whole part, I wanted to find out what the strength of a single bond is. I simply used the already broken layer adhesion samples, soaked the fractured surfaces in acetone, and firmly pushed them together after a couple of seconds. In the beginning, the glued sections are still sticky and soft and it takes a bit until the solvent evaporates to establish the full strength of the bond. To speed up this process, I put the parts for 24h at 60°C into my dehydrator.
When testing these samples, 2 of the 3 didn’t break at the bond but next to it, which shows that the strength of the ABS bond is at least as good as the normal layer adhesion. One of the samples, unfortunately, broke directly at the glued section, maybe because I didn’t properly push the parts together or fully evaporate the solvent. Anyways - on average, the parts still were able to bear 17 MPa before failure and fall within the scatter band of the other tests. So let’s get to full solvent bonding.

Glued Sample breaking next to the bonded section
My first idea was to build a contraption for my E3D Toolchanger, where I have one tool with a brush that automatically adds solvent onto each layer after it was printed. But since I didn’t even know if this new method worked or not, I thought I rather make a proof of concept and brush the acetone onto each layer manually. I added a short layer change G-Code in PrusaSlicer, where the printhead moves to the side and using M0 waits until I’m finished and push the button next to the screen again.

Printing the Layer Bonding Samples
Sounds straightforward; unfortunately, as it turned out, it wasn’t that easy. Acetone has quite a low boiling point, so if the previous layer is still warm, it directly boils off. If you get it to stay on the surface, it will soak into the material and cause that to foam up a little as soon as the hot, new layer gets printed. I was able to partially get around these problems by using the part cooling fan at full blow and also reducing the extrusion factor quite significantly to only 80 to 85%. Once I figured that out, the really boring part started and that was sitting in front of the printer for 2 to 3 hours for each set of samples, brushing acetone onto each of the 130 layers. A good thing that I started to learn a bit of Japanese, so I used the time to learn my Hiragana and Katakana characters. In the end, the samples turned out okay. Sometimes the nozzle really dug through the material resulting in plastic being dragged out to the sides, but in general, the acetone made the parts look really shiny. Printing the test hook worked better because since it only had 2 perimeters and sparse infill, the material that swoll up from the acetone could just squeeze out the sides, interfering less with the printing process.

Layer bonded ABS samples
Let’s now get back to the layer-bonded samples and see if the acetone was able to bond the layers together. The samples didn’t directly fall apart but their strength, unfortunately, was still significantly worse than the ones printed as one piece. The average strength was only 6 MPa and therefore only around 15% of the reference strength. A bit disappointing to be honest. The fracture surfaces also looked very much like the unbonded ones only with a bit of shininess of the acetone. Interestingly enough, I personally would have expected that they broke within the sections that swelled up more and where the nozzle dug through the material, but those sections seemed to be stronger. Maybe the nozzle textured the layers, so bonding is better. And this is probably also the right point to ask you for your ideas on how you think layer adhesion could be improved besides the usual slicer settings. Could we texture or stitch layer together in some way? Would that require an external tool or could this be handled by the slicer itself? Please comment your ideas down below to discuss them, and maybe I can try out some of them! The layer bonded test hook, on which I had significantly fewer printing problems, also didn’t increase in strength, and it failed just like the reference samples at only 6 kilograms.
Though wait, we’re not done yet because there is another material that’s commonly smoothed with solvents and therefore can also be glued, which is PVB. Some of you might know it under the name Polysmooth where Polymaker made it popular with their Polysmoother. PVB is soluble in isopropyl alcohol instead of acetone, which makes smoothing way more comfortable. Isopropyl alcohol is also volatile, flammable, and not the best thing to breathe but due to its higher boiling point easier and safer to work with. So I again printed flat dogbone samples and standing layer adhesion samples as reference and tested them for their strength. PVB is primarily not used for its mechanical properties but rather for its smoothability and, therefore, either decorative parts or prints that need to hold liquids and gases. Still, in terms of strength it was very similar to ABS with 42 MPa failure stress on average but a way more ductile behavior than ABS. Whereas ABS quickly failed after yielding, the PolySmooth just stretched and stretched. Layer adhesion was also very similar and the samples broke at around 45% of the reference stress.
Printing the layer bonded PVB samples worked out significantly better than with ABS and acetone, probably because with a draft shield printing first, I was able to evaporate more of the isopropyl alcohol before I printed the next layer. So a hand full of Katakana letters later I finally had my IPA bonded PolySmooth samples. Compared to the last acetone samples, these ones felt really soft after the process and probably absorbed quite a lot of solvent during printing. I put them together with the samples that I simply glued in the middle for 48h in the dehydrator, to get them back to their regular hardness.

Printing and Layer bonding the PolySmooth samples
The first results on the universal test machine were not super promising, because the glued samples were already weaker than the reference layer adhesion samples, and all broke right at the seam. The solvent bonded samples were a bit stronger but still didn’t reach the strength values of the reference.

Strength Test Results (ABS: blue, PolySmooth: orange)
So there you have it. Even though layer bonding sounds very exciting, it’s not as simple as it would seem and my first proof of concept results were not very promising. I’m not saying that my process was perfect, because it wasn’t automated and maybe even after 2 days in a dehydrator not all the solvent might have been removed from the samples, but would such a method really be feasible if you had to force dry parts for days or even weeks after printing them. I wouldn’t call solvent bonding dead, but there needs to be more detailed investigations. Have I used the right solvents? Might they even harm the material at these temperatures and concentrations, or would glues even work better? In a way, I’m also happy that the results were not overwhelming because, to be honest - in it’s current state it’s not only tedious to apply but also having flammable solvents next very hot components just screams for severe safety hazards. Still, I think it’s important to also publish negative findings like this one even though they are not groundbreaking because I can satisfy my and your curiosity and they can help others not follow similar paths in the future or improve on the things that didn’t work. In the end, we should rather try to come up with different methods to improve strength of or 3D printed parts. There is still so much untouched potential in software and slicers, where we need ideas and proof of concept to give an incentive to developers to implement them. So please keep your ideas coming!

Sea of broken samples