Testing BiMetallic Heat Breaks
The bi-metal heat break is the next evolution of the regular heat breaks that we know from our 3D printers. Let me first tell you what makes this multi-material assembly unique; let’s benchmark the ones I bought for my Ender-3 with extrusion tests and test prints and finally compare the standard Bowden solution to the $15 knock-off and $30 genuine part. Let me know down in the comments if you’ve ever used one of these heat breaks and if you’d rather do this upgrade instead of changing the whole hotend!
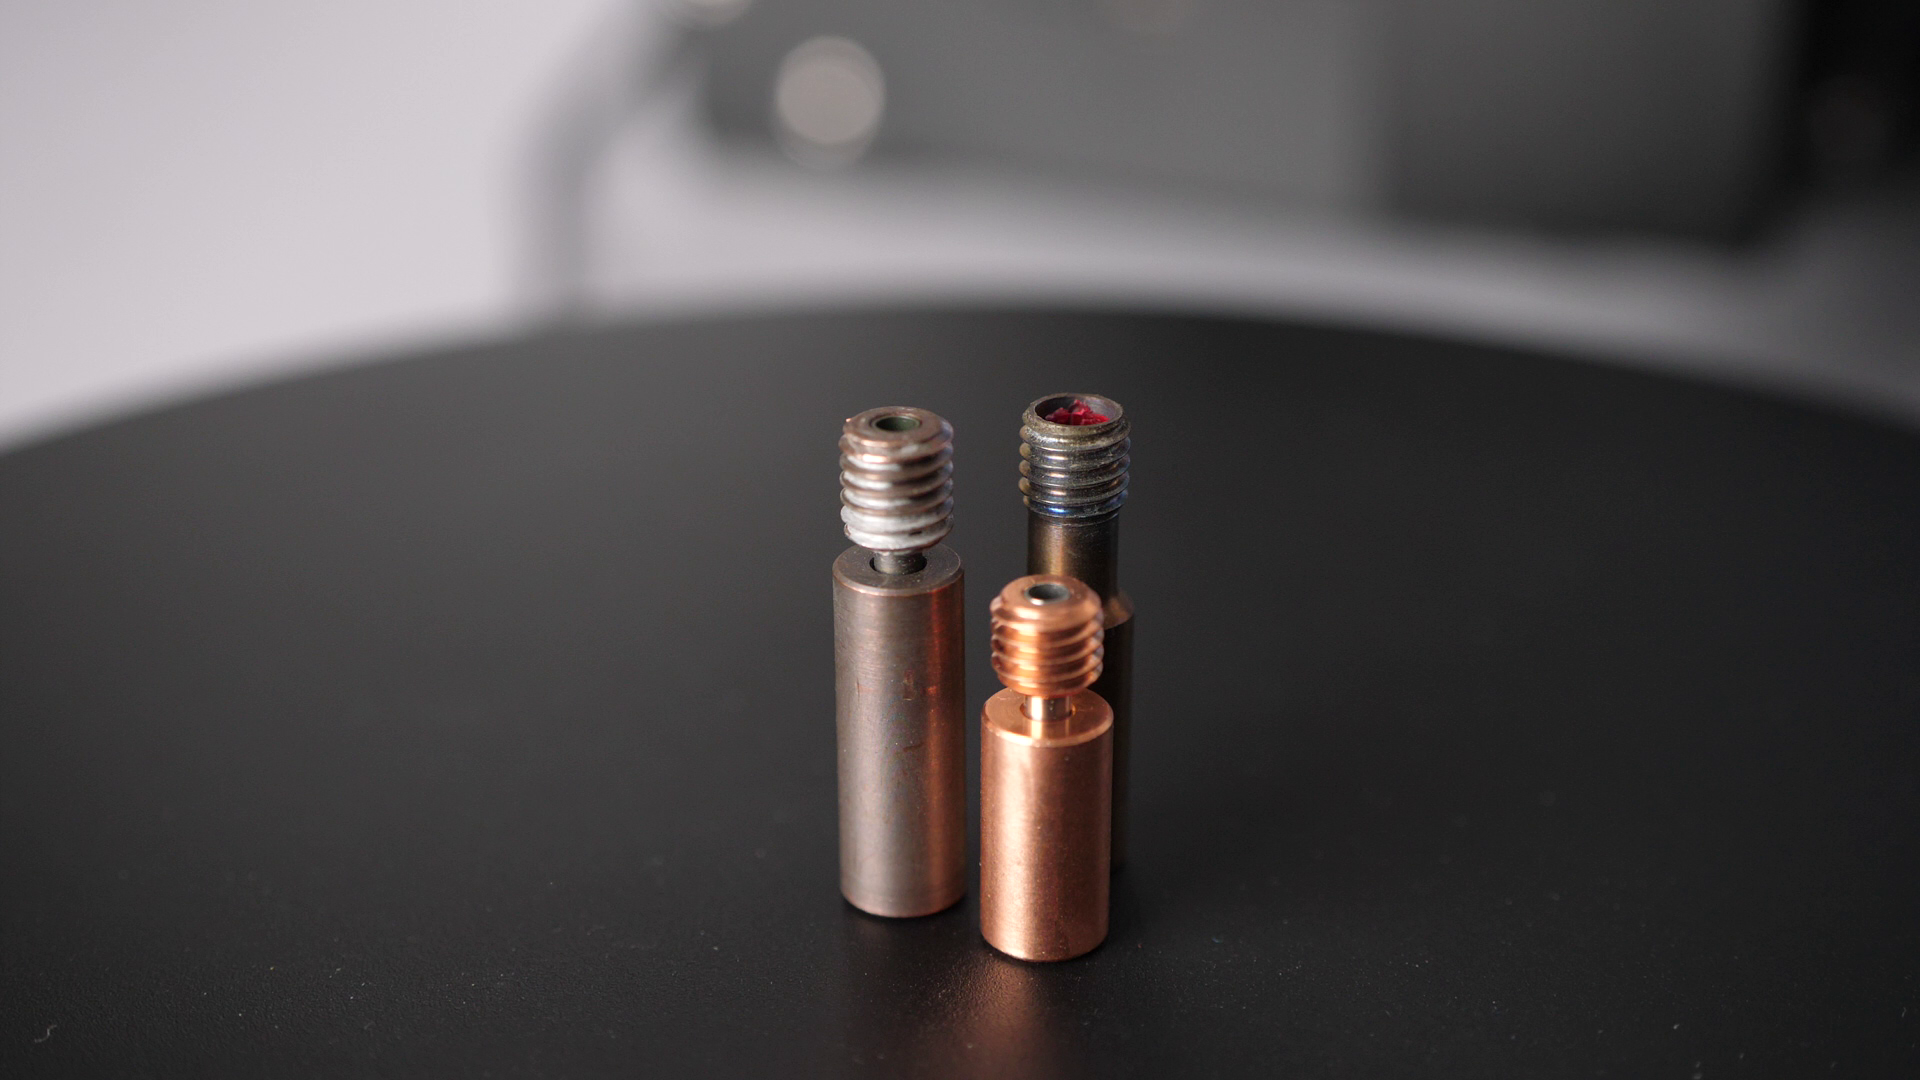
Copperhead Heat Break (left), BiMetal Heatbreak from eBay (front) and Bowden Heatbreak Tube (right)
So the heat break fits in-between the hotend and the cold end and is used to have a very sharp temperature gradient between the molten material and the filament that’s fed to the nozzle. This part is important because if you don’t have this sharp gradient, the filament tends to get soft way before the heating zone and eventually blocks the filament path. That’s what we call heatcreep. In order to accomplish that, all-metal hotend usually have a heat break with a very thin-walled throat, where only a minimum amount of heat can travel through.

Temperature Transition within an All-Metal Heat Break
Stainless steel is often used for that application, or even more recent heat breaks use titanium, which features an even small heat transfer coefficient but comes with other downsides. Bowden hotends have a slightly different approach and use the even worse thermal conductivity of the PTFE to isolate the hot- from the cold end, though this just on the side. The bi-metal heat break improves on the all-metal heat break in a way that it is a multi-part and multi-material construction. It features a thin metal tube that guides the filament. This has a couple of advantages. Stainless steel tubes are available with very thin walls, thinner than you would be comfortable when machining them. The thinner the wall, the less heat can be conducted and the sharper the temperature transition. Also, due to their manufacturing process, they can be stronger than regular stainless steel and the surface finish is also very smooth, which reduces friction. Then, there is the upper part of the heat break, which is made from copper. So all the heat that made it through the thin tube is transmitted very quickly into the heatsink where it dissipates and therefore also helps avoiding heatcreep. Let’s finally get to the lower threads, that are also made from copper for a particular reason. These sit in the heaterblock and they help to increase the length of your melting zone and will start heating your filament efficiently all the way from the start.

Melting Zone length
Yes, with the standard stainless steel, you’ll also have some material melted in that section, but since it doesn’t conduct heat that well, it won’t be able to melt filament that efficiently, especially at faster print speeds. The 3 parts are then probably heat shrunk together which requires all of the parts to be of high precision and the right alloy. If they aren’t, there is the risk that the press-fit decreases at higher temperatures and the copper sleeves come loose, which I heard happening with some non-genuine parts.

Section view of the Copperhead Heat Break
Speaking of non-genuine. I know bi-metal heat breaks from SliceEngineering hotends, especially their latest Copperhead. When I first heard about their claims about higher melting rates in a size that’s equal to a V6 I was intrigued and wanted to try it out. SliceEngineering doesn’t only offer these heat breaks for their Copperhead hotend but they also sell them for other machines, like the hugely popular Ender series. One machine, I had serious problems in that regard was my Ender-3 Pro, I used a lot last year for printing face shields. The thing was, that my Prusa was more than double as fast in printing those parts. In terms of number, I had to limit the melting rate of the Ender-3 to 5mm³/s, whereas the Prusa was able to easily print at 12mm³/s before the filament started skipping or grinding. That is, of course, partly due to the double-sided Bondtech gears and the short and straight filament path. So even though the material might not be properly melted, the Prusa was able to just force the filament through the nozzle. Since the feedsystem of the Ender is weak, as soon as the filament didn’t melt properly anymore, the backpressure increased and the filament started skipping.
To get an idea what those numbers mean, I sliced a 3DBenchy for the Ender-3 at a layer height of 0.16mm. What you can see is, that depending on the feature our volumetric flow-rates are around 2 to 4.5mm³/s. What I want to say with that is, that if you’re only printing slow, at fine layer heights and with the standard 0.4mm nozzle, you’re usually not that concerned with melting rates. Though as soon as want to go faster, thicker or wider, this becomes important.

Typical Extrusion Rates of a print @0.16mm layer height
To benchmark the change in extrusion capability, I ran an extrusion test in which I always extruded the same amount of filament, just at different extrusion speeds and weighted the resulting material spiral.
; Extrusion test speed table:
; 1 mm³/s = 25 mm/min
; 2 mm³/s = 50 mm/min
; 3 mm³/s = 75 mm/min
; 5 mm³/s = 125 mm/min
; 7.5 mm³/s = 187 mm/min
; 10 mm³/s = 249 mm/min
; 12.5 mm³/s = 312 mm/min
; 15 mm³/s = 374 mm/min
; 17.5 mm³/s = 437 mm/min
; 20 mm³/s = 499 mm/min

M104 S200               ; Set Nozzle Temperature
G1 X150 Y80 Z60 F10000  ; Go to extrusion position
M83                     ; Relative Extrusions
G1 F200                 ; Prime
G1 E20
G4 S2                   ; Wait 2 seconds

G1 F25                  ; Set Extrusion Speed in mm/min HERE

G1 E100                 ; Extrude 100 mm
G1 E100                 ; Extrude 100 mm
G4 S0
G1 E-5 F1000            ; Retract 5 mm
If the filament skips or strips, the real amount of extruded filament will be smaller, which means we under-extruded. I tested the whole range of extrusion rates from a slow 1mm³/s up to 20mm³/s using a simple G-Code.

Material Spirals
The standard Bowden setup results show that the faster we extrude, the less material is really pushed through the nozzle. At 5mm³/s we’re already extruding only 93% and starting at 10mm³/s we really dip downwards and can see a lot of grinding at the feeder gear. I performed this test with a freshly re-seated Bowdentube and no gap between it and the nozzle. But like you many know, if you don’t do anything against it, the Bowden tube will slowly walk upwards over time, leaving you with a gap, that’s very bad for our printing performance. To simulate that I intentionally moved the tube upwards by a mm and ran the extrusion test again, which shows that the extrusion performance is even worse and the dip in the curve due to grinding happens earlier at only 7mm³/s.
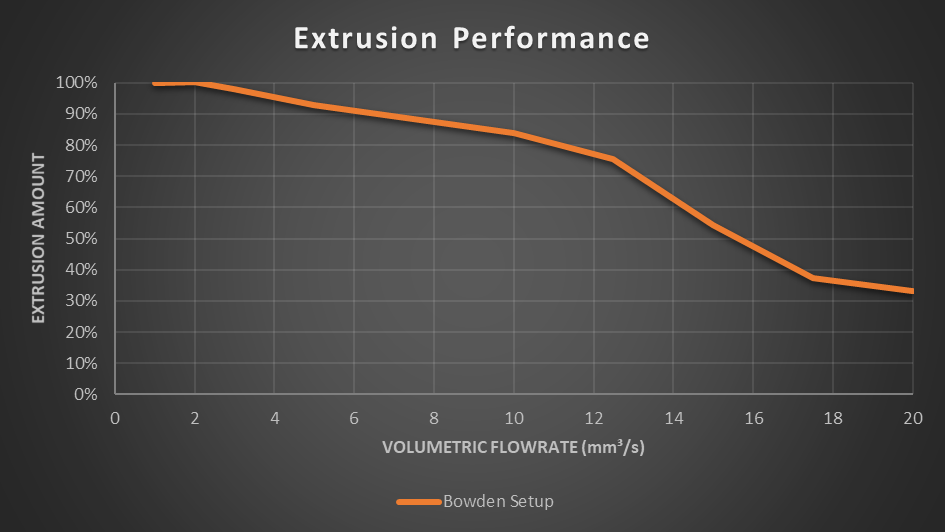
Extrusion Performance of the Standard Bowden Hotend
Just on a quick side-note: If you have ever wondered why you’re models have bulges in certain regions. Compare them with the flow rate in your slicer. These are often at locations where the printer pints significantly slower or faster than elsewhere. Therefore you are more or less under-extruding and that section becomes thicker or thinner. One reason to keep flow as constant as possible or to make sure that you’re only printing in a region where your extrusion graph is very shallow.
So I wanted to find out, if I can increase the melting rate and therefore decrease the backpressure of the Ender with one of these bimetal heat breaks. Since I was cheap and I had a hard time finding a part in Germany, I purchased a knock-off bi-metal heat break for around 15 bucks from a German eBay seller. Assembly was pretty straight forward. I removed the fan shoud, heated the nozzle, removed the installed filament and unscrewed the nozzle. Then I removed the Bowden tube, removed the two screws that additionally secure the heaterblock to the heatsink and loosened the small grub-screw in the front of the heatsink to slide the heat break out. Since the lower threads were quite gunked up, I had to use brute force to unscrew it from the heaterblock. I then used an M6 tap to recut the threads and tho remove the carbonized plastic.
Installing the new bi-metal heat break was pretty straight forward. I screwed the nozzle into the heaterblock, making sure that there still was a gap left for tightening and screwed in the heat break from the other side. While installing it with plenty of thermal paste, I already noticed the first strange thing because it was too short to bottom-out in the heatsink, so I just pushed it in that it was flush with the heatsink and fixed it in place with the grub screw. Installing the Bowden tube was then also quite a pain. Since the distance between the hotend and heatsink got smaller I wasn’t able to add the retaining screws and therefore had to really pay attention while hot-tightening the nozzle.

Bi-Metal Heatbreak from eBay
Then I reran the extrusion test and oh boy, especially at the higher extrusion rates, this part helped to push so much more material out o the nozzle than the standard setup. Only at around 15mm³/s the feeder started really badly grinding.

That looked promising with just a $15 part. Well, yes and no. Of course, I had to test its performance in a real printing test, with retractions and everything and this is where the problems started. On my 3DBenchys I got serious extrusion problems, and tuning retractions only helped slightly. So there was obviously something wrong.

3DBenchy with serious extrusion problems
This was the point where I contacted Dan from SliceEngineering and openly told him that I bought a knock-off heat break and if they see the same problems with their genuine parts. He assured me that they engineered their part especially for less heatcreep, lower retractions and more flow. So I went out and figured out why in my quick search, I didn’t find genuine BiMetallic heat breaks. It’s Copperhead heat break and then I found the one for my Ender 3 as an option. Yei, local shipping from Germany!
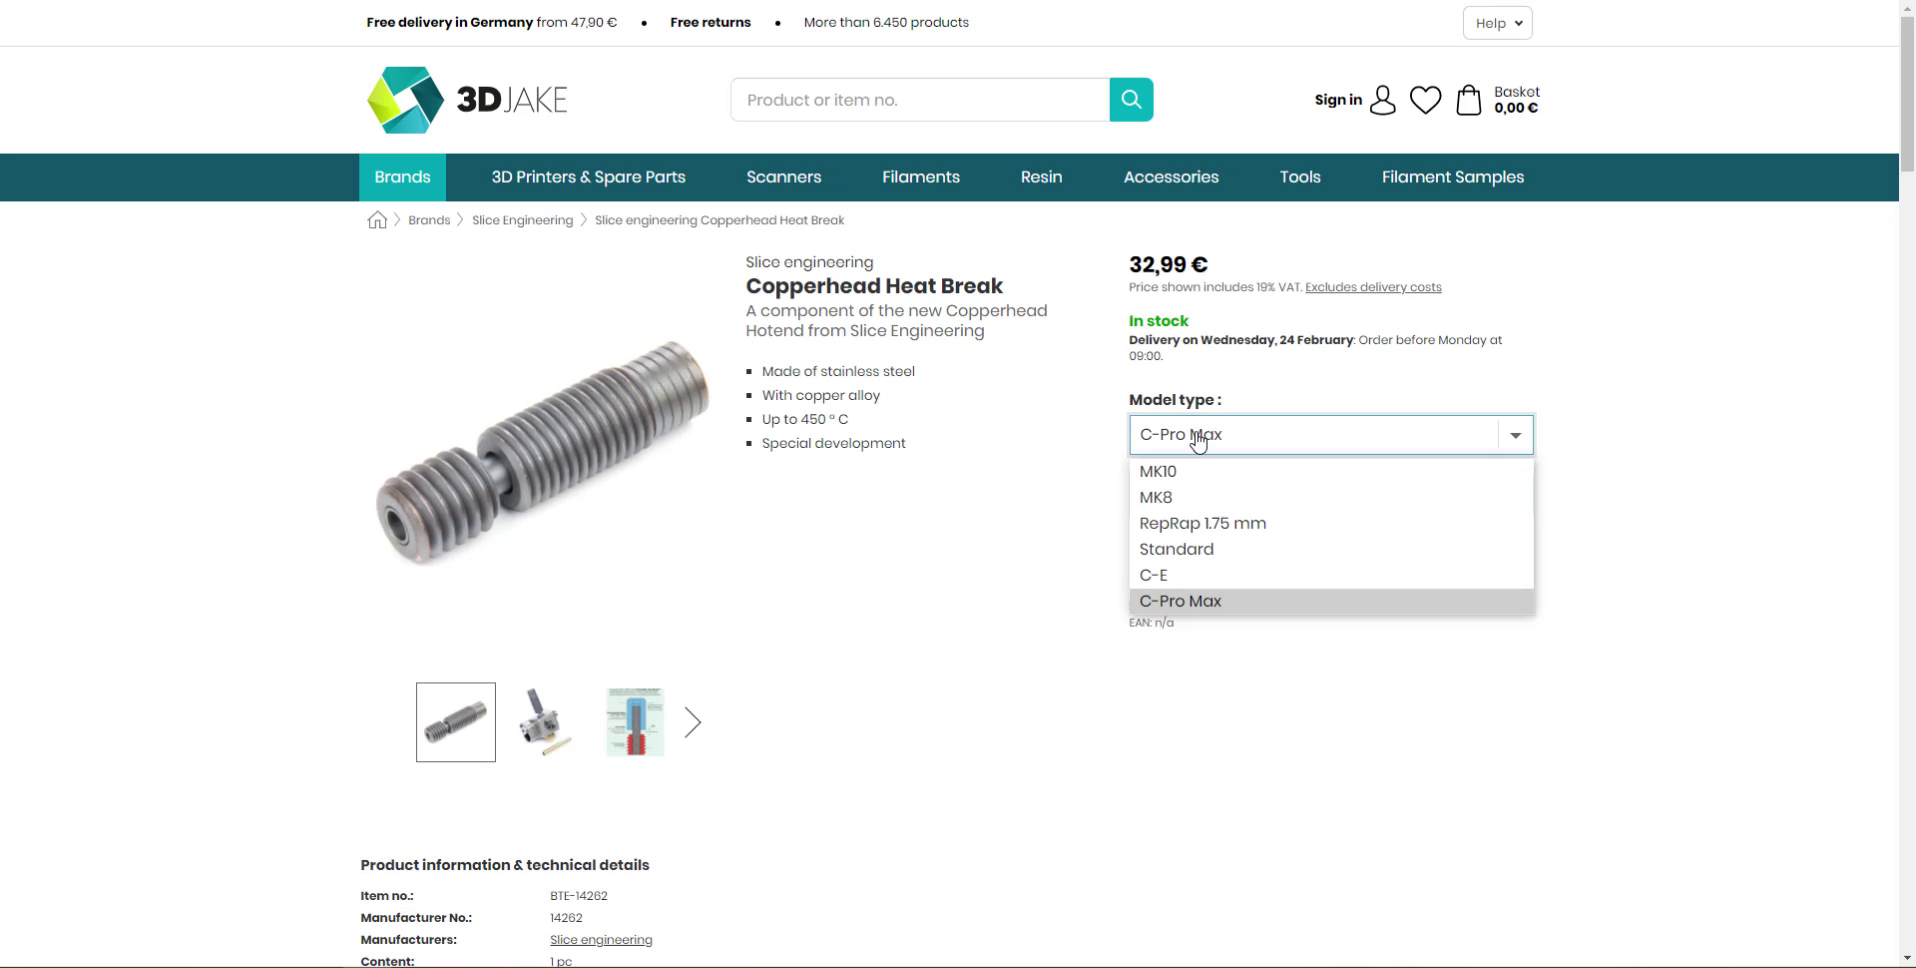
Sourcing Copperhead Heat Breaks in the EU
Once it arrived, it was interesting to see, that the knock-off wasn’t a straight copy, even though design files and drawings for the Copperhead are Open Source. The copper sections are longer and SliceEngineering uses a greyish Tungsten Disulfide coating on their part, probably for less friction on the inside and as an anti-seize on the threads.

Generic BiMetal Heat Break (left) and Copperhead Heat Break (right)
Installation was similar to the knock-off. The only thing I noticed was that here, the copper part on the cold-side seemed to be a bit too long and protruded out of the heatsink, probably also not optimal. Anyways, I first performed the extrusion benchmark, which was interestingly slightly worse than the knock-off but still a lot better than the standard setup. The real exciting part was the print tests. I first calibrated the retraction length using 3DOptimizers retraction test and only needed around 2mm of retraction on a Bowden system, which was quite impressive.

All Extrusion Test Results
The prints I was now able to produce also didn’t show any signs of heat creep or jamming anymore and came out beautifully, just as promised! Using this simple, new heat break seems to add quite a bit to the Ender. For once, it now allows me to print way quicker. Then, it seems to help print quality by reducing retractions to only 2mm and fixing the annoying problem with the Bowden tube wandering off. And then there is temperature capability. The all-metal heat break now allows me to push temperatures far above what I was comfortable doing with the Bowden setup in order to print ABS, Nylons or Polycarbonate. I’m not 100% sure why the knock-off didn’t work that well, but that’s probably a combination of dimensions, parts and the coating. As a small summary: an all metal heat break can be better than a PTFE lined hotend because it requires less maintenance and improves the temperature capability; but if not done well, can even make your printing results worse due to more friction in the feeding section and potentially more heatcreep if not done right. The Copperhead bi-metallic heat break improves on the all metal concept with a higher melting rate due to the copper ends, perfect surface finish and an even sharper temperature transition due to the thin, surgical tubing including the coating they use; But it is also more fragile and costs a significant amount of money.

Print results with the Copperhead Heat Break
I’m being totally honest here: If you have a printer and you’re only processing PLA at slow speeds, you won’t benefit a lot from this upgrade and might even break things or generate problems on a printer that works. I can guarantee that 1 of 10 that are trying to change the heat break will destroy either your heater wires or thermistor wires. But, if you’re into bigger nozzles, faster printing, or more challenging materials, the genuine BiMetallic CopperHead heat break seems to be a really capable and simple upgrade, especially if you currently run a Bowden setup! But let me know what you think!
Additional content
Extrusion Test GCode file: DOWNLOAD
ANSYS 2021 R1 Hotend Simulation Model: DOWNLOAD
Ender-3 (Affiliate Link): https://geni.us/MQGuatj
Copperhead Heat Break (US): https://geni.us/yU4qW
Copperhead Heat Break (EU) (Affiliate Link): https://geni.us/0BCErjX
Generic BiMetal Heat Break on AMAZON (Affiliate Link): https://geni.us/bS8B
Generic BiMetal Heat Break on ALIEXPRESS (Affiliate Link): https://geni.us/w4P2AOw