PC-Core ABS - Testing Dual-Material Filament for Warp-less Annealing
So filaments made from PC /ABS, which is a blend of the two materials, is something that is quite common and helps combine different properties of those materials for specific needs. I have been using PC/ABS or other PC blends in the past, and even though they show good overall properties, layer adhesion in particular is still something they are usually not great at. When I first read the articles about this new type of filament, I wasn’t sure how this star-shaped pattern inside of the filament should help with mechanical properties. The paper they wrote about this method explained it better, though. The general idea is, that you heat treat your parts over the glass transition temperature but below the melting point, after printing which, supposedly fuses the layers together. Unfortunately, if you usually put prints into an oven and heat them over their glass transition temperature, which is important that the healing process works, they severely deform and make them not properly usable anymore. The idea behind the dual material filament is that the flow of the material through the 3D printer nozzle is laminar, so your print, that looks from the outside like ABS, is reinforced internally via a continuous polycarbonate core. This is important for the heat treatment step. ABS has a glass transition temperature of around 100°C and PC significantly higher at around 140°C. In order to minimize deformation, the heat treatment temperature with this material is above the glass transition temperature of ABS but below the one of PC. This way the polycarbonate stays strong and reinforces the ABS and minimizes deformation during the process. The long exposure to heat, in the paper, they treated parts for 3 to 7 days, supposedly fuses the ABS layers, giving it superior strength, especially in-between the layers. Sounds like a plausible idea to me and worth trying out. PC and ABS are a good combination of materials for such a task, because they are mixable and work and can fuse together. Not every material combination does work due to things like polarity and you might have experienced that in the past, when you, for example, changed materials from Nylon to PLA and noticed that the first layers don’t stick together anymore until enough material got purged.

Manufacturing process of Dual-Material filament (Hart et al, Tough, Additively Manufactured Structures Fabricated with Dual‐Thermoplastic Filaments, 2020)
In the paper, they printed a big rod of the material with different shapes of the core, heated that rod up and drew filament from it. Since I don’t have such a device, I had to come up with another way of manufacturing. Quite a while ago, I saw DasMia, a fellow maker from the community, 3D printing her own rainbow 3D printing filament, which is an ingenious idea! But instead of printing sections or whole layers of different colored filaments, I’ll be using my E3D toolchanger to directly print a filament spiral that uses different materials for the core and the hull. The process is pretty simple and I created a model of the filament spiral in Fusion360, which consists out of two parts. One is the core, the other one is the outer section. If you’re interested in the design process, check out 3DMakerNoobs detailed video on it. Due to the size of the filament and me using 0.4mm nozzles I couldn’t really get fancy with the internal design, but I think that’s sufficient for a first test. The ratio between ABS and PC ended up to be 64/36 which is in a similar ratio as you might find it in PCABS blends. In the slicer, I handled the spiral like a normal, multi-color print and assigned one part to the ABS tool and one to the Polycarbonate tool. E3Ds toolchanger is a great printer for such experiments because it has individual toolheads, so individual nozzles to extrude the filament, which prevents contamination of one polymer with the remains of the other one and you don’t have to worry about purging. Together with the AC heatbed, that heats up quicker than the nozzles makes it great for printing even demanding materials because it can go all the way up to 200°C! Just on a side note: if you wanted to make such a multi-material filament on an industrial scale, there are co-extrusion machines, that can directly extrude those types of filaments, though they are more expensive and complex than a normal single screw extruder.

Printing process on the E3D Toolchanger
Printing wasn’t without problems because, at first, I had to make sure that the material sticks to the print plate. Usually, I would have used the typical adhesion sprays and liquids, but since they always leave residues on the parts, this wasn’t an option for the filament because that could later contaminate and therefore ruin the filament. So I remembered a trick from the old days and mixed myself some ABS slurry by dissolving ABS in acetone that can then be brushed onto the glass bed and only leaves a thin film of the material on it. The second problem was mesh bed leveling with my toolchanger, that was a bit buggy in the version of RepRap firmware that I used at that time. It’s fixed now but I upgraded the firmware only recently. Therefore first layers were not always perfect and sometimes some sections lifted.
The base materials that I used for the dual material filament were Spoolworks ABS that I printed at 245°C and Hobbykings Premium PC printed at 280°C. The PC itself was a bit of a pain to print on the glass bed, because it either didn’t stick properly or it ripped pieces of glass out of the surface. In the past, I had more success printing it on the smooth PEI of my Prusa with either gluestick or Magigoo PC. Manufacturing the dual material filament, still, overall worked quite well, and I printed spiral after spiral and checked at least the maximum dimension that sometimes was too high due to the material lifting by just pulling it through a spare heatbreak. This way, I could prevent jams during printing. Dimensions themselves, even though around the circumference not always perfect, were quite consistent over the length. I simply put the coils on empty spools and printed with them on my Prusa MK3. I didn’t find anything in the paper in regards to printing temperature for the dual material filament. I chose an in-between value of the materials and set the nozzle to 260°C.

Impressive print results with the DIY PC-Core ABS
The print results were really stunning, especially since it’s not a high precision filament. I slightly upped the extrusion factor due to the shape, but otherwise, printing results looked really good with the advantage of the nice surface finish of ABS but less overheating problems! I cut a section of filament with an exacto knife to nicely show the internal structure. We can see the transparent core of polycarbonate and the hull of ABS. Don’t mind the white part, that’s just from cutting the ABS. If we do the same thing with just a piece of filament that was extruded through the nozzle, we see that the structure remains, and we can still distinguish the ABS and PC, so laminar flow in the nozzle confirmed.

Section Cut of Extruded Filament
Pure printing performance itself wasn’t the main goal of this analysis. I wanted to find out, if this material really can be annealed without the downsides of warping and increase the material properties this way. I printed a ton of samples from the base polymers as reference and the PC-core-ABS of which I’ll test one half as a reference in the as-printed state, and the other half will be annealed and then tested. I manufactured impact test samples as well as my mini tensile test samples, both in the lying and, more importantly, in a standing orientation, where we want to see how layer adhesion changes.
I also printed temperature test samples from the PC and the ABS base-filaments to see when they start to severely soften to chose an annealing temperature for the following test. I put those samples in my kitchen convection oven, because I can see through the door. The ABS sample failed at 115°C, the PC sample maintained it’s structural stability all the way up to 165°C. This test doesn’t really give me the glass transition temperature, rather it gives me the heat deflection temperature, though I assumed that Tg should be a couple of degrees below the failure temperature. With those results, I decided I’ll be using 130°C as annealing temperature, which is just slightly below the 135°C from the paper. In the end, it’s probably a compromise between time and temperature. The higher the temperature, the faster the diffusion process, though we have to make sure that we maintain the reinforcing property of the PC by not reaching its glass transition temperature.

Samples, placed in the oven. Before the heat treatment process.
Next, I measured and marked all samples before the heat treatment process to analyze dimensional changes and placed all parts on flat glass mirrors in my new lab oven. Besides the test samples from the three different filaments, I also added a 3DBenchy and this rectangular section to the oven, set it to 130°C and left the samples in the chamber for 4.5 days. During the first two days there was a sweet rubbery smell coming from the oven, which was probably the Butyl in the ABS, which vanished after a while. After the 112h at 130°C, I turned off the oven and left everything to cool down for a night. I was really excited to see what happened to the samples during the week in the heat. After opening the oven, I was able to clearly see that the ABS samples didn’t take the heat well. The PC didn’t look impacted at all and our dual-material parts just showed the tiniest signs of sagging. That did already look really promising!

Samples after 112h @130°C
The dimensional measurements on the samples confirmed the observation. All the ABS parts looked basically unusable anymore. They gained, on average, around 20% in height, so the Z-direction and shrunk between 5 to 10% in length on the XY-plane. Both the PC and the PC-core ABS parts mostly retained their shape and most dimensional changes were only around 0 to 2%, which could also be measuring inconsistencies.
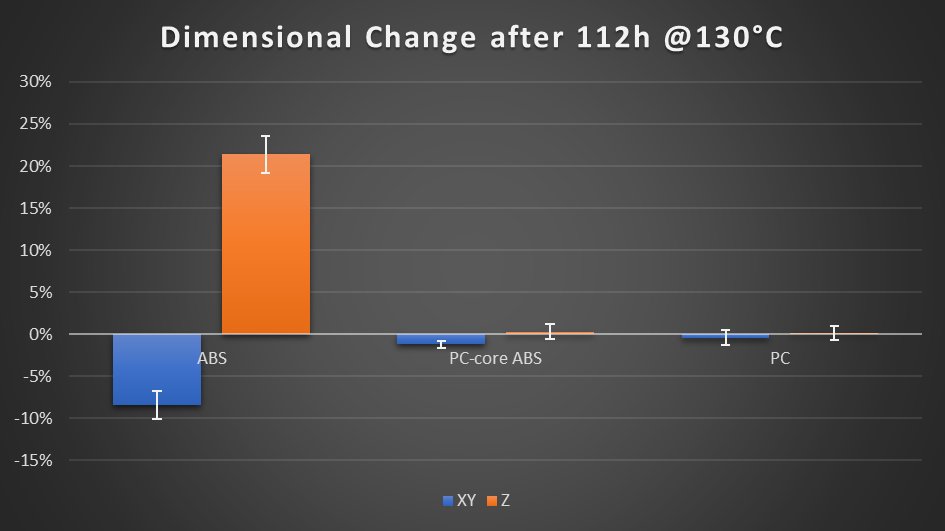
Dimensional change of the samples after heat treatment
Next, I finally measured the mechanical properties which we’ve all been waiting for. All in all, I tested around 50 tensile samples and 50 impact samples from before and after the heat treatment session.
We’ll start with the untreated baseline. In terms of tensile strength, ABS was the weakest with around 35MPa of maximum stress of the lying specimens and around half of that for the standing ones. HobbyKing Premium PC really impressed me because it was almost twice as strong as the ABS and the Layer adhesion samples were still able to bear 80% of the load, which I haven’t really seen on any other material besides PP but that’s only a quarter as strong. The as-built PC-core ABS parts were a bit stronger than pure ABS, probably due to the reinforcement of the PC. The layer adhesion samples were able to bear 60% of the load, which is the value we are really interested in, in the end.
Let’s now take a look a the results of the heat-treated samples. The ABS samples were hugely distorted, so take these values with a grain of salt. Still, the strength values stayed completely the same and more dramatically, the layer adhesion also doesn’t seem to hugely improve, which isn’t a promising start. Polycarbonate gains a significant amount of strength to almost 75MPa. The strength of the layer adhesion sample also improved a bit, but the ratio stayed at around 80%. Interestingly we don’t get the additional strength without cost because the parts, even though they deformed before failure, broke less ductile than the untreated ones. Almost as suspected, the dual material filament did also only improve slightly in axial strength, and the layer adhesion only improved by the same amount as well. The fracture surface looks slightly different, though no indication of fusing together in the test data. So far, it looks as if we unfortunately again haven’t found a way to fuse layers together with annealing. But let’s also take a look at the impact strength!

Tensile Test Results
I put the notched samples, one after another into my DIY impact testing machine and struck them with the hammer to find out how much energy the material can absorb. What we’re able to see is that in this test, the print direction dependence is even more present, because all materials had a way lower impact strength when printed standing, as when printed lying. Our own ABS/PC dual-material filament performed the best in the un-annealed state even better than ABS or PC on their own, so the combination seems have some benefits. ABS came second and PC was last, still, those values are very good in comparison to PLA or PETG, for example!
Unfortunately, due to the amount of warping, I wasn’t able to test the ABS samples in the annealed state. PC behaved similarly as we have seen in the previous test by becoming a little more brittle, though considering the scatter of the tests not by that much. Our multi-material prints, well, unfortunately, didn’t really change in terms of impact strength. The slight difference I was able to see is that those samples did not fully break apart, but in the end were still held by a small thread, though that didn’t show up in the strength values. It seems that the exposure to heat didn’t harm but also didn’t seem to significantly fuse the layers together in the way I hoped—kind of unfortunate.

Impact Test Results
This test was quite a huge amount of work, to be honest and I really hoped we would be able to see some improvements in terms of layer adhesion. I still think the approach that the authors of the paper suggested can be used for some very interesting property materials. We have clearly seen that the PC core was able to reinforce the ABS and prevented it from warping. So maybe I try out different heat treatment recipes to see if I have better success with others. Perhaps experimenting with different combinations of material, like PLA and TPU might result in improved impact strength, who knows.
Quoted articles
https://3dprinting.com/filament/military-spec-filament-produces-stronger-3d-printed-objects/
Hart et al, Tough, Additively Manufactured Structures Fabricated with Dual‐Thermoplastic Filaments(purchase): https://onlinelibrary.wiley.com/doi/10.1002/adem.202070013
Advances in FFF Manufacturing Processes for Improvements in Interlaminar Fracture Properties of AM Polymers(pdf): https://additivemanufacturingseries.com/applications-oct-2019/
DasMia - Rainbow filament: https://www.youtube.com/watch?v=iRQ4t3mT-Qo
3DMN - DIY Multi Color Filament: https://www.youtube.com/watch?v=EyO_p9iXhIw